Your cart is empty

Ultimate Guide to Smithing in OSRS: Best F2P Methods
Smithing in Old School RuneScape (OSRS) is a vital skill that allows players to create weapons, armor, and various other metal items. It plays a significant role in the game’s economy and combat system. Whether you’re a beginner or an experienced player, mastering smithing can enhance your gameplay experience. This guide will focus on the best free-to-play (F2P) methods to level up your smithing skill efficiently, helping you unlock the full potential of this essential skill.
In OSRS, the free-to-play (F2P) experience is limited compared to the members’ content, but you still have access to several effective smithing methods. To start smithing, players must first complete the “Smithing” tutorial, which introduces the basics of the skill. In F2P, players can work with bronze, iron, and steel bars, allowing them to create various items that are essential for combat and crafting.
The primary method of training smithing in F2P is through the creation of metal bars. Players can mine ores from various locations and use a furnace to smelt them into bars. The ores available for F2P players are bronze (an alloy of copper and tin), iron, and steel (made from iron bars). To maximize efficiency, players should prioritize mining iron ore, as it provides a higher experience rate compared to bronze. Iron ore is abundant in locations like the Varrock South Mine and the Al Kharid Mine.
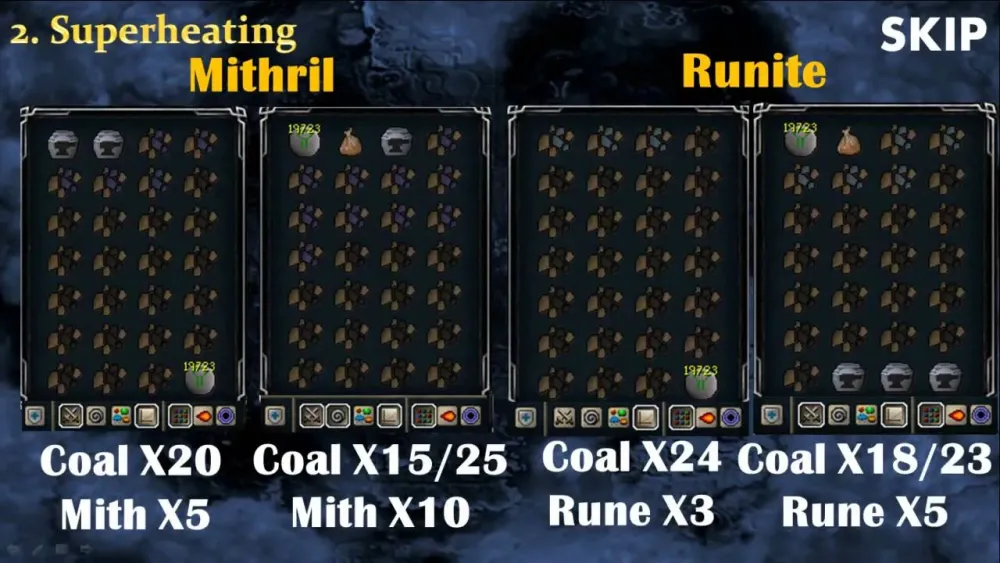
Once you have gathered enough ores, head to a nearby furnace to smelt them into bars. Each iron ore yields one iron bar, which grants 12.5 experience points. For steel bars, you need to combine 1 iron bar with 1 coal, resulting in 17.5 experience points per steel bar. To create steel bars, players can mine coal from the Al Kharid Mine or the Mining Guild (if they have access). The process of smelting is straightforward, and players can achieve a significant experience boost by constantly creating bars.
After creating enough bars, the next step is to use them for smithing. Players can forge various items, including weapons and armor. The best F2P items to smith for experience are iron items, as they provide more experience points than bronze. The most recommended items to create are iron knives and iron swords, which yield 25 and 12.5 experience points per item, respectively. Smithing iron items not only increases your skill level but also provides useful gear for combat.
In summary, F2P smithing in OSRS requires a strategic approach to mining, smelting, and item creation. By focusing on iron ore mining, efficient bar creation, and crafting valuable items, players can level up their smithing skill effectively. Remember to take advantage of the various locations and resources available to maximize your gains in this essential skill.
Essential Smithing Tools and Materials
When diving into the world of smithing in Old School RuneScape (OSRS), having the right tools and materials is crucial for maximizing your efficiency and output. Here’s a breakdown of what you’ll need:
- Anvil: This is where you’ll be doing most of your smithing. Anvils are found in various locations around Gielinor, including Varrock and Falador.
- Hammer: A hammer is essential for smithing tasks. You can find different types of hammers, but for F2P players, the standard hammer will do just fine.
- Ore: The primary material needed for smithing. As a free-to-play player, you’ll primarily work with bronze, iron, and steel ores. You collect these ores by mining them from rocks.
- Coal: While coal is primarily used in higher-level smithing, it’s good to know that you’ll need it for smelting steel bars. Coal can be mined from coal rocks.
Here’s a quick table summarizing the tools and materials:
| Tool/Material | Purpose |
|---|---|
| Anvil | Used for smithing items |
| Hammer | Required for smithing |
| Ore | Primary material for crafting |
| Coal | Used for smelting steel bars |
With these tools and materials in hand, you’ll be well on your way to becoming a proficient smith in OSRS!
Step-by-Step Smithing Process for F2P Players
Getting started with smithing in OSRS as a free-to-play player can be both exciting and rewarding. Here’s a simple, step-by-step guide to help you through the process:
- Gather Materials: Start by mining ores from ore rocks. Aim for copper and tin to make bronze bars or iron for iron bars. Make sure to collect enough ores to get started.
- Smelt Ores: Once you have your ores, head to a furnace (like the one in Varrock) to smelt them into bars. You’ll need to have 1 coal for every 5 iron ores when smelting iron.
- Use the Anvil: With your bars ready, go to an anvil. Click on the anvil and select the item you want to smith. For F2P players, this could include items like bronze and iron equipment.
- Craft Your Item: Once you select the item, your character will start crafting. This may take a few seconds, and you’ll receive experience points upon completion.
- Repeat: Keep gathering ores, smelting them into bars, and crafting items. The more you practice, the higher your smithing level will climb!
By following these steps, you’ll quickly become a skilled smith. Leveling up will unlock more advanced items, so stick with it!
Best Smithing Locations for F2P
When it comes to Smithing in Old School RuneScape (OSRS), choosing the right location can significantly enhance your training efficiency. Here are some of the best spots specifically for free-to-play (F2P) players:
- Varrock West Mine: Located just outside Varrock, this mine offers a variety of ores, including copper and tin. The nearby furnace in Varrock also makes it easy to smelt your ores into bars.
- Falador Mine: This mine is slightly further away but contains a good number of iron ores. You can mine these ores and then head to the nearby Falador Furnace to smelt them into iron bars.
- Rimmington Mine: Rimmington is another excellent location with a decent quantity of ores. It’s also close to the Rimmington Furnace, which allows for quick smelting.
- Al Kharid Mine: This mine is great for both copper and tin ores. The Al Kharid Furnace is also nearby, making it a convenient location for F2P smithers.
Each of these locations provides easy access to ores and furnaces, allowing you to maximize your time spent training Smithing. Remember to bring a pickaxe and some food for those longer sessions!
Recommended Smithing Training Methods
Training Smithing effectively in OSRS can be a bit tricky, especially for free-to-play players. Here are some recommended methods to level up your Smithing:
| Level | Method | Experience per Hour |
|---|---|---|
| 1-15 | Smithing Bronze Bars (Copper + Tin) | ~2,000 XP |
| 15-30 | Smithing Iron Bars | ~8,000 XP |
| 30-50 | Smithing Iron Plates | ~15,000 XP |
Tips:
- Focus on making iron bars from ores until you reach level 30.
- Once you hit level 30, switch to crafting iron plates as they provide better experience.
- Consider using the blast furnace (if you have access) for even faster experience gains.
By following these methods, you can efficiently level up your Smithing skills, enabling you to create better equipment and enhance your gameplay experience in OSRS. Happy Smithing!
7. Tips for Efficient Smithing Experience
Getting the most out of your Smithing experience in OSRS can make a significant difference in your overall gameplay. Here are some practical tips to help you level up your Smithing efficiently:
- Plan Your Skills: Before diving into Smithing, check your current Mining level and gather the necessary ores. This will save you time and ensure you can smelt and smith without interruptions.
- Use the Right Equipment: Equip the best pickaxe available to you. A higher-tier pickaxe will speed up your ore gathering, allowing you to spend more time smithing.
- Utilize the Best Furnace: Always use the nearest furnace for smelting ores. The Edgeville and Varrock furnaces are popular choices due to their accessibility. Consider using the Blast Furnace for bulk smelting if you have access.
- Stay Organized: Organize your inventory to maximize efficiency. Keep your ores and bars easily accessible, and use bank deposits to quickly switch between mining and smithing.
- Smith in Batches: Instead of smelting ores one by one, try to gather a large quantity and smelt them all at once. This method minimizes downtime and keeps you focused.
- Join a Clan: Being part of an active clan can provide you with tips, support, and even resources. Some clans might also organize events related to Smithing.
- Keep an Eye on Quests: Many quests reward you with experience in Smithing. Completing these quests can give you a significant boost in levels without the grind.
8. Common Mistakes to Avoid in Smithing
While Smithing can be a rewarding skill, there are several pitfalls that players often encounter. Avoiding these mistakes can save you time and resources:
- Ignoring Equipment Upgrades: Don’t overlook the importance of upgrading your pickaxe and hammer. Using a low-tier pickaxe can slow down your mining and smelting processes significantly.
- Overlooking Banking Locations: Familiarize yourself with the closest banks to your mining and smithing spots. This will help you avoid unnecessary runs back and forth, wasting valuable time.
- Not Using the Right Ores: Make sure you’re using the most efficient ores for your current level. Wasting time on low-level ores when you could be working with higher-level ones is a common error.
- Neglecting Inventory Management: A cluttered inventory can lead to inefficiency. Always keep your inventory organized to easily access what you need for mining and smithing.
- Being Impatient: Smithing can be a slow process, especially at lower levels. Rushing through it may lead to mistakes or missed opportunities for better ores and bars.
- Not Taking Breaks: Smithing can become monotonous. Taking short breaks can help you stay focused and engaged, making your experience more enjoyable.
Ultimate Guide to Smithing in OSRS: Best F2P Methods
Smithing is a vital skill in Old School RuneScape (OSRS), enabling players to create weapons and armor that enhance combat effectiveness. For free-to-play (F2P) players, mastering Smithing can provide significant benefits, including generating profit and improving combat capabilities. This guide outlines the best F2P methods to level up your Smithing skill efficiently.
1. Mining and Smelting
The first step to Smithing is obtaining ores. Players can mine various ores, including:
- Copper Ore
- Tin Ore
- Iron Ore
Once you have sufficient ores, you can smelt them into bars at a furnace. The major furnaces in F2P are located in:
2. Creating Items
After smelting, use the bars to create items. The most efficient items to smith in F2P are:
| Item | Level Required | Experience Gained |
|---|---|---|
| Bronze Bar | 1 | 6 |
| Iron Bar | 15 | 12 |
| Iron Platebody | 33 | 125 |
3. Using the Grand Exchange
Consider buying ores and bars from the Grand Exchange to save time. This method can help you avoid the tedious mining phase, allowing you to focus on Smithing.
4. Profitability
Smithing can be profitable if you focus on creating items that are in high demand. Iron items, in particular, sell well due to their utility among low-level players.
By following these methods, F2P players can effectively level up their Smithing skill, enhancing their gameplay experience in OSRS.
Conclusion
Mastering Smithing as a F2P player is entirely achievable through strategic mining, efficient smelting, and item creation, ultimately leading to enhanced combat abilities and potential profits.
