Your cart is empty

Ultimate Guide to Bloodvelds in OSRS Slayer Tower
Bloodvelds are a popular Slayer monster in Old School RuneScape (OSRS), known for their unique mechanics and valuable drops. They are often sought after by players looking to complete Slayer tasks, gain experience, or farm specific items. In this guide, we will delve into everything you need to know about Bloodvelds, from their characteristics to effective strategies for defeating them. Understanding their location and behavior is crucial for maximizing your efficiency while hunting these monsters.
The Slayer Tower is located in the Mort Myre Swamp area, just southwest of Burgh de Rott. To reach the tower, players can either navigate through the swamp or teleport directly to Burgh de Rott using the Fairy Ring (code: ALQ). Once at Burgh de Rott, head southwest until you find the tower. The Slayer Tower is a multi-level structure featuring various floors, with Bloodvelds primarily found on the second floor.
Upon entering the Slayer Tower, you will encounter several monsters, including the Bloodvelds. It’s important to note that Bloodvelds are aggressive, meaning they will attack you upon sight. To prepare for your encounter, ensure you have adequate gear and supplies. A good starting point is to equip armor that provides decent protection while allowing you to deal damage effectively. Many players choose to use melee or magic attacks against Bloodvelds, as they are weak to both styles.
In addition to Bloodvelds, the Slayer Tower houses other creatures like Abyssal Demons and the boss, the Daggonoth Mother. Be cautious of these monsters when traversing the tower, as they may pose a threat if you’re not adequately prepared. The Slayer Tower is also a popular location for players to train their skills, making it a bustling area with many adventurers hunting for Bloodvelds and other monsters.
Overall, the Slayer Tower is an accessible and strategic location for players looking to hunt Bloodvelds efficiently. Familiarizing yourself with the layout and taking the right precautions will significantly enhance your experience while completing Slayer tasks involving these creatures.
3. Requirements for Killing Bloodvelds
Before you venture into the Slayer Tower to hunt Bloodvelds, it’s essential to equip yourself with the right requirements. Here’s what you need:
- Slayer Level: You must have at least level 50 Slayer to receive Bloodvelds as a task. This ensures that you are adequately prepared for the challenges they present.
- Combat Level: While there’s no specific combat level required to kill Bloodvelds, having a combat level of 70 or higher is recommended. This will help you deal with them more effectively.
- Equipment: Equip yourself with the best gear you can afford. Here are some options:
| Slot | Recommended Gear |
|---|---|
| Head | Armadyl Helmet / Neitiznot Faceguard |
| Body | Karil’s Crossbow / Void Knight Robe |
| Legs | Karil’s Skirt / Void Knight Robe |
| Weapon | Rune Scimitar / Abyssal Whip |
Additionally, having some potions like Super Attack and Super Defense can significantly enhance your performance. Don’t forget about food; bringing Sharks or Brews can keep you in the fight longer!
4. Best Slayer Tasks for Bloodvelds
Bloodvelds can be a great Slayer task, offering decent experience and drops. Here are some of the best Slayer tasks for Bloodvelds:
- Efficient Experience: Bloodvelds provide good experience rates for players, especially those using high-tier weapons and abilities. You can expect around 200 XP per kill.
- Task Frequency: Bloodvelds are a common task assigned by various Slayer masters, including:
- Duradel
- Nieve
- Chaeldar
- Item Drops: Bloodvelds drop valuable items, such as:
To make the most of your Slayer tasks, consider using the Slayer Helm. It boosts your damage and accuracy against your assigned tasks, making Bloodvelds even easier to kill.
5. Strategies for Efficient Bloodveld Killing
Killing Bloodvelds efficiently in Old School RuneScape (OSRS) requires a blend of appropriate strategies and techniques. Here are some tips to enhance your Bloodveld slaying experience:
- Prayer Usage: Bloodvelds are weak to magic and melee attacks, but they can hit hard. Utilize prayers like Protect from Missiles or Protect from Magic to minimize damage. Make sure to bring enough prayer potions to maintain your prayer bonus.
- Multi-target Attacks: If you have access to area-of-effect spells or abilities, use them to hit multiple Bloodvelds at once. This speeds up kills and maximizes your Slayer XP.
- Use of Potions: Bring potions to boost your combat stats. Super Attack and Super Strength potions can significantly improve your damage output.
- Efficient Movement: Bloodvelds can be found on different floors of the Slayer Tower. Familiarize yourself with the layout to minimize time spent moving between kills.
- Banking Strategy: Plan your inventory wisely to limit trips to the bank. Consider bringing items that restore your health and prayer, along with food that offers high healing.
By implementing these strategies, you’ll enhance your efficiency and enjoyment while tackling Bloodvelds in Slayer Tower.
6. Recommended Gear and Inventory Setup
Having the right gear and inventory setup is crucial for a successful Bloodveld slaying session. Below is a recommended gear list and inventory setup:
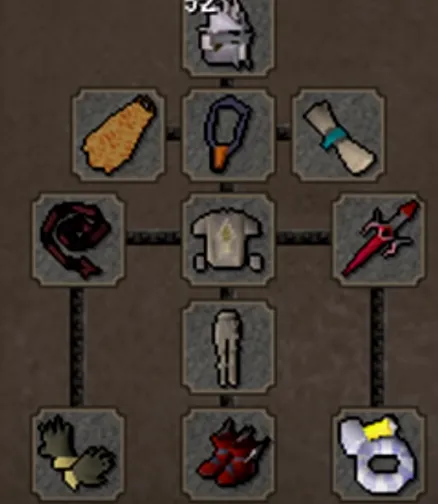
Recommended Gear
| Slot | Recommended Gear |
|---|---|
| Head | Armadyl Helmet or Fury (for magic) |
| Body | Karil’s Crossbow or God Wars Dungeon Armors (for melee) |
| Legs | Karil’s Skirt or Dragon Platelegs |
| Amulet | Amulet of Fury or Amulet of Magic |
| Weapon | Magic Staff or Bludgeon |
| Shield | Dragon Defender or Magic Shield |
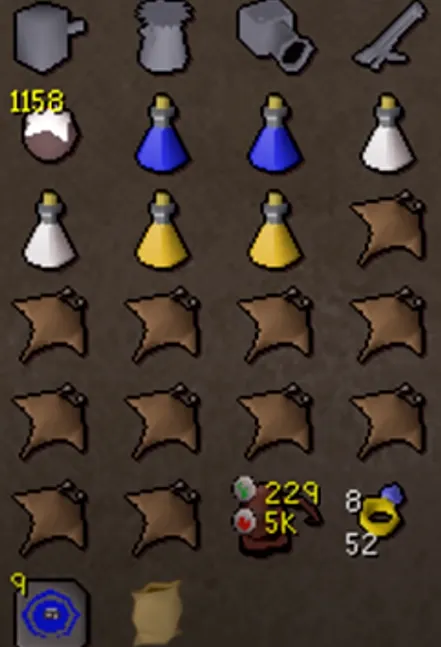
Inventory Setup
- Health Recovery: Bring Sharks or Monkfish for effective healing.
- Prayer Restoration: Include Prayer Potions to maintain your prayer bonuses.
- Combat Potions: Carry Super Attack and Super Strength potions for increased damage.
- Teleports: Have a few Teleportation Devices or Home Teleports to quickly return to the Slayer Tower after banking.
With the right gear and a well-thought-out inventory, you’ll be ready to take on Bloodvelds efficiently and effectively!
7. Experience Rates and Loot Drops
When it comes to training Slayer, Bloodvelds offer a solid option for experience rates and loot drops. Let’s break it down.
Experience Rates:
- Bloodvelds provide 100 experience points per kill.
- With optimal gear and strategies, players can achieve around 50-70 kills per hour.
- This translates to an experience rate of approximately 5,000 to 7,000 Slayer experience per hour.
These experience rates make Bloodvelds a great mid-level training target, especially if you’re aiming to level up your Slayer skill for higher-tier monsters.
Loot Drops:
Bloodvelds can drop a variety of items that can be quite profitable. Here’s a quick overview of their notable loot drops:
| Item | Rarity | Value (Coins) |
|---|---|---|
| Blood Rune | Common | 200 |
| Runes (Various) | Common | Varies |
| Uncut Gems | Uncommon | Up to 15,000 |
| Dark Bow | Rare | 1,000,000 |
Additionally, they might drop blood shards and other valuable items, making them an excellent target for players looking to make some coins while training.
8. Tips for New Players
If you’re a new player tackling Bloodvelds in the Slayer Tower, here are some tips to help you maximize your efficiency and enjoyment:
- Gear Up Properly: Equip gear that offers good defense and attack bonuses. Consider wearing rune or dragon gear if you can afford it.
- Bring Food: Bloodvelds can hit hard, especially if you’re low on defense levels. Bring plenty of food like sharks or pizzas to stay alive.
- Use Prayer: Activate your Protect from Missiles prayer to reduce damage taken from their ranged attacks.
- Keep Your Inventory Organized: Carry potions and food in an easy-to-reach manner. This will help you respond quickly during fights.
- Utilize Safe Spots: If you’re struggling, look for safe spots within the Slayer Tower to avoid taking damage while attacking.
By following these tips, you’ll not only enjoy your time at the Slayer Tower but also level up your Slayer skill effectively. Remember, practice makes perfect, so don’t get discouraged if you find it tough at first!
Ultimate Guide to Bloodvelds in OSRS Slayer Tower
Bloodvelds are a popular Slayer monster found in the Slayer Tower in Old School RuneScape (OSRS). They are known for their unique mechanics and the rewards they provide, making them a favorite among players seeking experience and loot.
Here are some essential details about Bloodvelds:
- Combat Level: 50
- Hitpoints: 130
- Attack Style: Ranged and Melee
- Weakness: Stab attacks
- Slayer Requirement: Level 50 Slayer
Bloodvelds can be found in the following locations:
| Location | Coordinates |
|---|---|
| Slayer Tower (first floor) | Varrock |
| Slayer Tower (second floor) | Varrock |
When fighting Bloodvelds, players should consider the following strategies:
- Use stab weapons like the Dragon Dagger or Rapier.
- Bring food to manage health, as Bloodvelds can deal significant damage.
- Utilize prayers such as Protect from Missiles to reduce damage taken.
- Consider using potions like Super Attack and Super Strength for enhanced damage.
Bloodvelds drop a variety of items, including:
- Blood Rune
- Runes of various types
- Unique drops like the Bloodveld pet
In conclusion, Bloodvelds are a crucial part of the Slayer experience in OSRS, offering both valuable loot and a challenging fight that can enhance any player’s skills and combat strategies.