Your cart is empty

OSRS Perilous Moons Loot Guide: Rewards, Drop Rates, and Best Gear
Old School RuneScape (OSRS) welcomed an exciting addition with the Perilous Moons quest and its accompanying dungeon, Neypotzli, introduced as part of the Varlamore expansion in March 2024. This mid-level content offers players a chance to battle three unique bosses—the Moons of Peril—and claim valuable loot from the Lunar Chest. Whether you’re an Ironman seeking self-sufficient resources or a main account chasing powerful armor sets, this guide dives deep into the loot of Perilous Moons, including drop rates, rewards, and strategies to maximize your gains. Let’s explore what makes this dungeon a must-visit for adventurers!
Perilous Moons is an experienced-level quest that unlocks access to the Neypotzli dungeon beneath Cam Torum, a dwarven settlement in Varlamore. The quest introduces players to the Moons of Peril—three nagua bosses inspired by the iconic Barrows Brothers but with a fresh twist of exploration and self-sufficiency. Completing the quest counts as a standard defeat of the Moons, granting immediate access to their loot table via the Lunar Chest.
The Moons of Peril: Meet the Bosses
The dungeon houses three distinct bosses, each with unique mechanics and loot:
- Blood Moon: Weak to slash attacks, this boss offers melee-focused rewards.
- Blue Moon: Vulnerable to crush damage, it drops magic-oriented gear.
- Eclipse Moon: Susceptible to stab attacks, it provides ranged equipment.
Each boss fight requires standing in a highlighted circle to avoid rapid damage, adding a layer of strategy to the encounters.
Why Perilous Moons Stands Out
Unlike Barrows, Perilous Moons emphasizes discovery and preparation within the dungeon. Players can gather resources like food, potions, and prayer-restoring moths onsite, making it especially appealing for Ironmen or those looking for a low-supply challenge.
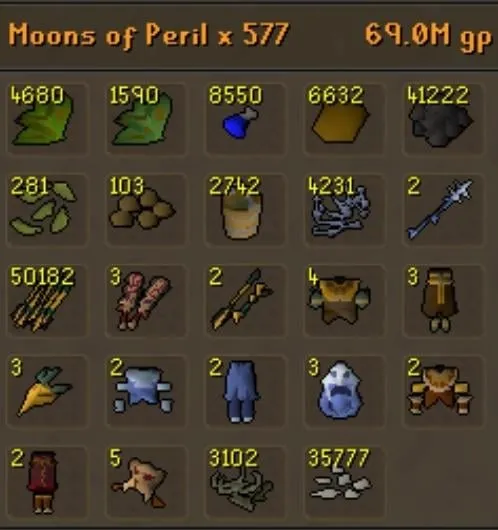
Perilous Moons Loot Overview

The primary allure of Perilous Moons lies in its Lunar Chest rewards, which scale based on how many bosses you defeat in a single run. Defeating all three Moons grants the best odds at unique items, but even a single kill offers a shot at loot. Here’s a breakdown of what you can expect.
Common Drops
These items drop frequently and provide useful resources, especially for mid-level players:
- Bone Shards: Used for prayer training or trading.
- Water Orbs: Valuable for crafting battlestaves.
- Soft Clay: Handy for crafting or profit.
- Moonlight Moths: Restore prayer points, great for extended runs.
Unique Armor Sets
The crown jewels of Perilous Moons are the three exclusive armor sets, each tied to a specific Moon:
| Armor Set | Boss | Combat Style | Set Effect |
|---|---|---|---|
| Blood Moon Armour | Blood Moon | Melee | Bloodrager: Chance to deal extra melee damage |
| Blue Moon Armour | Blue Moon | Magic | Frostweaver: Chance to freeze enemies |
| Eclipse Moon Armour | Eclipse Moon | Ranged | Searing Blows: Boosts ranged damage over time |
Each set degrades like Barrows gear and can be repaired similarly, offering mid-tier stats that bridge the gap between basic equipment and high-end options like Bandos or Ancestral.
Drop Rates for Perilous Moons Loot
Understanding the drop rates is key to planning your grind. Jagex revealed the official rates in April 2024, clarifying earlier misconceptions.
Individual Boss Drop Rates
Defeating any single Moon of Peril grants a 1/56 chance at a random piece of its respective armor set. For example:
- Blood Moon: 1/56 for Blood Moon Armour piece.
- Blue Moon: 1/56 for Blue Moon Armour piece.
- Eclipse Moon: 1/56 for Eclipse Moon Armour piece.
Full Run Bonus
Killing all three bosses in one run provides an additional 1/56 roll at any unique item from the combined loot table. This boosts your total odds to approximately 1/14 for a unique drop per full run, making it more rewarding than the average Barrows chest (around 1/17 for uniques).
Is It Worth Skipping Bosses?
For Ironmen or players with a completed set (e.g., full Blood Moon), skipping bosses might seem tempting. However, the extra roll from a full run generally outweighs the time saved, unless you can drastically increase your kill speed by focusing on one boss. Most players recommend sticking to all three for maximum efficiency.
Best Strategies to Maximize Perilous Moons Loot
To get the most out of your runs, preparation and execution are crucial. Here’s how to optimize your loot haul.
Gear Recommendations
Match your weapons to each boss’s weakness:
- Blood Moon: Use a slash weapon like an Abyssal Whip or Dragon Scimitar.
- Blue Moon: Opt for a crush weapon like a Zombie Axe or Verac’s Flail.
- Eclipse Moon: Equip a stab weapon like a Zamorakian Hasta or Dragon Dagger.
Tank gear (e.g., Barrows armor) helps mid-level players learn mechanics safely, while maxed accounts can push kills per hour with high-damage setups like a Scythe of Vitur.
Self-Sufficiency Tips
Leverage Neypotzli’s resources:
- Fishing: Catch fish in the Streambound Cavern for food (30+ Cooking recommended).
- Hunter: Trap Moss Lizards (20+ Hunter) or Moonlight Moths (75+ Hunter for prayer).
- Herblore: Craft Moonlight Potions (38+ Herblore) for stat boosts.
These eliminate the need to bring supplies, saving inventory space and gold.
Kills Per Hour and Profit
An average player with decent gear can achieve 10 kills per hour (all three bosses). Maxed players with optimal setups might hit 14 kills per hour. Profit varies based on luck, but estimates peg it at 2-3M GP/hour, factoring in uniques and common drops like water orbs (around 15-20M over a full grind for some players).
Why Perilous Moons Loot Matters for Your Account
Perilous Moons fills a unique niche in OSRS, offering accessible yet engaging content with tangible rewards. Here’s why it’s worth your time.
Mid-Level Progression
For players around combat level 75-100, the armor sets provide a stepping stone to endgame gear. Blood Moon Armour, for instance, offers a melee strength bonus rivaling mid-tier items, making it a cost-effective alternative to Bandos for budget builds.
Ironman Benefits
The dungeon’s self-contained nature is a godsend for Ironmen. Resources like water orbs and bone shards accelerate skilling, while the armor sets enhance combat capabilities without relying on the Grand Exchange.
Fashionscape and Fun
Beyond stats, the armor sets look striking—perfect for players who value aesthetics. The engaging boss mechanics and atmospheric dungeon design also make it a refreshing break from repetitive grinds like Barrows.
In conclusion, Perilous Moons loot offers a blend of utility, profit, and enjoyment for OSRS players. Whether you’re chasing the Blood Moon Armour for melee prowess, the Blue Moon set for magic flair, or the Eclipse Moon gear for ranged dominance, this dungeon delivers. Start your journey beneath Cam Torum today and claim your share of the Lunar Chest’s treasures!
