Your cart is empty

OSRS Monkey Madness 1 Puzzle Guide: Solve It Like a Pro
Old School RuneScape (OSRS) is packed with challenging quests, and Monkey Madness I stands out as one of the most iconic. A key part of this quest is the infamous sliding puzzle, which can stump even seasoned players. Whether you’re a first-timer or just need a refresher, this guide will walk you through the Monkey Madness 1 puzzle step-by-step, offering tips, strategies, and everything you need to conquer it. Let’s dive into Ape Atoll’s trickiest challenge and get you back on track to saving the 10th Squad!
Monkey Madness I is the fourth installment in the Gnome quest series and a rite of passage for OSRS players. Set on the treacherous Ape Atoll, the quest tasks you with helping King Narnode Shareen locate his missing 10th Squad. Along the way, you’ll face hostile monkeys, poisonous creatures, and, of course, the notorious reinitialization puzzle. This sliding puzzle appears mid-quest and is a hurdle you must clear to progress. While the quest offers rich rewards like access to Ape Atoll and the Dragon Scimitar training, the puzzle often becomes the make-or-break moment for many adventurers.
Why the Puzzle Matters
The reinitialization puzzle isn’t just a random obstacle—it’s your ticket off Crash Island and onto Ape Atoll. After meeting Daero and Waydar in the Grand Tree’s hangar, you’re tasked with solving this puzzle to prove your worth and secure passage. Fail to crack it, and you’ll be stuck, unable to advance the storyline. It’s a test of patience and logic, but with the right approach, it’s far less daunting than it seems.
Understanding the Monkey Madness 1 Puzzle
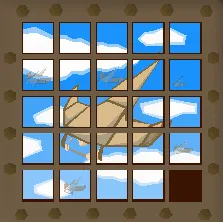
The Monkey Madness 1 puzzle is a classic 5×5 sliding tile puzzle, similar to those found in Treasure Trails puzzle boxes. It consists of 25 tiles, numbered 1 to 24, with one empty space (the 25th slot) that allows you to slide tiles around. Your goal is to rearrange the scrambled tiles into numerical order, starting with 1 in the top-left corner and ending with the empty space in the bottom-right. While it sounds simple, the random starting configuration can make it feel overwhelming without a plan.
How the Puzzle Fits into the Quest
After speaking with Daero in the Grand Tree’s hangar, he introduces you to Waydar, a gnome pilot who needs your help to “reinitialize” the glider controls. This is where the puzzle comes in. You’ll find the control panel southeast of the southern glider. Clicking it reveals the scrambled tiles, and your task begins. Solving it unlocks the next stage of the quest, where Waydar flies you to Crash Island, setting the stage for your Ape Atoll adventure.
Puzzle Difficulty and Alternatives
For players familiar with sliding puzzles, this might be a breeze. But for newcomers, it can be a frustrating roadblock. If you’re short on time or patience, there’s an alternative: pay Glough 200,000 GP to solve it for you, leaving just one tile to slide into place. However, solving it yourself is free and builds your OSRS problem-solving skills—plus, it’s more satisfying!
Step-by-Step Guide to Solving the Puzzle
Ready to tackle the Monkey Madness 1 puzzle? Follow this detailed, beginner-friendly guide to get it done efficiently. The key is to work systematically, focusing on one row or column at a time while preserving your progress. Here’s how to do it:
Step 1: Position the Top Row (Tiles 1-5)
Start by arranging tiles 1, 2, and 3 into the top-left corner. Use the empty space to maneuver them into place:
- Tile 1: Move it to the top-left corner (1,1).
- Tile 2: Slide it next to Tile 1 (1,2).
- Tile 3: Position it at (1,3).
Next, work on Tile 4. Move it to the top-right corner (1,5), then slide Tile 5 below it (2,5). Finally, shift Tile 4 left to (1,4) and Tile 5 up to (1,5), completing the top row.
Step 2: Complete the Second Row (Tiles 6-10)
With the top row locked in, focus on the second row. Repeat the process:
- Tile 6: Move to (2,1).
- Tile 7: Slide to (2,2).
- Tile 8: Position at (2,3).
- Tile 9: Move to (2,4).
- Tile 10: Place at (2,5).
Use the empty space strategically, sliding tiles around without disturbing the first row. If a tile gets stuck, backtrack slightly and reposition the empty space.
Step 3: Solve the Remaining Rows
At this point, you’ve got two rows done, and the puzzle starts to feel manageable. For the third row (Tiles 11-15), fourth row (Tiles 16-20), and part of the fifth row (Tiles 21-24), switch to a column-based approach:
- Column 4: Position Tiles 16 and 21 (4,4 and 5,4).
- Column 5: Position Tiles 17 and 22 (4,5 and 5,5).
Then, slide the remaining tiles (18, 19, 20, 23, 24) clockwise into their spots. The empty space should naturally end up at (5,5) when finished.
Step 4: Verify and Finish
Double-check your work. The tiles should read 1-24 from left to right, top to bottom, with the empty space at the bottom-right. If something’s off, identify the misplaced tile and adjust using the empty space. Once correct, speak to Daero and Waydar to continue the quest.
Tips and Tricks for Puzzle Success
Solving the Monkey Madness 1 puzzle doesn’t have to be a headache. Here are some pro tips to make it smoother and faster:
Use the Spare Controls
Before starting, grab the spare controls from the nearby crate. This shows the solved puzzle layout, giving you a visual reference to aim for. Keep it open as you work—it’s like having the answer key handy.
Break It Down into Chunks
Don’t try to solve the whole puzzle at once. Focus on small sections (e.g., one row or two tiles) to avoid feeling overwhelmed. Progress builds momentum, and small wins keep you motivated.
Avoid Random Moves
Moving tiles aimlessly can scramble your progress. Plan each move, thinking about how it positions the next tile. Patience here saves time in the long run.
Practice with Treasure Trails
If you’ve done Treasure Trails, you’ve likely encountered similar puzzles. Practice with those beforehand to sharpen your skills. The mechanics are identical, just with different images.
Rewards and What’s Next
Congratulations—you’ve solved the Monkey Madness 1 puzzle! But what’s in it for you, and where do you go from here?
Quest Progression
After solving the puzzle, Waydar flies you to Crash Island. From there, convince Lumdo to sail you to Ape Atoll by talking to Waydar again. The real adventure begins as you navigate the island’s dangers, including poisonous creatures and aggressive monkeys.
Long-Term Benefits
Completing Monkey Madness I unlocks incredible rewards:
- Access to Ape Atoll: A training hub with high-level monsters.
- Dragon Scimitar Training: Boost your combat prowess.
- Quest Points: 3 points to add to your tally.
- Experience: 35,000 Strength and Attack XP (or 20,000 if you choose the alternative reward).
Plus, you’ll earn bragging rights for conquering one of OSRS’s toughest quests.
Preparing for Monkey Madness II
Solving this puzzle is a stepping stone to Monkey Madness II, the sequel that ramps up the challenge. The skills you’ve honed here—patience, logic, and perseverance—will serve you well when facing Glough’s next scheme.
| Puzzle Step | Tiles Involved | Goal Position |
|---|---|---|
| Top Row | 1-5 | (1,1) to (1,5) |
| Second Row | 6-10 | (2,1) to (2,5) |
| Columns 4-5 | 16-17, 21-22 | (4,4-5) and (5,4-5) |
| Final Tiles | 18-20, 23-24 | (4,1-3) and (5,1-3) |
With this guide, the Monkey Madness 1 puzzle transforms from a daunting obstacle into a manageable task. Whether you solve it yourself or take Glough’s shortcut, you’re now equipped to push forward in the quest. So grab your gear, head to the Grand Tree, and show that puzzle who’s boss—happy questing!
