Your cart is empty

OSRS Greater Demon Guide Best Strategies and Locations
Greater Demons in Old School RuneScape (OSRS) are iconic slayer monsters known for their rune full helm and hard clue scroll drops. Assigned by slayer masters like Krystilia, Chaeldar, Konar, Nieve/Steve, and Duradel, they’re a staple task for mid-to-high-level players. This guide covers everything you need to know to efficiently tackle Greater Demon slayer tasks, including optimal gear, locations, strategies, and tips to maximize experience and loot. Whether you’re a melee enthusiast, a ranged safespotter, or looking to AFK, we’ve got you covered.
Greater Demons are large, demonic creatures with combat levels ranging from 100 to 113, depending on the variant. They’re weak to all combat styles, making them versatile for different playstyles. While no specific slayer level is required, you’ll need at least 70 combat to receive them as a task from most slayer masters. Additionally, having 43 Prayer for Protect from Melee is highly recommended to mitigate their melee attacks, which can hit up to 10.
Key Stats and Weaknesses
- Combat Levels: 100, 101, 104, 113
- Hitpoints: 115–130
- Max Hit: 8–10 (melee)
- Weakness: All combat styles (melee, ranged, magic); especially effective with demonbane weapons like Arclight
- Slayer Experience: 115–130 per kill
Notable Variants
Some unique Greater Demons count toward slayer tasks, offering alternative challenges and rewards:
- K’ril Tsutsaroth: Zamorakian general in the God Wars Dungeon, requiring 70 Hitpoints and partial completion of Troll Stronghold.
- Tstanon Karlak: K’ril’s bodyguard, also in God Wars Dungeon.
- Skotizo: A demi-boss in the Catacombs of Kourend, requiring a dark totem to access and offering guaranteed clue scrolls.
- Tormented Demons: High-level demons post-While Guthix Sleeps, dropping tormented synapse for demonbane weapons.
Best Locations for Greater Demon Slayer Tasks
Choosing the right location is crucial for efficiency. Below are the top spots to slay Greater Demons, each with unique advantages and considerations.
Catacombs of Kourend
The Catacombs of Kourend is a popular AFK spot due to its multicombat area. Wear proselyte armour, bring prayer potions, and use Protect from Melee for a low-effort setup. Safespots are available under the arch dividing the demon area or in the northeast corner behind the rope exit. You can also collect ancient shards and dark totem pieces for Arclight charges and Skotizo fights.
Chasm of Fire
Located northwest of Shayzien, the Chasm of Fire is ideal for cannon users. It’s a single-combat area with 17 Greater Demon spawns, split into two sections (8 and 9 spawns). Safespot behind pillars using ranged or magic for safe kills. Access via Fairy Ring code DJR or Kharedst’s memoirs.
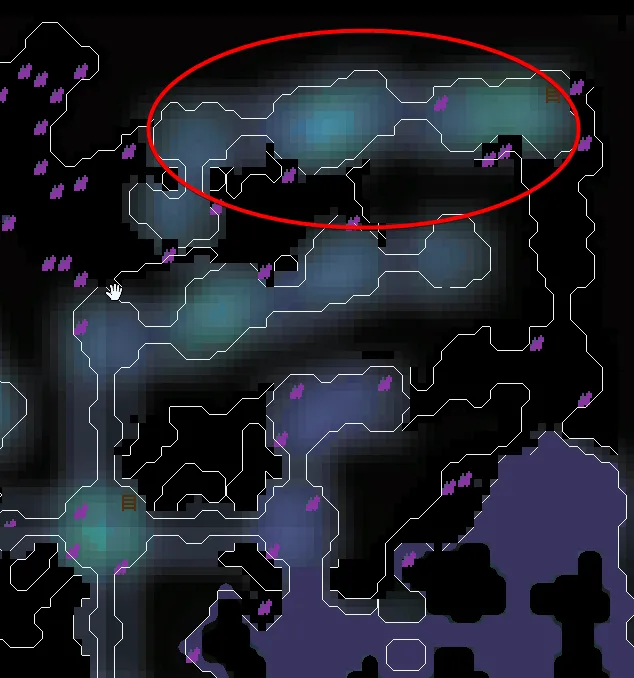
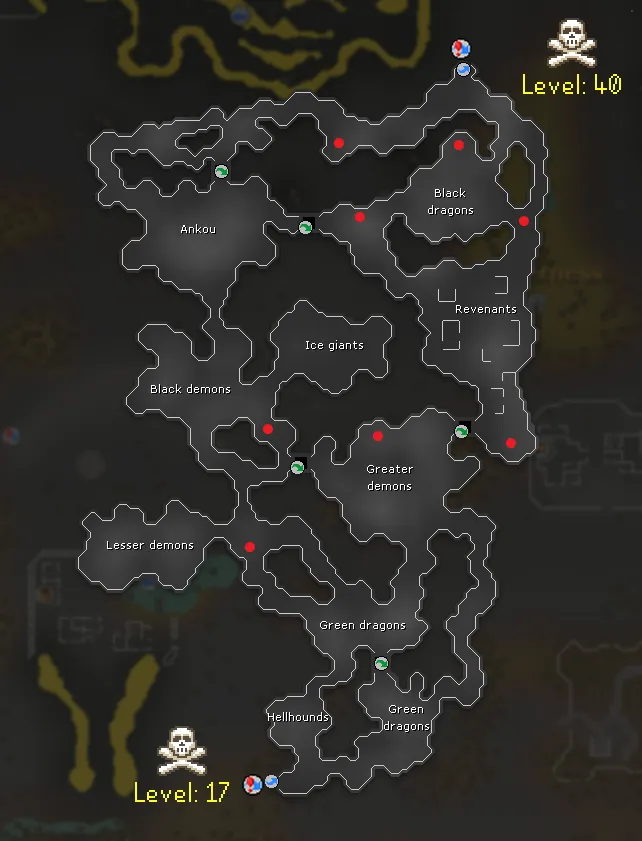
Wilderness Locations
Wilderness spots like the Wilderness Slayer Cave and Demonic Ruins offer enhanced loot but come with PKer risks. The Slayer Cave is multicombat and cannonable, with better drops, while the Demonic Ruins (level 44–48 Wilderness) restore prayer points, allowing permanent Protect from Melee. Bring minimal risk gear (e.g., Silverlight, monk robes) for F2P players.
Other Notable Spots
- Brimhaven Dungeon: Safespot at the easternmost land or behind mushrooms near stairs. Requires 875 coins and an axe to enter.
- Entrana Dungeon: Safespot behind burnt corpses. No weapons or armour allowed on Entrana, so craft gear on-site.
- Karuulm Slayer Dungeon: Safespot at the chamber entrance. Accessible via Rada’s Blessing or Fairy Ring CIR.
Recommended Gear and Inventory
Your gear setup depends on your combat style and whether you’re prioritizing DPS, AFK, or safety (e.g., in the Wilderness). Below are optimal setups for melee, ranged, and magic.
Melee Setup
Melee is the fastest for DPS, especially with demonbane weapons like Arclight (requires 75 Attack and Shadow of the Storm).
| Slot | Recommended Gear | Budget Alternative |
|---|---|---|
| Head | Slayer Helmet (i) | Rune Full Helm |
| Body | Proselyte Hauberk | Fighter Torso |
| Legs | Proselyte Tasset | Rune Platelegs |
| Weapon | Arclight or Abyssal Whip | Dragon Scimitar |
| Shield | Dragon Defender | Rune Kiteshield |
Ranged Setup
Ranged is ideal for safespotting, especially in the Chasm of Fire or Catacombs.
- Weapon: Toxic Blowpipe or Rune Crossbow (with broad bolts)
- Armour: Armadyl or Blessed D’hide, Ava’s Accumulator
- Ammo: Amethyst or Broad Bolts
Magic Setup
Magic is effective for safespotting or Entrana Dungeon, where gear restrictions apply.
- Weapon: Trident of the Seas or Iban’s Staff
- Armour: Mystic Robes or Ahrim’s
- Spells: Fire Blast or Trident spells
Inventory Tips
- Prayer Potions: 4–6 for AFK melee setups.
- Food: Sharks or Monkfish for non-AFK or Wilderness.
- Teleport: Kourend Castle teleport, Fairy Ring runes, or Annakarl Teleport for Wilderness.
- Cannon: 500–1000 cannonballs for Chasm of Fire or Wilderness Slayer Cave.
Strategies for Efficient Kills
Maximizing efficiency depends on your combat style, location, and whether you’re using a cannon or safespotting. Here are the best strategies.
AFK Melee in Catacombs
Wear proselyte armour, pray Protect from Melee, and stand in the multicombat area. Reset aggression every 10 minutes by running a short distance and returning. This yields 30,000–40,000 Slayer XP per hour and is low-effort.
Cannon and Safespot in Chasm of Fire
Set up a dwarf multicannon in the Chasm of Fire and safespot behind pillars with ranged or magic. This can yield up to 50,000 Slayer XP per hour with minimal attention. Use a blowpipe or crossbow for faster kills.
Wilderness Risk vs. Reward
In the Wilderness Slayer Cave, use a cannon and max ranged gear for 60,000+ Slayer XP per hour and better loot (e.g., hard clue scrolls with imbued Ring of Wealth). However, stay vigilant for PKers and risk only what you’re willing to lose. Demonic Ruins are safer for F2P players with prayer restoration.
Safespotting for Low Levels
Players with 75 combat or lower can safespot in the Catacombs (under the arch) or Entrana Dungeon (behind burnt corpses). Use ranged or magic to avoid damage, though kills will be slower.
Notable Drops and Rewards
Greater Demons have a lackluster drop table compared to other slayer monsters, but a few items stand out for their value or utility.
Key Drops
| Item | Drop Rate | Use/Value |
|---|---|---|
| Rune Full Helm | 1/64 | 20,000–30,000 GP |
| Hard Clue Scroll | 1/128 | Potential for high-value rewards |
| Ancient Shard | 1/256 (Catacombs) | Charges Arclight |
| Dark Totem Piece | 1/400 (Catacombs) | Used to fight Skotizo |
Alternative Monster Rewards
Killing Skotizo or Tormented Demons on task offers unique rewards:
- Skotizo: Guaranteed clue scrolls and a chance for Jar of Darkness.
- Tormented Demons: Tormented synapse (62.4M GP) for crafting demonbane weapons.
- K’ril Tsutsaroth: Zamorakian spear, steam battlestaff, or Zamorak hilt.
Greater Demons are a solid slayer task for mid-level players, offering decent XP and the chance for valuable drops like rune full helms and clue scrolls. By choosing the right location—whether it’s the AFK-friendly Catacombs, cannon-heavy Chasm of Fire, or risky Wilderness—you can tailor the task to your playstyle. Use demonbane weapons like Arclight for maximum efficiency, and don’t skip tasks unless you’re prioritizing profit over XP. Happy slaying!