Your cart is empty

OSRS Giant Mole Drop Table: A Comprehensive Guide to Loot and Rewards
The Giant Mole in Old School RuneScape (OSRS) is a popular mid-level boss that players frequently tackle for its unique drops and consistent rewards. Located beneath Falador Park in the Mole Lair, this oversized critter offers a mix of guaranteed loot, rare items, and tertiary drops that appeal to a wide range of players, from Ironmen to pet hunters. In this blog post, we’ll dive deep into the OSRS Giant Mole drop table, breaking down everything you can expect to gain from defeating this burrowing behemoth. Whether you’re chasing the elusive Baby Mole pet or farming mole skins for profit, this guide has you covered.
The Giant Mole stands out as one of OSRS’s most accessible bosses, requiring no specific quests or high combat stats to challenge. Its straightforward mechanics—melee attacks and occasional burrowing—make it an excellent entry point for players new to bossing. However, what truly draws adventurers to the Mole Lair is its drop table, which offers a blend of reliable income and rare collectibles.
Accessibility and Ease of Combat
Located under Falador Park, the Giant Mole is easy to reach with a spade and a light source. Teleporting via a Ring of Wealth to Falador Park or using a Falador teleport gets you there in seconds. The boss’s combat style is simple: it uses melee attacks dealing up to 21 damage and burrows around the lair when its health drops below 50%. This predictability allows players to use safespots or high-damage setups like Dharok’s to dispatch it quickly.
Appeal to Different Player Types
Ironmen love the Giant Mole for its mole claws and skins, which can be traded to Wyson the gardener for bird nests—key for gathering Saradomin brew ingredients. Meanwhile, pet hunters chase the Baby Mole, and profit-seekers capitalize on the consistent loot. This versatility keeps the Mole Lair bustling with activity.
Breaking Down the Giant Mole Drop Table
The Giant Mole’s drop table is divided into several categories: 100% drops, main drops, rare drop table (RDT) access, and tertiary drops. Let’s explore each section to understand what you can expect per kill.
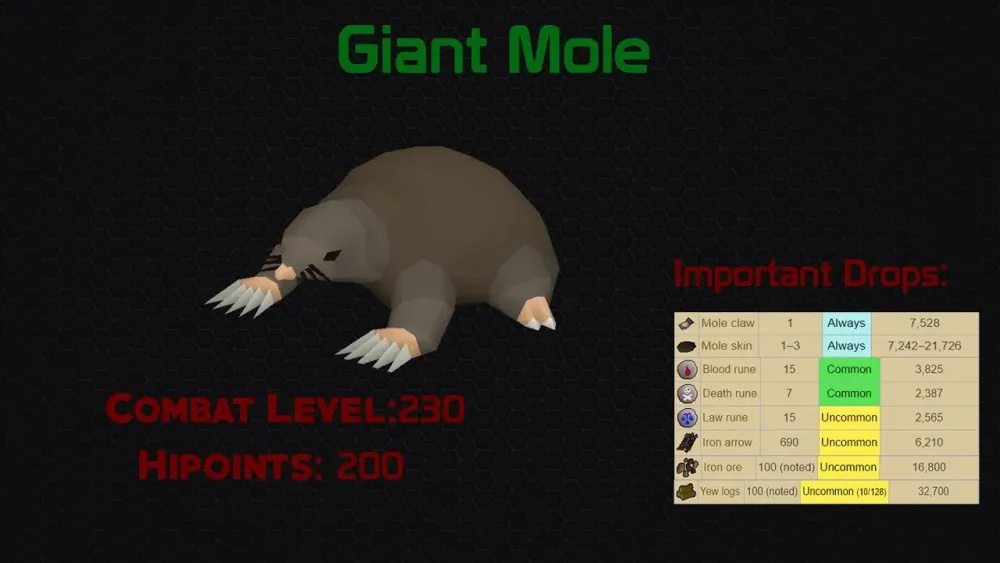
100% Drops: Guaranteed Loot
Every Giant Mole kill guarantees the following items:
- Mole Claw (1): Traded to Wyson for a bird nest, typically worth around 4-5k GP.
- Mole Skin (1-3): Also traded for bird nests, with an average of 2 per kill, adding another 8-10k GP.
- Big Bones (1): A minor addition, worth about 200 GP.
With the Falador Hard Diary completed, these drops become noted, allowing for longer trips and more efficient farming. The guaranteed loot alone makes the Giant Mole a steady money-maker, averaging 12-15k GP per kill from these items.
Main Drops: Common Loot
Beyond the 100% drops, the Giant Mole offers a variety of common items. These drops vary in frequency and value, contributing to the overall profit per hour.
| Item | Quantity | Rarity | Approximate Value (GP) |
|---|---|---|---|
| Mithril Bar | 5-10 (noted) | Common | 3,000-6,000 |
| Yew Logs | 100 (noted) | Common | 20,000 |
| Blood Runes | 15 | Common | 6,000 |
| Rune Med Helm | 1 | Uncommon | 11,000 |
| Air Orb | 15 (noted) | Common | 15,000 |
These items add up over time, with Yew Logs and Air Orbs being particularly valuable for Ironmen or players looking to sell on the Grand Exchange. The Rune Med Helm, while not a game-changer, is a decent mid-tier drop for newer accounts.
Rare Drop Table Access
The Giant Mole has a 4/128 chance to roll the rare drop table (RDT), which can yield high-value items like the Rune Spear or even a Dragon Med Helm. Wearing a Ring of Wealth removes the “nothing” roll, slightly boosting the odds of landing something worthwhile. While RDT drops are infrequent, they can significantly spike your profits when they hit.
Tertiary Drops: The Big Prizes
The tertiary drops are where the Giant Mole shines for collectors and high rollers. These items are rolled independently of the main table, offering a chance at rare and unique rewards.
Baby Mole Pet
The crown jewel of the Giant Mole drop table is the Baby Mole pet, with a drop rate of 1/3,000. This adorable companion is a status symbol for pet hunters, and its rarity keeps players coming back for hundreds—or even thousands—of kills. At 50 kills per hour, it’s a long grind, but the payoff is worth it for many.
Clue Scrolls and Other Tertiaries
Here’s a rundown of the notable tertiary drops:
- Elite Clue Scroll: 1/500 base rate, improved to 1/475 with elite Combat Achievements unlocked. A reliable source for clue hunters.
- Brimstone Key: Dropped only on Konar Slayer tasks, with a rate based on combat level (e.g., 1/100 at level 200). Opens the Brimstone Chest for extra loot.
- Long Bone: 1/400 chance, traded for 1,500 Construction XP.
- Curved Bone: 1/5,000 chance, worth 6,000+ Construction XP.
The Elite Clue Scroll is a standout, making the Giant Mole one of the best bosses for clue enthusiasts. The bones, while niche, are a boon for Ironmen training Construction.
Maximizing Profits from the Giant Mole
To get the most out of the Giant Mole drop table, efficiency is key. Here’s how to optimize your trips and boost your GP per hour.
Recommended Gear and Setup
For high-level players, Dharok’s armor with 1 HP (using a Dwarven Rock Cake) and Protect from Melee is the fastest method, often killing the Mole in 2-3 hits. Alternatively, a Twisted Bow or Tumeken’s Shadow offers top-tier damage, especially with the Mole’s 50% weakness to water spells. Mid-level players can use Void Knight gear or standard melee setups with a stab weapon, as the Mole has lower stab defense.
Falador Hard Diary Benefits
Completing the Falador Hard Diary is a game-changer. The Falador Shield 3 or 4 provides a mole locator on your minimap, eliminating the tedious search when the Mole burrows. Plus, noted mole claws and skins mean you can stay in the lair longer, pushing your kills per hour closer to 50-60, netting 600k-800k GP.
Tips and Tricks for Giant Mole Farming
Here are some practical strategies to make your Giant Mole runs smoother and more rewarding:
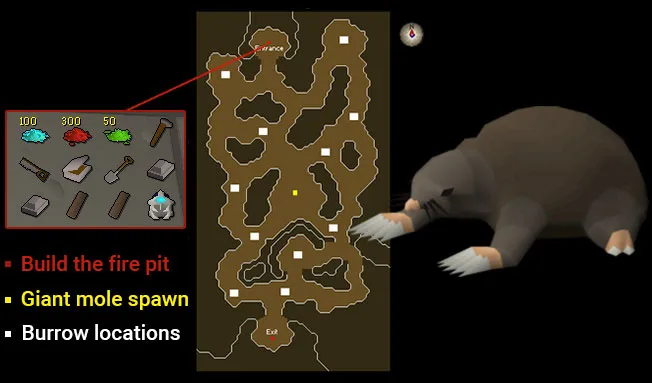
Light Source Management
Bring a covered light source like a Bullseye Lantern or Firemaking Cape to avoid extinguishment when the Mole burrows. If you’ve completed Making Friends with My Arm, light the Fire of Eternal Light in the lair for permanent illumination.
Dealing with Burrowing
The Mole has a 25% chance to burrow when its health is between 5% and 50%, unless hit by a splashing magic attack. High-damage setups minimize this annoyance, but without the Falador Shield, be prepared to chase it across the lair. Stamina potions help keep your energy up during the pursuit.
Profit Per Hour Breakdown
Assuming 50 kills per hour with the Hard Diary completed:
- Guaranteed Drops: ~12,000 GP/kill x 50 = 600,000 GP
- Main Drops: ~5,000-10,000 GP/kill x 50 = 250,000-500,000 GP
- Tertiary/RDT: Variable, but occasional big hits (e.g., Elite Clues at 50k-1M+)
Total profit typically ranges from 700k to 1M GP per hour, depending on luck with tertiary drops.
Conclusion: Is the Giant Mole Worth Farming?
The Giant Mole’s drop table offers a balanced mix of guaranteed income, useful resources, and rare collectibles, making it a worthwhile target for many OSRS players. Its accessibility and moderate difficulty ensure it remains a staple in the bossing community, whether you’re after profit, pets, or clues. With the right setup and diary rewards, you can turn Mole hunting into a lucrative and enjoyable grind. So grab your spade, light your lantern, and dive into the Mole Lair—there’s loot waiting to be unearthed!
