Your cart is empty

OSRS Bloodveld Slayer Guide Best Strategies Locations and Gear
Bloodvelds are a popular Slayer monster in Old School RuneScape (OSRS), known for their grotesque appearance, high hitpoints, and rewarding drops. Requiring a Slayer level of 50, they’re a great mid-tier task for players aiming to level up Slayer while earning decent loot. This comprehensive OSRS Bloodveld Slayer Guide covers the best locations, gear setups, strategies, and tips to maximize efficiency, whether you’re a beginner or a seasoned player. Let’s dive into everything you need to know to slay Bloodvelds like a pro!
Bloodvelds are demonic creatures that attack with magic-based melee, meaning your magic defense determines their attack accuracy, despite their melee-style hits. They have high hitpoints but low defense, making them ideal for fast experience rates. To damage Bloodvelds, you need a Slayer level of 50, and they can be assigned by Slayer Masters like Vannaka, Chaeldar, Nieve, Duradel, or Konar quo Maten.
Key Requirements
- Slayer Level 50: Mandatory to deal damage to Bloodvelds.
- Quest Access: Priest in Peril for Slayer Tower; partial progress in Sins of the Father for Meiyerditch Laboratories; Song of the Elves for Iorwerth Dungeon.
- Gear: High magic defense armor (e.g., dragonhide) and a strong weapon for your combat style.
- Optional: Morytania Diary for Slayer XP boosts or Kourend & Kebos Diary for Ash Sanctifier to gain Prayer XP from Vile Ashes.
Best Locations to Slay Bloodvelds
Choosing the right location depends on your goals—whether you prioritize XP, profit, or AFK potential. Below are the top spots to find Bloodvelds, each with unique advantages.
Stronghold Slayer Cave
Located beneath the Tree Gnome Stronghold, this cave is the go-to for cannon users due to its proximity to a bank and multiple spawns (12 Bloodvelds).
- Pros: Cannon-friendly, close to bank, safespot options.
- Cons: Can be crowded, especially in peak hours.
- Access: Use a Slayer Ring or Spirit Tree to Gnome Stronghold, then run southwest to the cave entrance.
- Safespot: Stand in the east room, north of rocks and east of a pillar, or in the northeast section with a cannon.
Catacombs of Kourend
Home to Mutated Bloodvelds (18 spawns), this multi-combat area offers better loot and XP but is more challenging.
- Pros: Drops Ancient Shards and Dark Totem pieces, AFK potential, ideal for bursting.
- Cons: No cannon support, requires Kourend access.
- Access: Kourend Castle Teleport (66 Magic, 60% Arceuus favor).
- Safespot: Use ranged attacks from behind rocks or slopes to avoid damage.
Slayer Tower
In Morytania, the Slayer Tower has 15 Bloodveld spawns on the second floor and basement, making it great for safespotting.
- Pros: Up to 10% Slayer XP boost with Morytania Diary, multiple safespots.
- Cons: No cannons, can be busy.
- Access: Slayer Ring, Fairy Ring (C K S), or Salve Graveyard teleport.
- Safespots: Northeastern corner of the center room behind the chair or next to armor stands in the basement.
Meiyerditch Laboratories
Accessible after partial completion of Sins of the Father, this multi-combat area has 4 Mutated Bloodveld spawns, perfect for cannoning.
- Pros: High XP and loot, cannonable, less crowded.
- Cons: Requires quest progress, harder to reach.
- Access: Drakan’s Medallion to Ver Sinhaza, then navigate to the labs.
Iorwerth Dungeon
In Prifddinas, this single-combat dungeon suits players with Song of the Elves completed, offering Crystal Shard drops.
- Pros: Unique loot, safespot options.
- Cons: Fewer spawns, no cannons.
- Access: Teleport to Prifddinas via crystal seed or portal nexus.
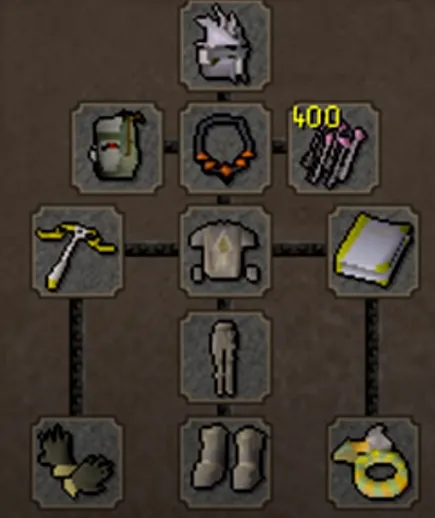
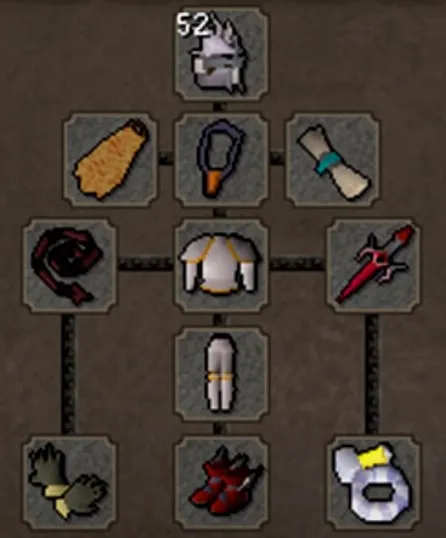
Recommended Gear and Inventory Setups
Your gear and inventory depend on your combat style, budget, and whether you’re safespotting or tanking. Bloodvelds are weak to all combat styles, so prioritize high damage output and magic defense.
Melee Setup
Melee is cost-effective and efficient with Protect from Melee prayer (level 43 Prayer recommended).
| Slot | Best-in-Slot | Budget Alternative |
|---|---|---|
| Head | Slayer Helm (i) | Black Mask |
| Neck | Amulet of Torture | Amulet of Strength |
| Body | Bandos Chestplate | Fighter Torso |
| Legs | Bandos Tassets | Obsidian Platelegs |
| Weapon | Abyssal Whip | Dragon Scimitar |
| Shield | Dragon Defender | Rune Defender |
Inventory: Prayer potions, high-healing food (e.g., sharks), super combat potion, teleport (Slayer Ring), cannon and cannonballs (if applicable), nature runes for High Alchemy.
Ranged Setup
Ranged is ideal for safespotting, with high magic defense armor to reduce damage.
- Best-in-Slot: Slayer Helm (i), Necklace of Anguish, Armadyl Chestplate, Armadyl Chainskirt, Toxic Blowpipe, Ava’s Assembler.
- Budget: Black Mask, Amulet of Glory, Black Dragonhide Body/Chaps, Rune Crossbow, Ava’s Accumulator.
- Inventory: Ranging potions, food, teleport, broad bolts or amethyst arrows, prayer potions.
Magic Setup
Magic is great for bursting Mutated Bloodvelds in the Catacombs of Kourend.
- Best-in-Slot: Slayer Helm (i), Occult Necklace, Ancestral Robe Top/Bottom, Trident of the Swamp, Imbued God Cape.
- Budget: Black Mask, Amulet of Glory, Ahrim’s Robetop/Skirt, Mystic Staff.
- Inventory: Runes for Ice Burst/Barrage, prayer potions, food, teleport, rune pouch.
Combat Strategies for Bloodvelds
Bloodvelds are relatively easy to kill due to their low defense, but their magic-based melee attacks require preparation. Here are the best strategies for different playstyles.
Melee Tanking
Use Protect from Melee to nullify damage and focus on high-damage weapons. Position yourself to avoid being surrounded, especially in multi-combat areas. Drink super combat potions and use Piety for maximum DPS. This method is great for Stronghold Slayer Cave or Slayer Tower.
Safespot Ranging
Safespotting is perfect for low-defense players or Ironmen. Lure Bloodvelds to a safespot (e.g., behind a chair in Slayer Tower or rocks in Catacombs) and attack with a crossbow or blowpipe. Ensure you have high magic defense armor to minimize any accidental hits.
Bursting Mutated Bloodvelds
For maximum XP (up to 70k Slayer XP/hr), use Ice Burst or Barrage in the Catacombs of Kourend. This requires two accounts: a main to cast spells and an alt to stack Bloodvelds.
- With your main, aggro all Bloodvelds in the area.
- Stand on a designated tile (e.g., tile 1 in the Catacombs).
- Use the alt to move between tiles to stack Bloodvelds tightly.
- Cast Ice Burst/Barrage on the stack for multi-target damage.
Note: This method is rune-intensive but offers unmatched XP rates. Solo bursting is possible but less efficient (around 50k XP/hr).
Cannon Method
In Stronghold Slayer Cave or Meiyerditch Laboratories, set up a dwarf multicannon in the northeast section to hit multiple Bloodvelds. Combine with melee or ranged attacks for faster kills. This method requires significant gold for cannonballs but speeds up tasks considerably.
Drops and Rewards
Bloodvelds are profitable due to their high yield of blood runes, alchables, and unique drops, especially from Mutated variants. Below is a summary of key drops.
Regular Bloodveld Drops
- Always: Vile Ashes (100% drop, use with Ash Sanctifier for Prayer XP).
- Notable: Blood Runes (3–30), Fire Runes (60), Mithril Chainbody, Rune Med Helm, Coins (10–450).
- Rare: Ensouled Bloodveld Head (1/35), Clue Scroll (Hard, 1/256).
Mutated Bloodveld Drops
- Unique: Ancient Shards, Dark Totem pieces (Catacombs), Crystal Shards (Iorwerth Dungeon).
- Superior Variants: Insatiable Bloodveld (2,900 XP) or Insatiable Mutated Bloodveld (4,100 XP), with three rolls on the drop table and a 1/111 chance for Superior Slayer items.
Profit Tips
- Bring nature runes to High Alch drops like Mithril items or Rune Med Helms.
- Use a Bracelet of Slaughter to extend tasks for more XP and loot.
- Ironmen should prioritize Bloodvelds for blood runes, essential for Magic training.
With this OSRS Bloodveld Slayer Guide, you’re ready to tackle these demons efficiently. Whether you’re cannoning in Meiyerditch, bursting in the Catacombs, or safespotting in the Slayer Tower, there’s a strategy for every playstyle. Happy slaying!
