Your cart is empty

Monkey Madness 1 OSRS Quick Guide
Monkey Madness 1 is one of the most iconic quests in Old School RuneScape (OSRS), taking players to the treacherous Ape Atoll to unravel a mystery surrounding the missing 10th Squad. This master-level quest is part of the Gnome quest series and offers fantastic rewards, including access to the Dragon Scimitar. In this quick guide, we’ll walk you through the steps to complete Monkey Madness 1 efficiently, with tips to navigate its challenges and avoid common pitfalls. Whether you’re a seasoned adventurer or a first-timer, this guide will help you conquer the quest and claim its rewards.
Before diving into Monkey Madness 1, ensure you meet the prerequisites and come prepared to face Ape Atoll’s dangers. This quest is notorious for its hazardous environment, so proper preparation is key.
Quest Prerequisites
- Completed Quests: The Grand Tree and Tree Gnome Village.
- Skills: No specific skill requirements, but 43 Prayer is highly recommended for protection prayers.
- Combat: Ability to defeat a level 195 Jungle Demon (safespot available).
Recommended Items
- Gold Bar: Required for crafting the M’Speak Amulet.
- Ball of Wool: Needed to complete the M’Speak Amulet.
- Monkey Bones or Corpse: Obtainable during the quest if you don’t have them.
- Food: High-healing food (e.g., sharks or monkfish) for dungeon navigation.
- Potions: Antipoison, prayer potions, stamina/energy potions.
- Teleportation: Ring of Dueling, Ardougne Cloak, or Al Kharid teleport for quick travel.
- Optional: Lockpick for escaping the jail, plank for dungeon traps, and combat gear for the final boss.
Starting the Quest
Monkey Madness 1 begins at the Grand Tree in the Tree Gnome Stronghold. Follow these steps to kick off your adventure.
Speaking to King Narnode Shareen
Head to the Grand Tree and speak to King Narnode Shareen on the ground floor. He’ll inform you that the 10th Squad, sent to decommission a shipyard in Karamja, has gone missing. He gives you the Gnome Royal Seal and tasks you with investigating the shipyard. Ensure you have at least one free inventory space, as the seal will drop to the ground if your inventory is full.
Traveling to Karamja
Climb to the top of the Grand Tree and take the glider to Gandius (Karamja). If you don’t have monkey bones or a corpse, kill a nearby monkey west of the glider landing site. Note: If you’ve started Tai Bwo Wannai Trio, monkeys will drop corpses instead, which are also usable. Head north to the shipyard gate and speak to G.L.O. Caranock in the southern building. He’ll act suspicious and send you back to the king.
Returning to the Grand Tree
Use a Ring of Dueling to teleport to the Al Kharid PvP Arena, then take the Al Kharid glider back to the Grand Tree. Speak to King Narnode again, who will give you Narnode’s Orders (ensure one inventory space is free). Head to the east side of the first floor (second floor in US terms) and talk to Daero at Blurberry’s Bar. Go through all chat options (1•4•2•4•3•4•4•1) to be teleported to a hangar.
Navigating Ape Atoll
Ape Atoll is a dangerous area where all creatures (except level 5 birds) are aggressive unless you’re in monkey form. Bring plenty of food, antipoisons, and an emergency teleport, and turn off auto-retaliate to avoid unnecessary combat.
Crash Island and Ape Atoll
In the hangar, speak to Daero, then solve the sliding puzzle in the southeastern corner (or pay Glough 200,000 coins in the Tree Gnome Stronghold to skip it). After the cutscene, talk to Waydar, then Lumdo, to sail to Crash Island. Convince Lumdo (chat option 4) to take you to Ape Atoll. Upon arrival, you’ll be attacked by poisoned arrows and imprisoned.
Escaping the Jail
In the jail, avoid standing near the cell walls to prevent damage from monkey guards. Wait for a guard to head to the switch room, then pick the lock (a lockpick helps) and run north to the grass area. Stay at least two squares away from guards to avoid being recaptured. Speak to Karam in the bushes near the crafting shop, then head south through the grass (activate Protect from Missiles for open areas) to find Garkor east of the monkey palace.
Obtaining the M’Speak Amulet
From Garkor, go west through the grass to a U-shaped building with a bamboo door. Stay on the dark brown floor to avoid detection. Search the stacked crates on the light brown floor for Monkey Dentures, then search the southeastern crate (chat option 1) to fall into a cave (heal up to avoid fall damage). In the cave, search the northwestern crates for a M’amulet Mould. Teleport out to resupply at a bank.
Ape Atoll Dungeon
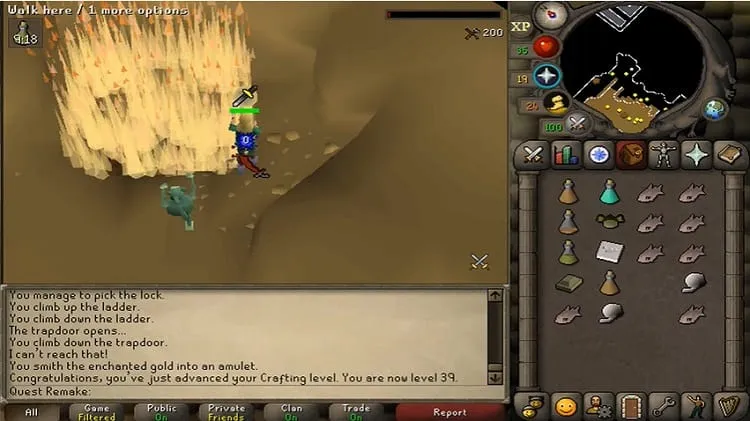
Return to Ape Atoll via Daero, Waydar, and Lumdo. Follow the yellow path west and climb down the ladder into the Ape Atoll Dungeon. Activate Protect from Melee, ignore hazards, and run to the end, using food, antipoisons, and stamina potions as needed. Speak to Zooknock and use your Monkey Dentures, M’amulet Mould, and Gold Bar on him to receive an Enchanted Bar. Use the Ball of Wool on the Enchanted Bar to craft the M’Speak Amulet.
Becoming a Monkey
To blend in on Ape Atoll, you’ll need a Monkey Greegree to transform into a monkey, allowing safe navigation without aggression from the island’s inhabitants.
Acquiring the Monkey Talisman
Teleport out and return to Ape Atoll. Equip the M’Speak Amulet and head to the monkey child’s house (east of the dungeon entrance). Talk to the Monkey Child (chat options 2•1) when the aunt is away to get a Monkey Talisman. You may need to repeat this step for additional talismans if planning for Recipe for Disaster.
Crafting the Greegree
Return to the Ape Atoll Dungeon with the Monkey Talisman and Monkey Bones (or corpse). Run through the dungeon again, using Protect from Melee. Give Zooknock the talisman and bones to receive a Karamjan Monkey Greegree. For additional greegrees (e.g., Ninja, Zombie, Gorilla), bring more talismans and specific monkey bones.
Rescuing the Monkey
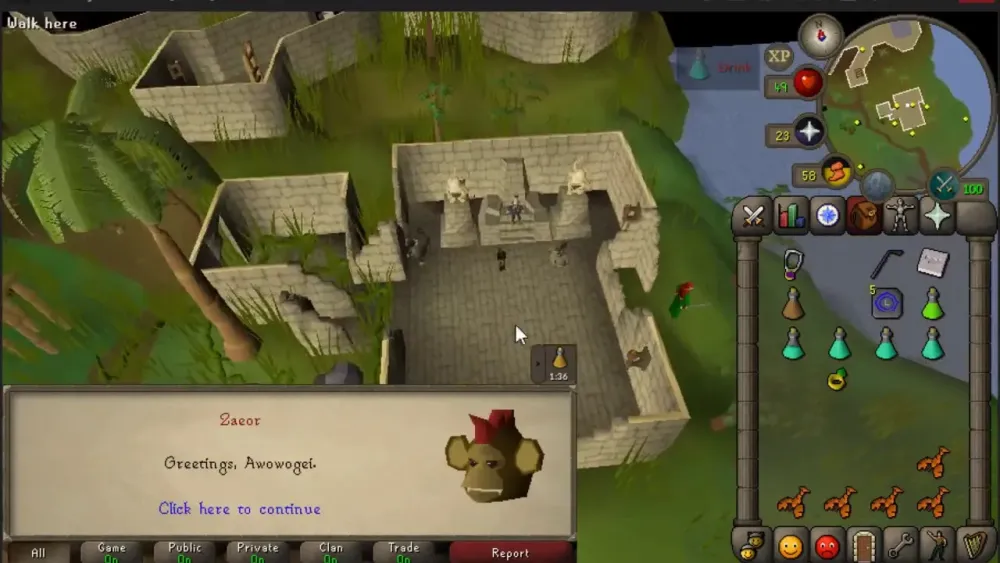
Teleport to Ardougne, equip the Karamjan Monkey Greegree, and speak to the Monkey Minder at the zoo. Talk to a monkey to have it jump into your backpack, then unequip the greegree and speak to the minder again. Walk (do not teleport) to the Grand Tree, then return to Ape Atoll. Equip the greegree and M’Speak Amulet, follow the red path to the monkey palace, and speak to King Awowogei via an Elder Guard. Deliver the rescued monkey, then talk to Garkor to receive the 10th Squad Sigil.
Defeating the Jungle Demon
The final challenge is defeating the level 195 Jungle Demon. With the right strategy, this fight is manageable even for lower-level players.
Preparing for the Fight
Stock up on high-healing food, prayer potions, and antipoison. Equip combat gear and the 10th Squad Sigil. Ensure you have a weapon suitable for your combat style (ranged or magic recommended for safespotting).
Fight Strategy
Right-click the 10th Squad Sigil to teleport to the Jungle Demon’s arena. Activate Protect from Magic and stay out of melee range to avoid heavy damage. Use a safespot (e.g., behind a tree or rock) to attack with ranged or magic while the 10th Squad weakens the demon. If using melee, prayer flick between Protect from Melee and Magic based on the demon’s attack animations. Once defeated, speak to Garkor, then Zooknock, to return to Ape Atoll. Teleport out quickly to avoid damage.
Quest Completion
Return to the Grand Tree and speak to King Narnode Shareen to complete the quest. Speak to Daero for your experience rewards, choosing either:
| Option | Experience Reward |
|---|---|
| Option 1 | 35,000 Attack, 35,000 Defence, 20,000 Strength, 20,000 Hitpoints |
| Option 2 | 35,000 Strength, 35,000 Hitpoints, 20,000 Attack, 20,000 Defence |
Note for 1-Defence Pures: Avoid speaking to Daero after the quest to prevent gaining Defence XP. You can return to Ape Atoll without training by stopping after killing the Jungle Demon.
Rewards and Tips
Completing Monkey Madness 1 grants:
- 3 Quest Points
- 10,000 Coins
- 3 Diamonds
- Experience: 110,000 total (choose between Attack/Defence or Strength/Hitpoints).
- Access: Full access to Ape Atoll (bank and javelin store unlocked after Monkey Madness II), ability to wield the Dragon Scimitar, and use of the Monkey Greegree.
Additional Tips
- Safespot the Jungle Demon: Use ranged or magic to minimize risk.
- Bank Often: Teleport out to resupply before entering the dungeon or fighting.
- Extra Greegrees: Collect multiple talismans and bones for Ninja, Zombie, or Gorilla greegrees for future quests like Recipe for Disaster.
- Protect Prayers: Keep Protect from Melee on in the dungeon and Protect from Missiles when navigating open areas on Ape Atoll.
With this guide, you’re ready to tackle Monkey Madness 1 and claim its rewards. Brave Ape Atoll, outsmart the hostile monkeys, and emerge victorious! For more OSRS quest guides, check out our other posts or visit the OSRS Wiki. Happy adventuring!
