Your cart is empty

Monkey Madness 1 OSRS Guide – Ultimate Quest Walkthrough
Monkey Madness 1 is a cornerstone quest in Old School RuneScape (OSRS), renowned for its challenging gameplay and rewarding outcomes. This master-level quest takes you to the treacherous Ape Atoll, where you’ll navigate deception, combat, and puzzles to help King Narnode Shareen locate his missing 10th Squad. Completing this quest unlocks the coveted Dragon Scimitar and access to Ape Atoll, making it a must for adventurers. In this comprehensive guide, we’ll break down the requirements, step-by-step walkthrough, combat strategies, and tips to ensure you conquer Monkey Madness 1 with ease.
Before diving into Monkey Madness 1, ensure you meet the prerequisites and come prepared to tackle Ape Atoll’s dangers. Proper preparation minimizes frustration and boosts your chances of success.
Quest and Skill Requirements
To start Monkey Madness 1, you must complete the following quests:
- The Grand Tree
- Tree Gnome Village
While no specific skill levels are mandatory, the following are recommended for a smoother experience:
- 43 Prayer (for Protect from Melee and Protect from Magic)
- 50+ Combat Stats (Attack, Strength, Defence, Hitpoints)
- 30+ Agility (to navigate Ape Atoll’s terrain)
Items Needed
Gather these items before starting the quest:
| Item | Purpose |
|---|---|
| Gold Bar | Crafting the M’Speak Amulet |
| Ball of Wool | Crafting the M’Speak Amulet |
| Monkey Bones or Corpse | Creating the Monkey Greegree |
| Gnome Royal Seal | Given by King Narnode |
| High-Healing Food (e.g., Sharks) | Surviving combat and traps |
| Antipoison Potions | Countering poison from spiders and snakes |
| Prayer Potions | Maintaining protection prayers |
| Energy/Stamina Potions | Running through Ape Atoll Dungeon |
| Lockpick (Optional) | Escaping jail |
Tip: Bring extra monkey bones and talismans if you plan to complete the “Freeing King Awowogei” subquest in Recipe for Disaster later, as you’ll need additional greegrees.
Step-by-Step Quest Walkthrough
Monkey Madness 1 is divided into four chapters. Follow these steps to navigate the quest efficiently.
Chapter 1: Starting the Quest
- Head to the Tree Gnome Stronghold and speak to King Narnode Shareen in the Grand Tree’s base. He tasks you with investigating Glough’s old shipyard for traces of the 10th Squad and gives you the Gnome Royal Seal.
- Take the glider from the top of the Grand Tree to Karamja (Gandius). If you don’t have monkey bones, kill a nearby monkey to obtain them.
- Go north to the Shipyard and speak to G.L.O. Caranock in the southern building. He acts suspiciously and tells you to return to the King.
- Return to King Narnode via glider. He gives you Narnode’s Orders and instructs you to speak to Daero on the 1st floor (east side) of the Grand Tree.
Chapter 2: Arriving at Ape Atoll
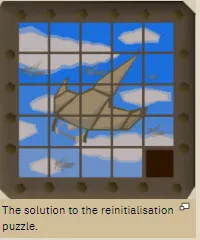
- Talk to Daero (Chat 1-4-2-4-3-4-4-1) to be taken to the hangar. Solve the sliding puzzle on the southeastern panel (or pay Glough 200,000 GP to skip it).
- After the cutscene, speak to Daero, then Waydar, to fly to Crash Island.
- Talk to Lumdo, then Waydar (Chat 4), and finally Lumdo again to sail to Ape Atoll.
- Upon arriving, you’ll be attacked by poisoned arrows and imprisoned. Pick the lock on your cell (stay 2 squares away from guards to avoid damage) and escape when the guard heads to the switch room.
- Head north to the grass, staying in the jungle grass to avoid archer monkeys. Speak to Karam in the bushes near the crafting shop.
- Travel south, then east, in the grass to reach Garkor near the castle. Complete all dialogue to proceed.
Chapter 3: Crafting the M’Speak Amulet and Greegree
- Go west through the grass to the bamboo door of a hut. Stay on the dark brown floor to avoid detection. Search the stacked crates for Monkey Dentures and the southeastern crate to fall into a cave (Chat 1). Heal up to avoid fall damage.
- In the cave, search the northwest crates for an M’amulet Mould. Teleport to a bank to resupply.
- Return to Ape Atoll via Daero, Waydar, and Lumdo. Follow the yellow path west and enter the Ape Atoll Dungeon. Use Protect from Melee, eat food, and drink potions to survive traps and enemies.
- At the dungeon’s end, speak to Zooknock and use your Monkey Dentures, M’amulet Mould, and Gold Bar on him to receive an Enchanted Bar and the mould back.
- Teleport to a bank, use the Enchanted Bar with a furnace to create an Unstrung Amulet, and combine it with a Ball of Wool to make the M’Speak Amulet.
- Return to Ape Atoll and speak to the Monkey Child in the northwest house (Chat 2-1). Give him 5 bananas (pickable nearby) to receive a Monkey Talisman. Repeat for additional talismans if needed.
- Re-enter the Ape Atoll Dungeon, give Zooknock a Monkey Talisman and Monkey Bones to receive a Karamjan Monkey Greegree. Use different bones for other greegrees (e.g., Ninja, Zombie, Gorilla).
Chapter 4: The Final Battle
- Equip the M’Speak Amulet and Karamjan Monkey Greegree. Head to Ardougne Zoo, transform into a monkey, and talk to the Monkey Minder. Speak to a monkey to put it in your inventory.
- Travel by foot to the Grand Tree (no teleportation, or the monkey will disappear). Fly back to Ape Atoll, equip the greegree, and speak to an Elder Guard to meet King Awowogei.
- Talk to Awowogei, then the Monkey Minder again, to release the monkey. Speak to Awowogei to discuss an alliance, then talk to Garkor to receive the 10th Squad Sigil.
- Prepare for the Jungle Demon (Level 195). Equip the sigil, use Protect from Magic, and stay out of melee range. Attack with ranged or magic, or let the 10th Squad weaken it before finishing it off.
- After defeating the demon, speak to Garkor, then Zooknock to return to Ape Atoll. Teleport out, return to the Grand Tree, and talk to King Narnode to complete the quest.
Combat Strategies for the Jungle Demon
The Jungle Demon is the quest’s toughest challenge, but with the right strategy, you can defeat it efficiently.
Safespotting with Ranged or Magic
Use Protect from Magic to block the demon’s magic attacks and stay out of melee range. Position yourself behind a tree or rock to safespot, attacking with a crossbow, bow, or magic spells like Fire Bolt. This method minimizes damage and is ideal for lower-level players.
Melee with Prayer Flicking
For melee users, alternate between Protect from Melee and Protect from Magic based on the demon’s attack animations. Stay stocked with prayer potions and high-healing food. Hit-and-run tactics can reduce damage taken.
Using the 10th Squad
The 10th Squad will assist in the fight, dealing significant damage to the demon. Let them weaken it while you stay safe, then deliver the final blow to ensure you get the kill credit. This is a low-risk strategy for underprepared players.
Rewards and Benefits
Completing Monkey Madness 1 yields substantial rewards:
- 3 Quest Points
- 10,000 Coins
- 3 Diamonds
- Experience Reward: Choose between 35,000 XP in Attack and Defence + 20,000 XP in Strength and Hitpoints, or vice versa, by speaking to Daero.
- Dragon Scimitar Access: Ability to buy and wield this powerful weapon.
- Monkey Greegree: Transform into a monkey on Ape Atoll and Ardougne Zoo.
- Ape Atoll Access: Full access (bank and javelin store unlocked after Monkey Madness II).
Note: 1-Defence pures should avoid speaking to Daero post-quest to prevent gaining Defence XP, but this restricts returning to Ape Atoll.
Tips for Success
Maximize your efficiency and safety with these tips:
- Use Runelite’s Quest Helper: This plugin highlights steps and items, reducing errors.
- Turn Off Auto-Retaliate: Prevents accidental attacks on aggressive monkeys.
- Bank Frequently: Restock food, potions, and antipoison before entering the Ape Atoll Dungeon.
- Watch Guard Patterns: Time your jail escape to avoid detection.
- Bring a One-Click Teleport: Essential for emergencies on Ape Atoll.
Pro Tip: If you’re struggling with the Jungle Demon, practice prayer flicking in the Nightmare Zone post-quest, where you can refight the demon.
Common Challenges and Solutions
Monkey Madness 1 can be daunting, but these solutions address common issues:
Getting Caught in Jail
Time your escape when the guard moves to the switch room. Stay 2 squares away from guards and use the grass to avoid archers. If caught, try again with a lockpick for faster escapes.
Surviving Ape Atoll Dungeon
Keep Protect from Melee active, use antipoison for spiders, and bring a plank for claw traps. Run through hazards, eating food as needed, and drink stamina potions to maintain energy.
Puzzle Frustration
The sliding puzzle can be tricky. Use Runelite’s puzzle solver or pay Glough 200,000 GP to skip it. Take breaks if you feel stuck to avoid burnout.
Monkey Madness 1 is a thrilling yet challenging OSRS quest that tests your combat, navigation, and puzzle-solving skills. With this guide, you’re equipped to tackle Ape Atoll’s dangers, defeat the Jungle Demon, and claim your rewards. Prepare thoroughly, stay patient, and enjoy the adventure. Happy questing!
