Your cart is empty

Lizardman Shamans OSRS Ultimate Guide
In Old School RuneScape (OSRS), Lizardman Shamans are formidable foes that attract players for their lucrative drops, challenging combat, and unique mechanics. Found primarily in the Lizardman Canyon and other select locations, these giant reptilian humanoids are a staple for mid-to-high-level players seeking the coveted Dragon Warhammer. This comprehensive guide covers everything you need to know about Lizardman Shamans, including their locations, combat strategies, drops, and tips for maximizing efficiency.
Lizardman Shamans are high-level monsters with a combat level of 150, requiring careful preparation to tackle effectively. They are part of the Lizardmen Slayer category and can be assigned as a task by Slayer masters like Chaeldar, Konar, Nieve, or Duradel. Their unique abilities and multi-combat environments make them a challenging yet rewarding target.
Key Characteristics
- Combat Level: 150
- Hitpoints: 150
- Attack Style: Crush (Melee) and Ranged
- Max Hit: 31 (Melee), 21 (Ranged)
- Poisonous: Yes (deals 10 damage)
- Slayer Requirement: Level 1 (but higher recommended for efficiency)
Why Fight Lizardman Shamans?
Players are drawn to Lizardman Shamans for their rare drops, particularly the Dragon Warhammer, a powerful special attack weapon valued for its ability to lower an opponent’s Defence. Additionally, they offer decent Slayer experience (157.5 per kill) and other valuable loot, making them a popular choice for both profit and training.
Locations and Access
Lizardman Shamans are found in specific areas of Gielinor, each with unique access requirements and combat dynamics. Knowing where to find them and how to prepare is crucial for a successful trip.
Lizardman Canyon
The primary location for Lizardman Shamans is the Lizardman Canyon, located west of Shayzien in Great Kourend. This multi-combat area houses three shamans in the western section, accessible via handholds.
- Requirements: 100% Shayzien favour, 5% Hosidius favour, and completion of the Client of Kourend quest.
- Getting There: Teleport to Lovakengj with a Xeric’s Talisman or use the Shayzien fairy ring (CIR).
- Tip: Speak to the wounded soldier outside to check how many players are in the western area, helping you avoid crowded worlds.
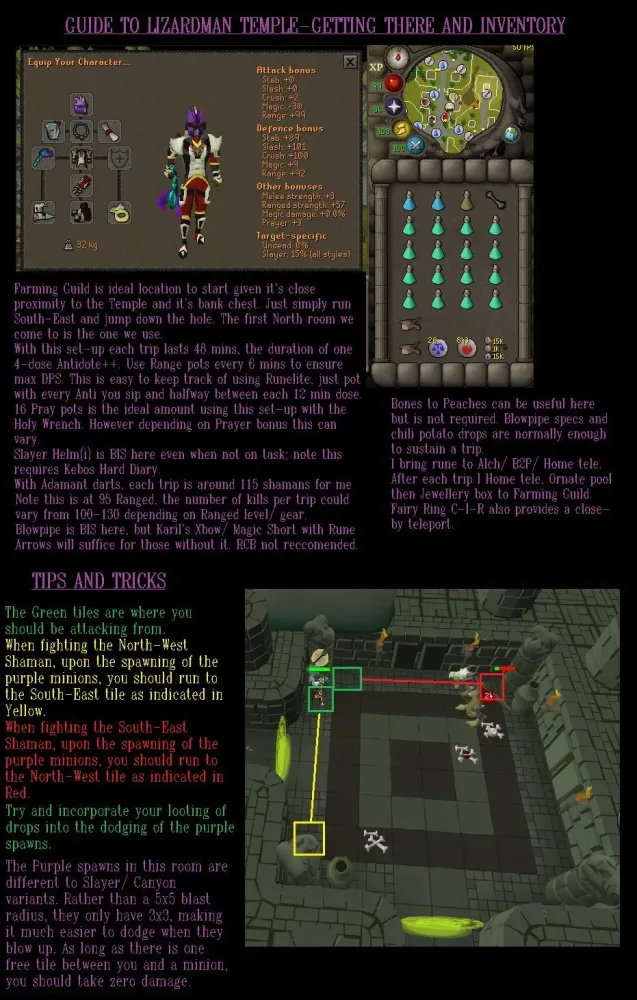
Lizardman Temple
The Lizardman Temple, introduced in 2019, is a single-combat area beneath Molch, ideal for solo players. Shamans here wear a pernicious olmic headdress and are slightly smaller (2×2 tiles).
- Requirements: 100% Shayzien favour and partial completion of The Depths of Despair quest.
- Getting There: Use the fairy ring (DJR) or teleport to Xeric’s Glade.
- Advantage: Single-combat reduces the risk of being overwhelmed by multiple shamans.
Chambers of Xeric
Lizardman Shamans also appear as a boss encounter in the Chambers of Xeric raid, but this guide focuses on their surface variants. Their mechanics in raids are similar, though scaled for group combat.
Combat Strategies

Fighting Lizardman Shamans requires a solid understanding of their attack patterns and abilities. They use a combination of melee, ranged, and special attacks, making them dangerous without proper preparation.
Shaman Attack Patterns
Lizardman Shamans have three main attack types:
- Melee (Crush): A powerful close-range attack dealing up to 31 damage.
- Ranged: A projectile attack with a max hit of 21.
- Special Attacks:
- Acid Spit: A green projectile that creates a 3×3 poison pool, dealing rapid damage if you stand in it.
- Minion Spawn: Summons three lizardman minions that attack with melee and ranged.
- Jump Attack: The shaman leaps to a new position, dealing 20–25 damage in a 3×3 area if you’re caught in the landing zone.
Recommended Gear
Your gear setup depends on whether you’re using melee, ranged, or magic, but prioritizing high Defence and Prayer bonuses is key. Below is a recommended setup for melee, the most common approach:
| Slot | Item |
|---|---|
| Head | Slayer Helmet (i) or Neitiznot Faceguard |
| Cape | Fire Cape or Infernal Cape |
| Neck | Amulet of Torture or Amulet of Glory |
| Body | Bandos Chestplate or Fighter Torso |
| Legs | Bandos Tassets or Obsidian Platelegs |
| Weapon | Abyssal Whip or Dragon Scimitar |
| Shield | Dragon Defender or Dragonfire Shield |
| Hands | Barrows Gloves or Combat Bracelet |
| Feet | Primordial Boots or Dragon Boots |
| Ring | Berserker Ring (i) or Ring of Suffering |
Inventory Setup
A well-planned inventory ensures prolonged trips and survivability:
- Prayer Potions (4–6): To maintain Protect from Melee.
- Super Combat Potion (1): Boosts Attack, Strength, and Defence.
- Antipoison (2): To counter their poisonous attacks.
- Food (Sharks or Monkfish): For healing.
- Teleport (Xeric’s Talisman): For quick escapes.
- Runes (optional): For Blood Barrage or Teleport to House.
Combat Tips
- Use Protect from Melee: This negates their most damaging attack.
- Avoid Special Attacks: Move away from acid pools and jump attack landing zones.
- Kill Minions Quickly: Use area-of-effect attacks like Chinchompas or Ancient Magicks to dispatch summoned minions.
- Safe Spot (Canyon): In the Lizardman Canyon, lure shamans to pillars or corners to avoid multi-combat aggression.
- World Hopping: If the Canyon is crowded, hop worlds to find a quieter one.
Drops and Rewards
Lizardman Shamans are renowned for their valuable drops, making them a profitable Slayer task or off-task activity. Their drop table includes both common and rare items.
Notable Drops
| Item | Drop Rate | GE Value (approx.) |
|---|---|---|
| Dragon Warhammer | 1/5,000 | 30M–40M GP |
| Xerician Fabric | 1/25 | 2,000 GP |
| Rune Med Helm | 1/25 | 11,000 GP |
| Grimy Ranarr Weed | 1/25 | 7,000 GP |
| Lizardman Fang | 1/5 | 50 GP |
Profitability
On average, players can expect 300,000–500,000 GP per hour from common drops, with the potential for massive spikes if the Dragon Warhammer drops. Completing Slayer tasks with a Slayer Ring or Imbued Heart can further boost profits and efficiency.
Tips for Success
Maximizing your time with Lizardman Shamans requires strategic planning and adaptability. Here are some final tips to ensure success:
Preparation Checklist
- Quest Completion: Finish Client of Kourend and The Depths of Despair for access to all locations.
- Shayzien Favour: Achieve 100% favour for unrestricted access.
- Slayer Level: Aim for 70+ Slayer for better task frequency.
- Combat Stats: 80+ Attack, Strength, and Defence recommended.
Efficiency Hacks
- Use Konar for Tasks: Konar’s tasks may assign Lizardman Shamans with a chance for bonus loot via Brimstone Keys.
- Bank at Shayzien: The nearby bank chest minimizes downtime.
- Bring Stamina Potions: Maintain run energy for faster navigation in the Canyon.
- Track Kills: Use a kill counter to estimate your Dragon Warhammer drop odds.
Common Mistakes to Avoid
- Ignoring Special Attacks: Failing to dodge acid pools or jump attacks can lead to quick deaths.
- Undergearing: Low-tier gear makes surviving their high-damage attacks difficult.
- Overcrowding: Avoid peak hours in the Canyon to secure a spot.
With the right gear, strategy, and persistence, Lizardman Shamans in OSRS can be a highly rewarding endeavor. Whether you’re chasing the Dragon Warhammer or grinding Slayer XP, this guide equips you with the knowledge to succeed. Happy hunting!