Your cart is empty

Lizardman Shaman Task OSRS Guide for Efficient Slayer and Loot

The Lizardman Shaman task in Old School RuneScape (OSRS) is a thrilling yet challenging Slayer assignment that draws players for its unique mechanics and valuable drops, most notably the Dragon Warhammer. This guide dives into everything you need to know to tackle this task efficiently, from preparation to combat strategies, gear setups, and maximizing your rewards. Whether you’re a seasoned Slayer or a newcomer aiming for that coveted drop, this post will set you up for success.
What Are Lizardman Shamans?
Lizardman Shamans are giant reptilian humanoids found in the Kebos Lowlands, stronger than regular lizardmen and brutes. They’re exclusive to Slayer tasks assigned by high-level Slayer masters like Chaeldar, Konar, Nieve, or Duradel. You’ll need 100% Shayzien favour to access them, and they’re known for their high-damage special attacks and lucrative loot table.
Why Take on This Task?
The primary allure of Lizardman Shamans is the Dragon Warhammer, a rare drop with a 1/5,000 chance, prized for its special attack that lowers enemy defense in PvM encounters. Other drops like Xeric’s Talisman, Lizardman Fangs, and herb seeds also make this task profitable. Plus, completing the task contributes to Slayer points and Combat Achievements.
Preparation for the Lizardman Shaman Task
Requirements and Recommendations
Before heading out, ensure you meet the following:
- 100% Shayzien Favour: Necessary to fight Shamans in Lizardman Canyon or Caves.
- Slayer Task: Shamans in the Lizardman Caves require an active lizardman task.
- Partial Fairytale II – Cure a Queen: For fairy ring access (code DJR or CIR).
- Hard Kourend & Kebos Diary (Recommended): Enhances Slayer helmet with Shayzien armour effects, reducing acid spit damage.
- 75+ Ranged or Melee Stats: For efficient kills.
Inventory Setup
Your inventory should balance combat sustainability and efficiency. A typical setup includes:
| Item | Purpose |
|---|---|
| Shayzien Armour (Tier 5) | Nullifies acid spit damage |
| Antidote++ (2-3) | Protects against poison from ranged attacks |
| Prayer Potions (4-6) | Sustains Protect from Missiles or Melee |
| Ranging Potions (1-2) | Boosts Ranged for faster kills |
| High-Level Food (10-15) | Sharks or Karambwans for healing |
| Rune Pouch | High Alchemy or Bones to Peaches runes |
| Xeric’s Talisman | Quick teleport to Shayzien |
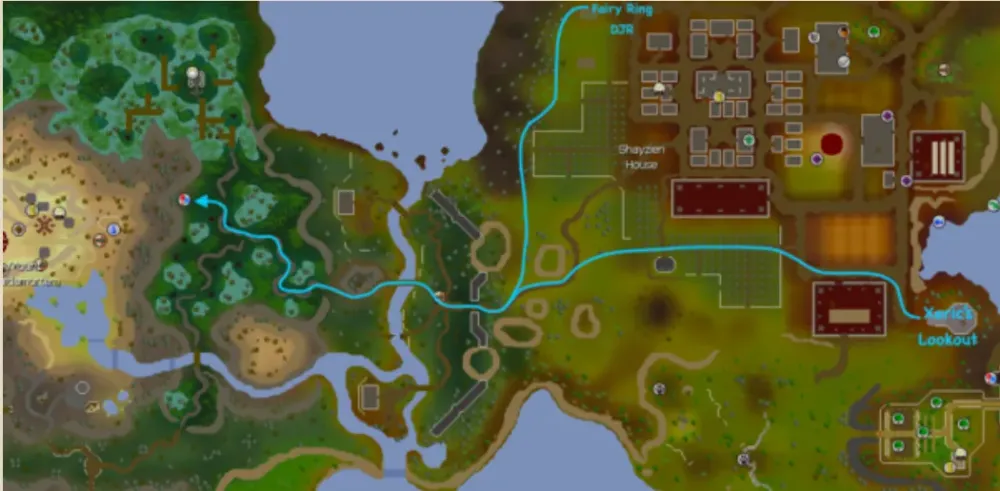
Where to Find Lizardman Shamans
Lizardman Canyon
Located in the western part of Lizardman Canyon, this multi-combat area houses three Shamans. It’s ideal for players using a dwarf multicannon, which can significantly boost kill speed. However, expect aggression from nearby lizardmen and brutes unless you clear them first.
Lizardman Caves
Found at the northern end of the Lizardman Settlement, the Caves contain eight Shamans in a single-way combat area, split into rooms with two Shamans each. This location is task-only, meaning you can only fight here during a Slayer assignment. Cannons are not allowed, making it better for focused, solo combat.
Lizardman Temple
Beneath Molch, the Lizardman Temple offers six Shamans in a compact, single-way area. It’s less crowded than the Canyon and has smaller rooms, reducing the area of effect for special attacks like spawns. This is a top choice for task efficiency.
Combat Strategies for Lizardman Shamans
Shaman Attacks and How to Counter Them
Lizardman Shamans have a mix of standard and special attacks you need to dodge:
- Melee Attack: A close-range crush attack. Use Protect from Melee if within range or stay distant with Ranged.
- Ranged Attack: A poison-capable attack. Activate Protect from Missiles and carry Antidote++.
- Acid Spit: Deals up to 30 unblockable poison damage. Full Shayzien Armour (Tier 5) nullifies this. Without the Hard Diary, swap Slayer helmet for Shayzien helm.
- Jump Attack: Shamans leap to your location, dealing heavy damage. Move immediately when you see them jump. Hugging walls in the Temple prevents this.
- Spawns: Summons three minions, one under you and two nearby, which explode after a delay for 8-10 damage. Run a few tiles away when the screen shakes to avoid them.
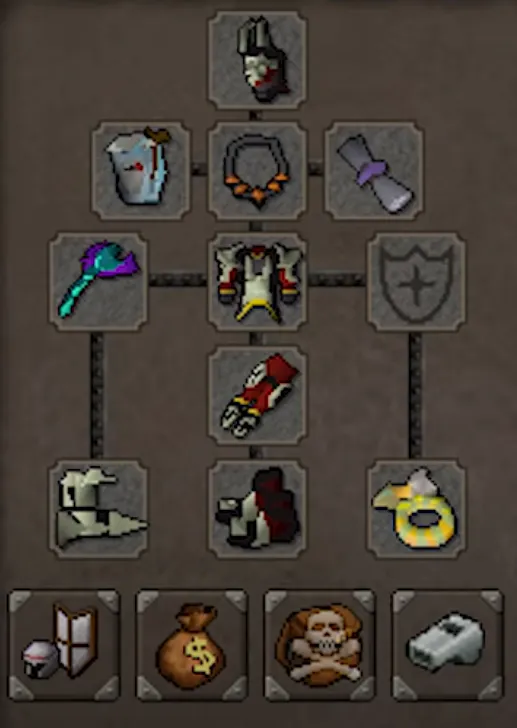
Ranged Setup and Tactics
Ranged is the preferred method due to Shamans’ lack of ranged defense bonuses and your ability to outrange their melee attacks. Recommended gear includes:
- Weapon: Toxic Blowpipe, Bow of Faerdhinen, or Rune Crossbow.
- Armour: Full Shayzien (Tier 5), with Slayer helmet if Hard Diary is complete.
- Accessories: Ava’s Assembler, Necklace of Anguish, Archers Ring (i).
Tactic: In the Temple, stand along the south or west walls to prevent jump attacks. Keep Protect from Missiles active, sip Antidote++ every 15 minutes, and move when spawns appear. Focus on one Shaman at a time in multi-combat areas like the Canyon, setting your cannon in the northwest corner near obstructions for optimal coverage.
Melee Setup and Tactics
Melee is viable but riskier due to Shamans’ melee attacks. Gear up with:
- Weapon: Abyssal Whip, Dragon Scimitar, or Noxious Halberd (to outrange melee).
- Armour: Shayzien (Tier 5), Bandos or Proselyte for prayer bonus.
- Accessories: Amulet of Torture, Berserker Ring (i).
Tactic: Use Protect from Melee and stay one tile away with a halberd to avoid their melee hits. Dodge spawns and acid spit carefully, as you’ll be closer to the action. Melee is best in single-way areas like the Temple to avoid multiple Shamans piling on.
Maximizing Efficiency and Loot
Tips for Faster Kills
To breeze through your task and boost your chances of rare drops:
- Use the Temple: Its layout simplifies dodging special attacks.
- Prayer Flicking: If skilled, flick Eagle Eye with Protect from Missiles to save prayer potions.
- Cannon in Canyon: Place it strategically to hit multiple Shamans, but world-hop if crowded.
- Bones to Peaches: Use tablets or spells to convert Shaman bone drops into food, extending trips.
- Ring of Wealth: Wears it to remove “nothing” drops, slightly improving loot odds.
Loot Table Breakdown
Here’s what you can expect from Lizardman Shamans:
| Drop | Drop Rate | Estimated Value (GP) |
|---|---|---|
| Dragon Warhammer | 1/5,000 | 30M+ |
| Xeric’s Talisman | 1/125 (with Easy Diary) | 100K-200K |
| Lizardman Fang (100) | 19/250 (with Easy Diary) | 20K |
| Noted Herbs | 22.5/250 | 10K-50K |
| Rune Med Helm | 1/25 | 11K |
The average kill is worth around 14,659 GP, or 7,116 GP excluding the Dragon Warhammer, making this task profitable even without the big drop.
Combat Achievements and Slayer Points
Two easy Combat Achievement tasks are tied to Shamans:
- Shayzien Protector: Kill a Shaman without taking damage from its spawns.
- Shaman Slayer: Complete a Lizardman task.
These yield 2 points each and are straightforward with proper dodging. On task, you’ll also earn Slayer experience (157.5 per kill) and points, especially if extended via Konar (130-210 kills).
With this guide, you’re ready to tackle the Lizardman Shaman task in OSRS like a pro. Equip your Shayzien armour, set up your inventory, and head to the Temple or Canyon for a shot at that Dragon Warhammer. Happy Slaying!