Your cart is empty

Lizardman Shaman Molch OSRS Ultimate Guide
In the vast world of Old School RuneScape (OSRS), the Lizardman Shaman in Molch stands out as a challenging yet rewarding monster to tackle. Located in the Kebos Lowlands, these reptilian foes are a hotspot for players hunting the coveted Dragon Warhammer, a weapon prized for its powerful special attack. This guide dives deep into everything you need to know about farming Lizardman Shamans in Molch, from preparation and strategies to gear setups and tips for maximizing efficiency. Whether you’re a seasoned player or new to the grind, read on to master this iconic OSRS activity.
Lizardman Shamans are primarily sought after for their rare drop, the Dragon Warhammer, which boasts a 1/5,000 drop rate and fetches a high price due to its utility in high-level PvM encounters. Beyond the warhammer, they offer decent Slayer experience, Xeric’s Talisman components, and other loot like seeds and runes, making them a profitable endeavor. Molch’s Lizardman Temple, in particular, is a single-way combat area, offering a controlled environment compared to the multi-combat Lizardman Canyon, which reduces the risk of being overwhelmed by multiple shamans.
What Makes Molch Unique?
Unlike other locations, Molch’s Lizardman Temple, accessible via four entrances around the step pyramid, houses six shamans in a compact, single-way combat setup. This makes it ideal for players who prefer focused fights without interference from other monsters or players. The temple’s proximity to an altar dedicated to Xeric also adds lore intrigue, with NPCs like Kaht B’alam providing cultural insights into the lizardmen’s history.
Key Requirements for Molch
Before heading to Molch, ensure you meet these prerequisites:
- 100% Shayzien Favour: Required to kill Lizardman Shamans anywhere in OSRS, earned through Shayzien activities like healing wounded soldiers or completing the Architectural Alliance miniquest.
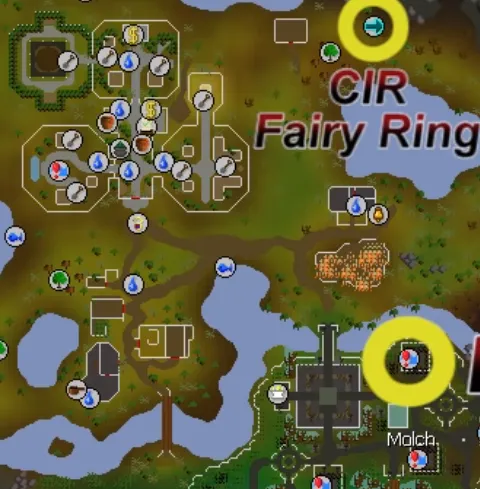
- Partial Completion of Fairytale II – Cure a Queen: Needed for fairy ring access (code DJR) to reach Molch quickly.
- Slayer Task (Optional): Lizardman Shamans count toward lizardmen Slayer tasks, offering bonus experience if assigned by Chaeldar, Konar, Nieve, or Duradel.
- Recommended Combat Stats: At least 80 Ranged or Melee, 60 Defence, and 43 Prayer for Protect prayers.
Navigating to the Lizardman Temple in Molch

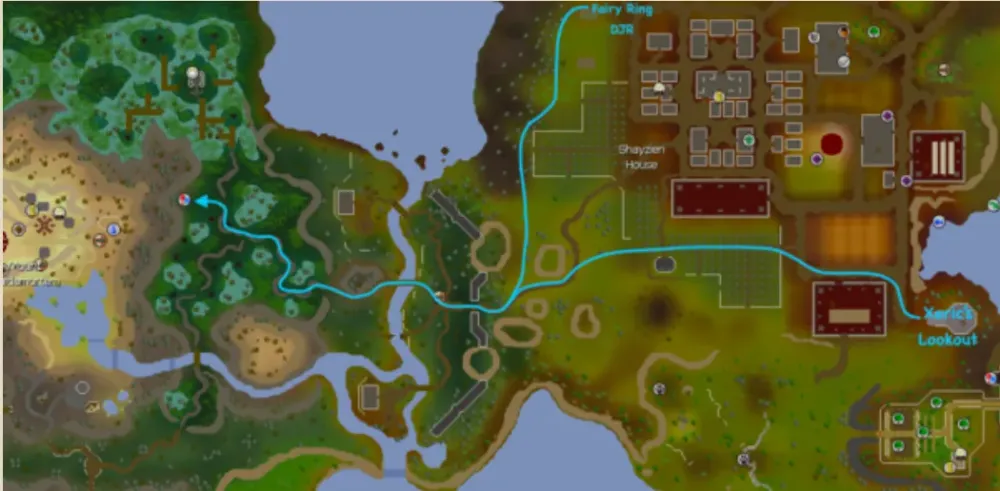
Getting to Molch is straightforward with the right teleports. The Lizardman Temple lies beneath the settlement, accessible via entrances around the step pyramid. Here are the fastest routes:
Travel Options
- Skills Necklace: Teleport to the Farming Guild, then run south across the bridge and through the swamp to Molch.
- Fairy Ring (DJR): Use code DJR, then head southwest and take the Boaty to Molch for a direct route.
- Xeric’s Talisman: Teleport to Xeric’s Glade, run south past the Farming Guild, and cross the bridge to Molch.
Tips for Efficient Travel
Once in Molch, locate the step pyramid west of the village. The temple entrances are one-way, but you can exit via a strange hole in the southwest corner, which places you atop the pyramid. Keep a teleport like Xeric’s Talisman handy for quick banking between trips. If on a Slayer task, the fairy ring code BLS takes you directly to a task-only cave, but Molch’s temple is generally preferred for its single-way combat.
Combat Mechanics and Shaman Attacks
Lizardman Shamans are formidable, with a combat level of 150, 150 hitpoints, and a max hit of 31 (melee) or 21 (ranged). Their attacks require careful attention to avoid quick deaths, especially for lower-level players. Understanding their mechanics is crucial for a successful grind.
Standard Attacks
- Melee: A close-range crush attack dealing up to 31 damage. Avoid by keeping distance or using Protect from Melee if in melee range.
- Ranged: A projectile attack hitting up to 21 and capable of inflicting poison starting at 10 damage. Protect from Missiles is highly recommended.
Special Attacks to Watch For
Shamans have three special attacks with no cooldown, making them unpredictable:
- Acid Spit: A green ball of acid targets your position, dealing up to 30 unblockable poison damage. Wearing full tier-5 Shayzien armour negates this damage entirely, though poison can still apply.
- Jump: The shaman leaps into the air, crashing down at your location for heavy damage. Dodge by moving a few tiles away when you see it jump. Hugging walls or obstacles prevents this attack.
- Spawns: Summons three minions that chase you and explode after a few seconds, dealing 8-10 damage if you’re within two tiles. Run around obstacles or move away to avoid explosions.
Defensive Stats
Shamans have unique defensive stats that influence your combat style choice:
| Defence Type | Bonus |
|---|---|
| Stab | -20 |
| Ranged | 0 |
| Slash | 40 |
| Crush | 30 |
| Magic | 50 |
With negative stab defence and no ranged defence bonuses, Ranged or stab-based Melee attacks are most effective. Avoid slash, crush, or magic attacks due to their high resistance.
Optimal Gear and Inventory Setup
Your gear and inventory can make or break your shaman-killing efficiency. Ranged is the preferred combat style for its ability to outrange attacks and maneuver around special abilities, though Melee is viable for higher-level players with strong stab weapons.
Ranged Setup
Here’s a recommended Ranged setup for tackling shamans:
- Helmet: Shayzien helm (5) or Slayer helmet (if Hard Kourend & Kebos Diary is completed and upgraded via Captain Cleive).
- Body and Legs: Shayzien platebody (5) and greaves (5) to negate acid spit damage.
- Weapon: Toxic Blowpipe (best DPS) or Rune Crossbow with broad bolts (budget option).
- Ammo: Amethyst or adamant darts for Blowpipe; broad bolts for crossbow.
- Cape: Ava’s Assembler or Accumulator for ammo retrieval.
- Accessories: Necklace of Anguish, Archers Ring (i), and Ranger Gloves.
Melee Setup
For Melee enthusiasts, focus on stab weapons:
- Helmet: Shayzien helm (5) or Slayer helmet (upgraded).
- Body and Legs: Shayzien platebody (5) and greaves (5).
- Weapon: Ghrazi Rapier or Zamorakian Hasta for high stab accuracy.
- Shield: Avernic Defender or Dragon Defender.
- Cape: Infernal or Fire Cape.
- Accessories: Amulet of Torture, Berserker Ring (i), and Ferocious Gloves.
Inventory Recommendations
A balanced inventory ensures long trips and efficient kills:
- 3-4 Prayer Potions: To maintain Protect from Missiles or Melee.
- 1 Antidote++: To counter poison from ranged or acid attacks.
- 2-3 Stamina Potions: For constant movement to dodge special attacks.
- Rune Pouch: With nature, lava, and water runes for High Alchemy and Bones to Peaches (optional).
- Xeric’s Talisman: For quick banking.
- Food: Sharks or better to heal from stray hits.
- Emergency Teleport: House teleport tablet or rune pouch with teleport runes.
Strategies for Success
Killing Lizardman Shamans in Molch requires a blend of preparation, awareness, and execution. The single-way combat of the Lizardman Temple simplifies fights, but their special attacks demand constant vigilance. Here are proven strategies to optimize your grind.
Positioning and Movement
In the temple, each chamber contains two shamans. Focus on one at a time to avoid being overwhelmed. Stand along the south or west walls to prevent jump attacks, as shamans can’t leap if you’re adjacent to obstacles. When spawns appear, run around the room’s pillars or move a few tiles away to avoid their explosions. For acid spit, keep moving unless wearing full tier-5 Shayzien armour.
Prayer and Combat Tips
- Protect from Missiles: Use this as your default prayer for Ranged setups to block ranged attacks and reduce poison risk.
- Piety or Eagle Eye: Boost your Melee or Ranged accuracy and damage for faster kills.
- Watch for Spawns: Prioritize dodging minions over attacking, as their explosions can stack damage quickly.
- Slayer Task Bonus: If on a lizardmen task, wear an upgraded Slayer helmet for extra damage and accuracy, but ensure Shayzien armour effects are active.
Loot and Efficiency
Shamans drop a variety of items, with the Dragon Warhammer being the ultimate prize. Other notable drops include:
- Xeric’s Talisman (inert): 1/250 drop rate (1/125 with Kourend & Kebos Easy Diary).
- Lizardman Fangs: Used to charge Xeric’s Talisman.
- Seeds and Herbs: High-value seeds like ranarr and toadflax.
- Runes: Chaos, death, and blood runes for profit.
Use High Alchemy on low-value items like rune gear to save inventory space. Bones to Peaches can convert shaman bone drops into food, extending trips for those with the spell or tablets.
Common Mistakes to Avoid
- Ignoring Special Attacks: Failing to dodge jumps or spawns can lead to quick deaths.
- Skipping Shayzien Armour: Without tier-5 armour, acid spit will deal significant damage.
- Overloading Inventory: Bring only essential items to maximize food and potion slots.
- Fighting Multiple Shamans: In multi-combat areas like the Canyon, stick to one target unless using a cannon.
By combining the right gear, strategies, and awareness, you’ll turn the Lizardman Shaman grind in Molch into a profitable and manageable task. The Dragon Warhammer may take thousands of kills, but with persistence and this guide, you’re well-equipped to conquer the temple and claim your rewards. Happy hunting!
