Your cart is empty

How to Build an Inconspicuous Hole in OSRS: A Complete Guide
Old School RuneScape (OSRS) offers players a vast world filled with adventures, quests, and clever mechanics to enhance gameplay. One such feature is the “inconspicuous hole,” better known as a STASH unit (Store Things And Stuff Here). These handy storage spots allow you to stash emote clue items near Treasure Trail locations, saving bank space and making clue hunting more efficient. If you’re wondering how to build an inconspicuous hole in OSRS, this guide will walk you through everything you need to know—requirements, materials, locations, and tips for success. Let’s dive into this essential skill for any avid adventurer!
In OSRS, an inconspicuous hole isn’t just a random pit—it’s a cleverly disguised STASH unit designed to blend into the environment. Introduced on July 14, 2016, as part of the “Hidey Holes & Miniquests” update, these units let players store items required for emote clues, which are part of Treasure Trails. Before STASH units, players had to clog their banks with clue-specific gear or make tedious bank runs. Now, you can build these inconspicuous holes across Gielinor and keep your inventory light.
Why Build STASH Units?
Building an inconspicuous hole offers several benefits:
- Saves Bank Space: Store emote clue items like capes, hats, and weapons without cluttering your bank.
- Convenience: Access gear right where you need it during Treasure Trails.
- Time Efficiency: No more running to the bank mid-clue—everything’s ready at the location.
How STASH Units Work
STASH units start as inconspicuous bushes, crates, holes, or rocks scattered throughout the game world. Once you build them with the right materials and Construction level, they transform into usable storage. You can then deposit and retrieve emote clue items as needed, making them a game-changer for clue scroll enthusiasts.
Requirements to Build an Inconspicuous Hole
Before you can start building STASH units, you’ll need to meet specific requirements. These vary depending on the tier of the clue scroll the unit corresponds to—Beginner, Easy, Medium, Hard, Elite, or Master. Here’s what you need to get started:
Construction Skill Levels
Your Construction level determines which STASH units you can build:
- Beginner: Level 17 Construction
- Easy: Level 27 Construction
- Medium: Level 42 Construction
- Hard: Level 55 Construction
- Elite: Level 77 Construction
- Master: Level 88 Construction
Tip: You can use temporary boosts (like a Crystal Saw or Spicy Stew) to meet these requirements if your base level is close but not quite there.
Required Materials
Each STASH unit tier requires specific materials. Here’s a breakdown:
| Tier | Construction Level | Materials |
|---|---|---|
| Beginner | 17 | 2 Planks, 10 Nails |
| Easy | 27 | 2 Planks, 10 Nails |
| Medium | 42 | 2 Oak Planks, 10 Nails |
| Hard | 55 | 2 Teak Planks, 10 Nails |
| Elite | 77 | 2 Mahogany Planks, 10 Nails |
| Master | 88 | 2 Mahogany Planks, 10 Nails, 1 Gold Leaf |
Note: You’ll also need a hammer and a saw, which are standard Construction tools. All 10 nails must be of the same metal (bronze, iron, steel, etc.), and nails don’t bend during STASH construction, so use whatever’s cheapest or most accessible.
Step-by-Step Guide to Building an Inconspicuous Hole
Ready to build your first STASH unit? Follow these steps to turn an inconspicuous hole into a functional storage spot:
Step 1: Gather Your Materials
Check the tier of the STASH unit you want to build and collect the required planks, nails, hammer, and saw. For Master units, don’t forget the Gold Leaf (purchasable from the Grand Exchange or certain shops like the Stonemason in Keldagrim).
Step 2: Locate the Inconspicuous Hole
STASH units are tied to specific emote clue locations. There are 116 total STASH units in OSRS as of April 2025, spread across Gielinor. You can find their locations by:
- Visiting Watson in Hosidius and checking his noticeboard for a list of built and unbuilt units.
- Building a S.T.A.S.H. chart in your Player-Owned House (POH) study at level 40 Construction.
- Using the OSRS Wiki’s comprehensive STASH unit list for coordinates and clue details.
Step 3: Build the STASH Unit
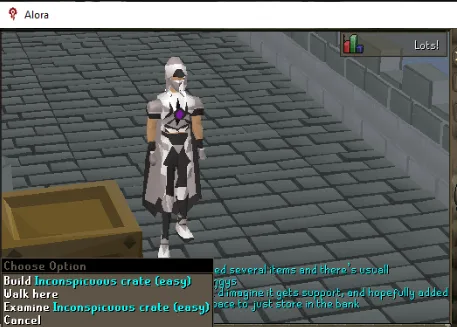
Approach the inconspicuous hole (it might appear as a bush, crate, or rock) and use your Construction skill:
- Right-click the object and select “Build.”
- Confirm you have the required level and materials.
- Watch as it transforms into a STASH unit!
Once built, you can store the specific emote clue items tied to that location.
Step 4: Fill the STASH Unit
Deposit the items required for the corresponding emote clue. For example, a STASH unit near Lumbridge might need a coif and leather body. You can fill it while wearing the items, and they’ll stay safe until you retrieve them.
Best Locations for Inconspicuous Holes
With 116 STASH units available, some stand out for their convenience or frequency in Treasure Trails. Here are a few noteworthy locations to prioritize:
Popular Easy STASH Units
- Lumbridge Swamp: Near the windmill, stores a bronze dagger and iron med helm.
- Draynor Village: By the jail, holds a studded body and leather chaps.
Useful Medium STASH Units
- Falador Park: Stores a mithril chainbody and green d’hide chaps.
- Seers’ Village: Near the church, holds a steel kiteshield and blue robe top.
High-Tier Favorites
- Shayzien Encampment (Elite): Stores a Shayzien medpack and black d’hide chaps.
- Wilderness Volcano (Master): Holds a fire cape and obsidian cape—perfect for daring clue hunters.
Pro Tip: Focus on building STASH units in areas you frequently visit or where clues often send you to streamline your gameplay.
Tips and Tricks for Building STASH Units
To make the most of your inconspicuous holes, keep these strategies in mind:
Level Up Construction Efficiently
If your Construction level is too low, train it affordably:
- Plank Making: Use the sawmill to turn logs into planks cheaply.
- POH Furniture: Build oak larders (level 33) or oak doors (level 74) for steady XP gains.
- Boosts: Sip a Spicy Stew with orange spice (+5 boost potential) or use a Crystal Saw (+3 boost).
Plan Your STASH Building Route
Save time by mapping out STASH locations in advance. Group them by region (e.g., Varrock, Falador, Wilderness) and tackle them in batches with all materials in your inventory.
Stockpile Materials
Buy planks and nails in bulk from the Grand Exchange or gather them yourself. Gold Leaves for Master units are pricey (around 130k GP each), so budget accordingly if you’re aiming for all 116 units.
Track Your Progress
Use Watson’s noticeboard or your POH S.T.A.S.H. chart to avoid rebuilding units you’ve already completed. This keeps your efforts organized and efficient.
Building an inconspicuous hole in OSRS is a small but impactful way to enhance your Treasure Trail experience. Whether you’re a casual clue hunter or a completionist aiming to construct all 116 STASH units, this guide has you covered. Start with the easy ones, level up your Construction, and watch your gameplay become smoother than ever. Happy stashing, adventurers!
