Your cart is empty

Greater Demon Locations OSRS – Best Spots to Slay and Loot
Greater Demons are iconic Slayer monsters in Old School RuneScape (OSRS), known for their rune full helm and hard clue scroll drops. Assigned by Slayer masters like Krystilia, Chaeldar, Konar, Nieve/Steve, and Duradel, they’re a popular task for players seeking decent experience and loot. This guide dives into the best locations to slay Greater Demons, covering their advantages, safespots, and strategies to maximize efficiency. Whether you’re a mid-level player or a seasoned Slayer, you’ll find the perfect spot to tackle these demonic foes.
Greater Demons are a solid Slayer task due to their accessibility, moderate combat difficulty, and valuable drops. With combat levels ranging from 100 to 113, they’re manageable for players with 70+ combat stats and 43 Prayer for Protect from Melee. Their drop table, while not as lucrative as higher-tier monsters, includes notable items like the rune full helm and hard clue scrolls. Additionally, locations like the Catacombs of Kourend offer unique drops such as ancient shards and dark totem pieces, making them appealing for both profit and progression.
Key Benefits of Slaying Greater Demons
- Slayer XP: Each kill yields 115–120 Slayer XP, with extended tasks offering up to 250 kills for 100 Slayer points.
- Safespottable: Most locations allow ranged or magic safespotting, reducing damage taken.
- Unique Drops: Catacombs of Kourend drops can be used to access Skotizo, a demi-boss with guaranteed clue scrolls.
- Accessibility: Locations are spread across free-to-play and members’ areas, catering to all players.
Top Greater Demon Locations in OSRS
Greater Demons are scattered across Gielinor, with each location offering unique advantages and challenges. Below, we explore the best spots, focusing on accessibility, combat efficiency, and loot potential. All locations have similar drop tables, except the Wilderness Slayer Cave, which has enhanced drops.
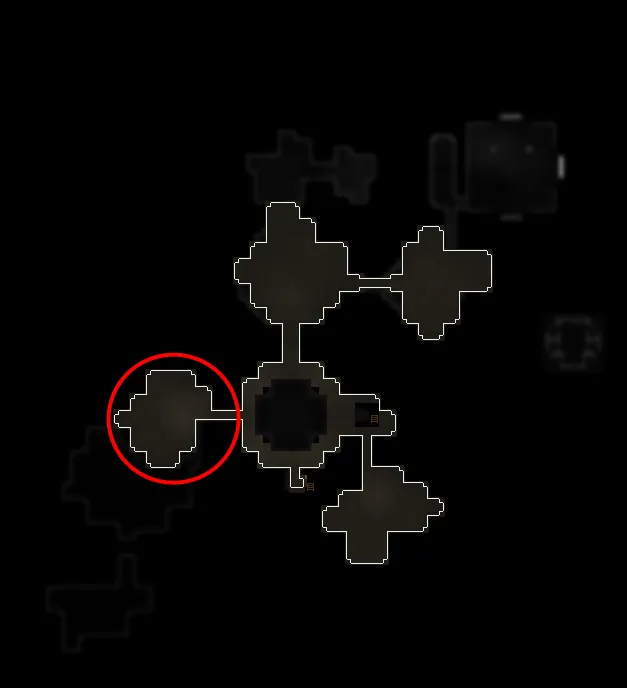
Catacombs of Kourend
The Catacombs of Kourend is one of the most popular spots for slaying Greater Demons due to its multicombat area, safespots, and unique drops. Located in Great Kourend, it’s ideal for players seeking passive totem pieces for Skotizo while AFK training.
- Advantages: Safespots under arches or in the northeast corner; drops ancient shards and dark totem pieces; multicombat allows cannon use.
- Drawbacks: Can be crowded; requires travel to Kourend.
- Safespot Tip: Stand under the arch dividing the Greater Demon area or behind the rope exit in the northeast corner.
How to Get There: Use a Kourend Castle teleport or Xeric’s Talisman to reach Great Kourend, then enter the Catacombs via the statue in the city center.
Chasm of Fire
The Chasm of Fire in the Shayzien region is a Slayer-only area with 17 Greater Demon spawns split into two sections (8 and 9 spawns). It’s a single-combat zone, perfect for focused kills with a dwarf multicannon.
- Advantages: Cannonable; safespots behind pillars; less crowded than the Catacombs.
- Drawbacks: Requires a Slayer task; far from teleports.
- Safespot Tip: Use the pillars to block melee attacks while ranging or maging.
How to Get There: Teleport to Shayzien via a skills necklace or use the Lovakengj Minecart Network, then head to the Chasm entrance.
Wilderness Slayer Cave
The Wilderness Slayer Cave offers enhanced drops, making it a high-risk, high-reward option. It’s a multicombat area, ideal for cannon users, but player killers (PKers) pose a significant threat.
- Advantages: Better drop table; cannonable; hard clue scrolls drop at double the rate with an imbued ring of wealth.
- Drawbacks: High PKer activity; bring minimal gear to avoid losses.
- Safespot Tip: Use stalagmites at the chamber entrance for ranged or magic attacks.
How to Get There: Teleport to the Lava Maze via a burning amulet or run from the Wilderness lever in Edgeville.
Brimhaven Dungeon
The Brimhaven Dungeon on Karamja is a members-only area with Greater Demons alongside other monsters like dragons. It’s less crowded but requires 875 coins to enter and a hatchet for vine obstacles.
- Advantages: Safespots at the easternmost land or behind fungus near stairs; good for mid-level players.
- Drawbacks: Entry fee; travel time to Karamja.
- Safespot Tip: Stand at the easternmost edge or behind the fungus to avoid melee hits.
How to Get There: Use a Karamja teleport (e.g., amulet of glory) or take the boat from Port Sarim, then pay Saniboch to enter.
Demonic Ruins (Free-to-Play)
The Demonic Ruins in the high-level Wilderness is the only free-to-play location for Greater Demons. It’s a multicombat area with two spawns, but PKers make it risky.
- Advantages: Accessible to F2P players; prayer restoration at the ruins allows permanent Protect from Melee.
- Drawbacks: High PKer risk; limited spawns.
- Safespot Tip: Use ranged or magic from behind nearby rocks or ruins.
How to Get There: Run north from the Wilderness lever or use an Annakarl teleport to reach level 45–46 Wilderness.
Strategies for Slaying Greater Demons
Greater Demons use melee attacks, making Protect from Melee (43 Prayer) essential for low-damage runs. They’re weak to demonbane weapons like Arclight, Silverlight, or Darklight, and have a 40% elemental weakness to water spells. Below are key strategies to optimize your kills.
Recommended Gear and Inventory
| Slot | Recommended Gear |
|---|---|
| Weapon | Arclight, Abyssal Whip, or Water Surge (magic) |
| Armor | Black Dragonhide (ranged), Proselyte (prayer bonus), or Mystic (magic) |
| Accessories | Ring of Wealth (Wilderness), Amulet of Glory |
| Inventory | Prayer potions, food (sharks), teleport runes, cannonballs (if cannoning) |
Combat Tips
- Safespotting: Use ranged or magic from designated safespots to avoid damage.
- Cannoning: Place a dwarf multicannon in multicombat areas like the Catacombs or Wilderness Slayer Cave for faster kills.
- Prayer Management: Use Protect from Melee and flick Piety or Rigour for DPS boosts.
- Wilderness Caution: Bring only what you’re willing to lose; use a looting bag to store drops.
Alternative Monsters for Greater Demon Tasks
For variety or better loot, you can kill alternative monsters that count toward Greater Demon Slayer tasks. These include:
- K’ril Tsutsaroth: Zamorakian general in the God Wars Dungeon; requires 70 Hitpoints and Troll Stronghold partial completion.
- Tstanon Karlak: K’ril’s bodyguard, also in God Wars Dungeon; easier than K’ril but less rewarding.
- Skotizo: Catacombs of Kourend demi-boss; requires a dark totem and offers guaranteed clue scrolls.
- Tormented Demons: Post-While Guthix Sleeps; high XP (1,065 Slayer XP/kill) and drops tormented synapse for demonbane weapons.
Note: These alternatives are tougher and may require higher stats or specific quests, but they offer better rewards for advanced players.
Drop Table Highlights
Greater Demons have a modest drop table, with the rune full helm (worth ~20k GP) and hard clue scrolls being the highlights. The Wilderness Slayer Cave enhances drop rates, especially for clues. Key drops include:
| Item | Drop Rate | Notes |
|---|---|---|
| Rune Full Helm | 1/64 | Valuable for mid-level players |
| Hard Clue Scroll | 1/128 (1/64 with Ring of Wealth in Wilderness) | High potential rewards |
| Ancient Shard | 1/256 (Catacombs) | Charges Arclight |
| Dark Totem Piece | 1/400 (Catacombs) | Used for Skotizo |
Average kill value is ~3,686 GP, or ~1,521 GP on a Konar task, with Wilderness kills offering higher potential due to enhanced tables.
Final Tips for Greater Demon Slaying
To maximize your Greater Demon Slayer tasks, prioritize the Catacombs of Kourend for AFK training and totem pieces, or the Wilderness Slayer Cave for better loot if you’re comfortable with PKer risks. Use safespots and cannons where possible, and consider extending tasks to 200–250 kills for more XP and drops. For F2P players, the Demonic Ruins is your only option, so stick to minimal gear and Protect from Melee.
By choosing the right location and strategy, you’ll turn Greater Demon tasks into a rewarding grind. Happy slaying, and may your rune full helms stack high!