Your cart is empty

Getting to Ape Atoll OSRS – Ultimate Guide for Old School RuneScape Players
Ape Atoll in Old School RuneScape (OSRS) is a fascinating and challenging destination packed with unique content like the Monkey Madness quests, high-level training spots, and exclusive rewards. Whether you’re a seasoned player or a curious newcomer, reaching Ape Atoll requires completing specific steps, navigating quests, and understanding the game’s mechanics. This guide will walk you through everything you need to know about getting to Ape Atoll in OSRS, ensuring you’re well-prepared for the adventure. From quest requirements to travel methods and handy tips, we’ve got you covered.
Ape Atoll is one of the most iconic locations in OSRS, offering a mix of rewarding activities and challenging gameplay. It’s home to the Monkey Madness I and II quests, which unlock powerful rewards like the dragon scimitar and access to high-level training areas. The island also features unique NPCs, a rich storyline, and opportunities for skilling and combat. Visiting Ape Atoll is a rite of passage for many players, but getting there isn’t as simple as hopping on a boat. You’ll need to meet specific requirements and follow a clear path.
Key Attractions on Ape Atoll
- Monkey Madness Quests: These quests are central to Ape Atoll’s appeal, offering exciting narratives and valuable rewards.
- Training Areas: The Ape Atoll Agility Course and Skeleton Dungeon provide excellent experience for Agility and combat skills.
- Unique Items: Unlock the monkey greegree, which lets you transform into a monkey, and access exclusive weapons like the dragon scimitar.
Who Should Visit?
Ape Atoll is best suited for mid-to-high-level players who have completed prerequisite quests and have decent combat stats. If you’re looking to level up skills like Agility, Ranged, or Magic, or want to dive into one of OSRS’s most engaging questlines, Ape Atoll is a must-visit.
Prerequisites for Reaching Ape Atoll
Before you can set foot on Ape Atoll, you’ll need to complete certain tasks and meet specific requirements. The primary hurdle is starting or progressing through the Monkey Madness I quest, which serves as the gateway to the island. Below, we outline the essential prerequisites to ensure you’re ready.
Quest Requirements
To access Ape Atoll, you must at least start Monkey Madness I. This quest has its own prerequisites, including:
- Completion of The Grand Tree: A quest that introduces the gnome storyline and requires 25 Agility.
- Completion of Tree Gnome Village: A shorter quest with no skill requirements but involves combat.
Starting Monkey Madness I also requires you to speak with King Narnode Shareen in the Grand Tree, so make sure you’ve wrapped up these earlier quests.
Recommended Stats and Gear
While there are no strict skill requirements for Monkey Madness I, having the following stats and gear will make your journey smoother:
| Skill/Item | Recommended Level/Detail |
|---|---|
| Combat Level | 50+ (for safer encounters with enemies) |
| Hitpoints | 40+ (to survive traps and combat) |
| Prayer | 43 (for Protect from Melee) |
| Gear | Rune armor, decent weapon (e.g., rune scimitar), food, and antipoisons |
Tip: Bring plenty of food and antipoisons, as Ape Atoll’s enemies like poisonous spiders and monkeys can hit hard.
Step-by-Step Guide to Get to Ape Atoll
Now that you know why Ape Atoll is worth visiting and what you need to prepare, let’s dive into the step-by-step process of getting there. This section covers the initial journey during Monkey Madness I and how to return afterward.
Starting Monkey Madness I
To begin your journey to Ape Atoll, follow these steps:
- Visit the Grand Tree: Head to the Tree Gnome Stronghold and speak with King Narnode Shareen in the Grand Tree’s basement.
- Accept the Quest: He’ll task you with investigating the disappearance of the 10th Squad, starting Monkey Madness I.
- Travel to Karamja: Take a glider from the Grand Tree to Karamja (Gandius) after speaking with Daero Weir at the Grand Tree’s second floor.
- Meet Lumdo: At the Karamja shipyard, speak with Waydar, who will arrange for Lumdo to sail you to Ape Atoll.
Note: During your first trip, you’ll crash-land on Ape Atoll, leading to your capture by the island’s monkeys. This is part of the quest’s storyline.
Navigating the Crash Site
After crashing, you’ll wake up in a prison cell on Ape Atoll. Here’s how to proceed:
- Escape the Cell: Avoid the gorilla guards’ patrol patterns and pick the lock to escape.
- Stay Stealthy: Equip a monkey greegree (obtained later in the quest) or avoid detection by hiding in tall grass to move around safely.
- Progress the Quest: Follow the quest objectives, such as speaking with NPCs like Karam and gathering items to advance.
This initial visit is heavily tied to the quest, so follow the Monkey Madness I objectives closely.
Returning to Ape Atoll After the Quest
Once you’ve progressed or completed Monkey Madness I, returning to Ape Atoll becomes much easier. Here’s how:
- Teleport Option: Use the Ape Atoll teleport spell (requires 64 Magic, 2 Law, 2 Fire, 2 Water runes, and a banana) or the Ape Atoll teleport tablet.
- Glider Route: Return to the Grand Tree, speak with Daero Weir, and use the glider to Karamja, then sail with Lumdo.
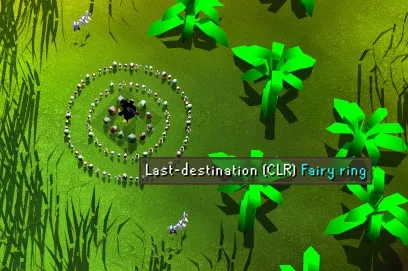
- Fairy Ring: With Monkey Madness II partially completed, use fairy ring code CLR to teleport directly to Ape Atoll.
Tips for Surviving Ape Atoll
Ape Atoll is a dangerous place, with aggressive monkeys, traps, and poisonous creatures. To make your trips safer and more efficient, keep these tips in mind.
Dealing with Enemies
The island is crawling with high-level monkeys and other threats. Here’s how to handle them:
- Use Protect from Melee: Monkeys hit hard, so activate Protect from Melee (43 Prayer) when in combat.
- Carry Antipoison: Spiders and scorpions can poison you, so keep antipoisons or super antipoisons handy.
- Monkey Greegree: After obtaining the greegree during Monkey Madness I, equip it to transform into a monkey and avoid aggression from most NPCs.
Navigating Traps and Obstacles
Ape Atoll is littered with traps that can deal significant damage. Be cautious with these:
- Spike Traps: Watch for floor spikes in dungeons and step carefully to avoid taking damage.
- Agility Shortcuts: Some areas require decent Agility to bypass obstacles, so train this skill if needed.
- Bring Stamina Potions: Running across the island can drain energy, so stamina potions help maintain mobility.
Maximizing Your Time on Ape Atoll
Once you’ve reached Ape Atoll, you’ll want to make the most of your visit. Whether your goal is questing, training, or collecting rewards, here’s how to optimize your time.
Training Opportunities
Ape Atoll offers some of the best training spots in OSRS:
| Activity | Skill | Details |
|---|---|---|
| Ape Atoll Agility Course | Agility | Requires 48 Agility; great XP post-Monkey Madness I |
| Skeleton Monkeys | Ranged/Magic | Chinning spot for fast XP; requires monkey greegree |
| Monkey Guards | Combat | High HP enemies for melee training |
Quest and Reward Focus
If you’re on Ape Atoll for Monkey Madness I or II, prioritize these rewards:
- Dragon Scimitar: Unlocked after Monkey Madness I, a powerful weapon for melee training.
- Monkey Greegree: Allows safe exploration of Ape Atoll by disguising you as a monkey.
- Access to Ape Atoll Dungeon: Post-quest, this area becomes a prime training spot.
Pro Tip: Complete Monkey Madness II for additional teleports and access to even more content, like the Demonic Gorilla slayer task.
Getting to Ape Atoll in OSRS is a rewarding journey that opens up a wealth of content. By preparing for Monkey Madness I, navigating the island’s challenges, and leveraging its training spots, you’ll make the most of this iconic location. Follow this guide, stay cautious, and enjoy everything Ape Atoll has to offer!