Your cart is empty

Demonbane vs Bloodvelds in OSRS: A Comprehensive Comparison
Demonbane and Bloodvelds are two formidable creatures in Old School RuneScape (OSRS) that challenge players with their unique mechanics and combat styles. While both offer valuable rewards and experience, understanding their distinct characteristics is essential for effective strategies in combat. This article provides a comprehensive comparison, focusing on the strengths and weaknesses of each enemy, equipping players with the knowledge needed to tackle these foes successfully.
Demonbane creatures are known for their high combat levels and unique attacks, making them challenging opponents for adventurers in OSRS. These demons, primarily found in areas like the Morytania Swamp and the Abyss, possess a range of characteristics that set them apart from other monsters. Their combat style is primarily melee, and they have the ability to inflict significant damage, requiring players to adopt effective combat strategies.
One of the key characteristics of Demonbane creatures is their vulnerability to specific weapons and spells. Players equipped with the right gear, particularly those utilizing Demonbane weapons, can deal increased damage. These weapons are crafted specifically for slaying demons and can greatly enhance a player’s efficiency in combat. Additionally, using the correct prayers, such as Protect from Missiles or Protect from Magic, can mitigate the damage taken during encounters.
Combat strategies against Demonbane creatures often revolve around maximizing damage output while minimizing damage taken. Players should consider their combat style—whether melee, ranged, or magic—and choose their equipment accordingly. Ranged attacks, for instance, can keep players at a safe distance while dealing damage. Utilizing potions, such as Super Restore or Saradomin Brews, can also help maintain health during prolonged fights.
Understanding the mechanics of Demonbane attacks is crucial. Players should be aware of their special abilities, such as summoning minions or inflicting status ailments. These mechanics often require players to adapt their strategies mid-fight, emphasizing the need for situational awareness. Players should also keep an eye on their hit points and be prepared to switch to defensive tactics if necessary.
In summary, tackling Demonbane enemies requires a blend of the right equipment, effective combat strategies, and a keen understanding of their mechanics. With the proper preparation and approach, players can emerge victorious from these challenging encounters, reaping the rewards they provide.
Exploring Bloodvelds: Strengths and Weaknesses

Bloodvelds are intriguing monsters in Old School RuneScape (OSRS), known for their unique combat mechanics and experience rates. Let’s dive into their strengths and weaknesses to understand what makes them tick.
Strengths of Bloodvelds:
- High Hitpoints: Bloodvelds boast a substantial HP pool, which can be a challenge for inexperienced players but provides a reliable source of experience for those who can manage their damage effectively.
- Healing Ability: One of the standout features of Bloodvelds is their ability to heal themselves. They regain health based on the damage dealt to them, making it essential to maintain a steady damage output to prevent them from healing too much.
- Magic Weakness: Bloodvelds are weak against Magic attacks. This can be advantageous for players using Magic gear and spells, allowing for efficient combat without needing to engage in melee.
Weaknesses of Bloodvelds:
- Low Defense: While their hitpoints are high, Bloodvelds have relatively low defense, making them susceptible to high damage from players who can consistently hit.
- Ranged Attack: Bloodvelds have a ranged attack that can deal considerable damage, especially in higher-level areas, which can catch unprepared players off guard.
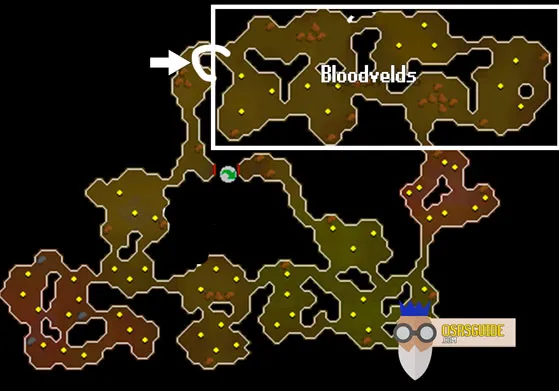
- Location: Bloodvelds are primarily located in the Haunted Mine and the Bloodveld area in the God Wars Dungeon, which can be challenging to access for newer players.
In summary, Bloodvelds offer a unique combat experience, blending their healing abilities with their weaknesses. Understanding these aspects can help players strategize effectively when facing them.
Demonbane vs Bloodvelds: Combat Efficiency and Experience Rates
When comparing Demonbane weapons to Bloodvelds, it’s essential to consider combat efficiency and experience rates. Both elements play a crucial role in maximizing your time spent battling these creatures.
Combat Efficiency:
| Aspect | Demonbane Weapons | Bloodvelds |
|---|---|---|
| Damage Output | High damage against demons, ideal for maximizing hits. | Moderate damage due to healing abilities, can prolong battles. |
| Attack Speed | Fast attack speed, enhances overall efficiency. | Variable based on player’s gear and strategy. |
| Spell Effectiveness | Effective against demons, especially when using magic. | Weak to magic, allowing for high efficiency if using spells. |
Experience Rates:
Bloodvelds offer a solid experience rate, especially for players focusing on training melee and magic skills. On average, players can expect around 50,000 to 60,000 XP per hour if managed correctly. In contrast, using Demonbane weapons can further enhance this experience rate when fighting Bloodvelds due to their magical weaknesses.
In conclusion, choosing between Demonbane weapons and standard combat gear when facing Bloodvelds can significantly impact your combat efficiency and experience rates. Understanding how to leverage the strengths of both will lead to a more rewarding experience in OSRS.
Gear and Loadout Recommendations for Each
When it comes to tackling Demonbane and Bloodvelds in Old School RuneScape (OSRS), having the right gear and loadout can significantly impact your efficiency and success. Let’s break down the ideal setups for each of these creatures.
Demonbane Gear Recommendations
Demonbane is a formidable foe, so your gear should reflect your need for both offense and defense. Here’s a solid loadout to consider:
- Weapon: Abyssal whip or a Godsword for high damage output.
- Armor:
- Accessories:
- Amulet of Fury for a good all-around boost.
- Ring of suffering to provide extra damage mitigation.
Don’t forget to bring potions! Super combat potions and prayer potions are essential for maximizing damage and survival.
Bloodvelds Gear Recommendations
Bloodvelds are a bit easier to handle, but you still want to make sure you’re well-equipped:
- Weapon: A whip or a scimitar will do just fine.
- Armor:
- Void Knight equipment for a balanced setup.
- Proselyte armor for increased prayer bonuses.
- Accessories:
- Amulet of Glory for the teleportation benefits.
- Ring of wealth to increase drop rates.
For Bloodvelds, consider using Saradomin brews or prayer potions to keep your health and prayer high.
Where to Find Demonbane and Bloodvelds in OSRS
Knowing where to find these creatures is essential for your grinding sessions in OSRS. Each has its own specific locations, and understanding these will help you plan your trips effectively.
Finding Demonbane
Demonbane can typically be found in the following locations:
- Catacombs of Kourend: This is a popular spot due to its relatively low competition.
- Infernal Eels: They can also be found in the Wilderness level 1-5, but be cautious of PKers.
Keep in mind that Demonbane requires a slayer task to kill, so make sure you have the right assignment!
Finding Bloodvelds
Bloodvelds are a bit more widely distributed, making them easier to find:
- Slayer Tower: Located in the Mort Myre Swamp, this is a prime location to hunt Bloodvelds.
- Catacombs of Kourend: Like Demonbane, Bloodvelds also inhabit this area.
Bloodvelds can be killed without a slayer task, making them a great choice for training combat skills without constraints.
In summary, equipping yourself correctly and knowing the locations of these monsters will enhance your OSRS experience. Happy hunting!
Tips and Tricks for Maximizing Your Efficiency
When it comes to maximizing your efficiency while battling Demonbane or Bloodvelds in Old School RuneScape (OSRS), a few key strategies can make all the difference. Here are some tips to help you optimize your time and resources:
- Choose the Right Gear: Equip yourself with gear that offers the best bonuses against your target. For Demonbane, consider using gear that enhances your magic attack and defense, while for Bloodvelds, focus on strength and prayer bonuses.
- Use Potions Wisely: Always have a supply of Potions, such as Super Restore and Saradomin Brews, on hand. These can help maintain your health and prayer, allowing you to fight longer without needing to leave the area.
- Utilize Prayer Effectively: Activate your prayers strategically. For Bloodvelds, using the Protect from Magic prayer can significantly reduce damage taken. For Demonbane, consider using prayers that boost your attack or defense.
- Consider Slayer Tasks: If you’re on a Slayer task for either Demonbane or Bloodvelds, make sure to complete it to gain extra experience points and rewards. This can enhance your overall gameplay.
- Use Efficient Training Methods: When training combat skills, prioritize methods that allow for multi-target damage. This is particularly effective against Bloodvelds that often spawn in groups.
By incorporating these tips into your gameplay, you can enhance your efficiency, maximize experience gain, and ultimately make the most of your time spent battling both Demonbane and Bloodvelds.
Conclusion: Which Option is Best for Your Gameplay?
Deciding between Demonbane and Bloodvelds in OSRS ultimately comes down to your specific gameplay preferences and goals. Here’s a quick comparison to help you make the best choice:
| Factor | Demonbane | Bloodvelds |
|---|---|---|
| Combat Style | Magic | Melee |
| Experience Rate | Moderate | High |
| Resource Management | High | Moderate |
| Loot Variety | Low | Moderate |
If you enjoy magic combat and are looking for a unique challenge, then taking on Demonbane might be your best bet. However, if you prefer a more traditional melee approach with higher experience gains and the potential for valuable loot, Bloodvelds could be the way to go.
Ultimately, consider your gear, skill levels, and personal preferences. Both options have their merits, and you can’t go wrong with either choice as long as it aligns with your gameplay style!