Your cart is empty

Alchemical Hydra OSRS Range Guide for Efficient Kills
The Alchemical Hydra is one of the most rewarding Slayer bosses in Old School RuneScape (OSRS), offering lucrative drops and exciting combat mechanics. Located in the Karuulm Slayer Dungeon, this level 426 boss requires a Slayer level of 95 and a Hydra task to challenge. Using a ranged setup is the most popular and effective method for taking down this multi-headed beast, thanks to its ability to deal consistent damage from a safe distance. In this comprehensive guide, we’ll explore how to optimize your ranged setup, master the Hydra’s phases, and maximize your kill efficiency.
Ranged is the go-to combat style for the Alchemical Hydra due to its versatility and safety. The boss’s mechanics, which include switching between ranged and magic attacks, make it easier to pray against its attacks while maintaining distance. Additionally, ranged weapons like the Twisted Bow or Toxic Blowpipe allow for high damage output, especially when paired with dragonbane weapons that exploit the Hydra’s draconic nature.
Benefits of Ranged Over Melee or Magic
- Safety: Ranged allows you to stay out of the Hydra’s melee range, reducing the risk of taking unnecessary damage.
- Accuracy: High-end ranged weapons benefit from the Hydra’s relatively low ranged defense.
- Consistency: Ranged setups require fewer switches compared to melee, making it easier to focus on mechanics.
Preparation and Requirements
Before heading to the Karuulm Slayer Dungeon, ensure you’re well-prepared. The Alchemical Hydra fight is instanced, meaning you can reclaim items from Orrvor quo Maten for 100,000 coins if you die, but proper gear and stats will minimize risks.
Stat Requirements
- Slayer: 95 (non-boostable)
- Ranged: 90+ recommended for accuracy and damage
- Prayer: 44+ for Protect from Magic and Missiles
- Defense: 70+ for better survivability
Getting to the Hydra
The Alchemical Hydra resides in the Karuulm Slayer Dungeon on Mount Karuulm. You can reach it by:
- Teleporting to Mount Karuulm using Rada’s Blessing 3 or higher.
- Using the Fairy Ring code C-I-R and running north.
- Navigating north past the Tasakaal, then east past regular Hydras to reach the lair entrance near Orrvor quo Maten.
Note: Without the Elite Kourend & Kebos Diary, you’ll need Boots of Stone, Brimstone, or Granite to avoid taking damage from the dungeon’s heated floor.
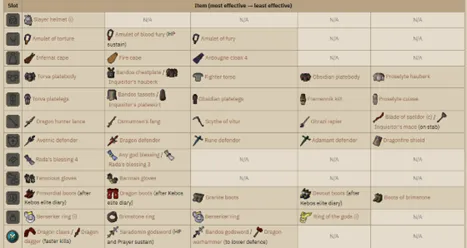
Best Ranged Gear Setup
Choosing the right gear is critical for maximizing damage and minimizing supply costs. Below is a recommended ranged setup for different budgets, along with a table comparing key items.
High-End Gear
- Weapon: Twisted Bow (ideal due to its scaling with the Hydra’s high magic level)
- Ammo: Dragon Arrows
- Helm: Slayer Helmet (i) (boosts damage and accuracy on task)
- Neck: Necklace of Anguish
- Body: Armadyl Chestplate
- Legs: Armadyl Chainskirt
- Cape: Ava’s Assembler
- Boots: Pegasian Boots
- Gloves: Barrows Gloves
- Ring: Archers Ring (i)
Mid-Tier Gear
- Weapon: Toxic Blowpipe with Adamant or Dragon Darts
- Helm: Slayer Helmet (i)
- Neck: Amulet of Fury
- Body: Blessed D’hide Body
- Legs: Blessed D’hide Chaps
- Cape: Ava’s Accumulator
- Boots: Boots of Brimstone
- Ring: Ring of Suffering (i)
Gear Comparison Table
| Slot | High-End | Mid-Tier | Budget |
|---|---|---|---|
| Weapon | Twisted Bow | Toxic Blowpipe | Dragon Crossbow |
| Helm | Slayer Helmet (i) | Slayer Helmet (i) | Black Mask (i) |
| Neck | Necklace of Anguish | Amulet of Fury | Amulet of Glory |
| Cape | Ava’s Assembler | Ava’s Accumulator | Ava’s Accumulator |
Inventory Setup
- 20 Prayer Potions: To sustain Protect prayers
- 5-8 Food: Sharks or Manta Rays for emergencies
- Antidote++: To counter poison attacks
- Ranging Potions: For a damage boost
- Teleport: For quick escapes (e.g., House Tab)
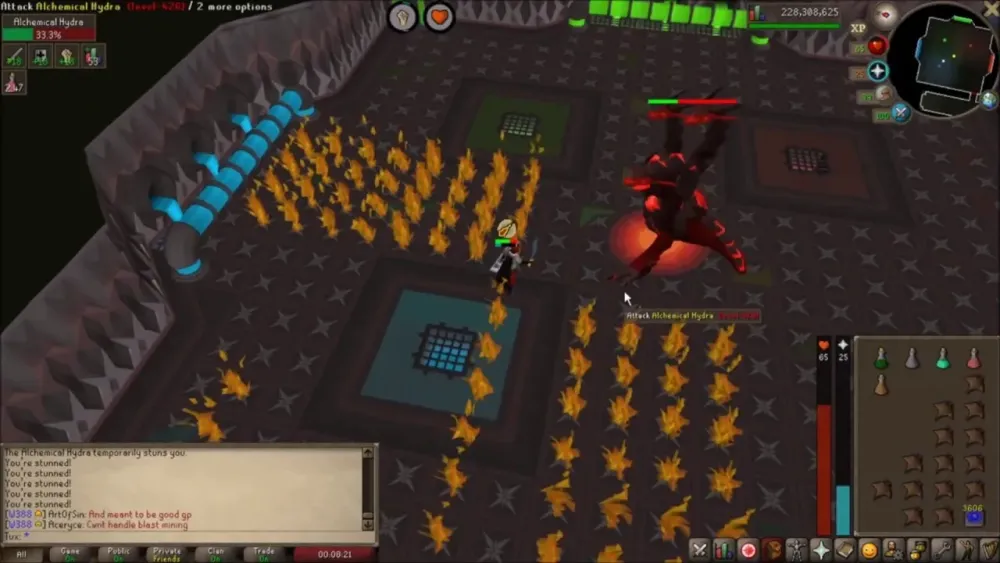
Mastering the Alchemical Hydra’s Phases
The Alchemical Hydra fight consists of four phases, each triggered at 75%, 50%, and 25% health (825, 550, and 275 Hitpoints). Each phase has unique mechanics, and luring the Hydra to the correct chemical pool is essential to remove its 75% damage reduction.
Phase 1: Green Carapace (Poison)
The Hydra starts with a green carapace and should be lured to the red chemical pool. It alternates between ranged and magic attacks every three hits.
- Special Attack: After three attacks, it launches 4-5 poison blobs, with a 3×3 splatter effect dealing up to 12 poison damage per tick.
- Strategy: Stand west of the red vat, move north two tiles when the Hydra is over the pool, and sidestep west to avoid poison blobs.
Phase 2: Blue Carapace (Lightning)
At 75% health, the Hydra turns blue and must be lured to the green chemical pool. It continues alternating attack styles.
- Special Attack: Four lightning currents spawn in the room’s corners, converging on your location. Getting hit binds you and deals up to 22 damage.
- Strategy: Start near the room’s center, loop around the last lightning spawn to escape the box they form, or hug the northern wall and move west while attacking.
Phase 3: Red Carapace (Fire)
At 50% health, the Hydra turns red and requires luring to the blue chemical pool.
- Special Attack: The Hydra breathes a 5×5 fire layer to your sides, followed by a tracking fire that deals up to 20 damage plus a 5-damage bleed.
- Strategy: Turn off run to walk around the fire walls. Position yourself to avoid the tracking fire by moving early.
Phase 4: Grey Carapace (Enraged)
At 25% health, the Hydra turns grey, loses its damage reduction, and no longer needs luring.
- Special Attack: It alternates between ranged and magic every attack, with increased speed (every four ticks) and up to 55 damage per hit.
- Strategy: Prayer flick between Protect from Magic and Missiles after each attack. Watch for occasional poison blobs after three attacks.
Tips for Maximizing Efficiency
With practice, you can achieve 25-28 kills per hour, making the Alchemical Hydra one of the most profitable Slayer tasks. Here are some tips to streamline your kills:
Prayer Management
Prioritize prayer bonus gear to reduce potion consumption. If you’re confident, prayer flicking can minimize damage, especially in Phase 4, where attacks are predictable.
Positioning and Movement
- Phase Transitions: Pre-position yourself near the next chemical pool before the Hydra phases to save time.
- Lightning Phase: Use the Twisted Bow’s range to attack while moving west along the northern wall to avoid lightning.
- Fire Phase: Walk, don’t run, to control your movement and avoid resetting the fire bleed.
Inventory Optimization
Experienced players can reduce food to 2-3 pieces if mechanics are handled correctly, freeing space for more potions or loot. Ruby Bolts (e) can be used until the red phase for high-damage procs, then switch to a Blowpipe for faster attacks.
Loot and Profit
The Alchemical Hydra’s drop table includes valuable items like the Hydra’s Claw, Leather, and Brimstone Ring components. On a Konar task, the average kill is worth approximately 161,275 coins, with potential for rare drops like the Ikkle Hydra pet.
By mastering the ranged setup and mechanics outlined in this guide, you’ll be well-equipped to tackle the Alchemical Hydra efficiently. Happy slaying!
