Your cart is empty

OSRS Giants Foundry Moulds Ultimate Guide for Smithing Success
The Giants’ Foundry in Old School RuneScape (OSRS) is a dynamic Smithing minigame that offers players a rewarding way to train their Smithing skill while crafting massive swords for Kovac. Central to mastering this minigame are the moulds, which determine the quality of your swords and, ultimately, your experience and rewards. In this comprehensive guide, we’ll dive deep into everything you need to know about Giants’ Foundry moulds, from how they work to the best strategies for unlocking and using them efficiently.
Moulds in Giants’ Foundry are critical tools that shape the swords you craft. Each mould corresponds to a specific part of the sword—forte, blade, or tip—and influences the sword’s quality based on how well it matches Kovac’s commission. A higher mould score leads to better rewards, including Smithing XP, gold, and Foundry Reputation.
How Moulds Impact Sword Quality
Sword quality is calculated by combining the metal score (based on the bars or items used) and the mould score (determined by the moulds selected). The mould score ranges from 10 to 199, with higher scores achievable by using optimal moulds that align with Kovac’s requests, such as “narrow and spiked” or “broad and flat.” Mismatching moulds or making mistakes during refinement can deduct points, lowering your rewards.
Default vs. Purchasable Moulds
Players start with a set of default moulds, but additional moulds can be purchased from Kovac’s Reward Shop using Foundry Reputation. Default moulds have an average score of around 38, while optimal purchased moulds can boost this to approximately 59, significantly increasing XP and rewards per sword.
Best Moulds to Unlock

Not all moulds are created equal. Some offer substantial improvements to your mould score, while others become obsolete as you level up. Below, we outline the top moulds to prioritize and when to skip certain ones.
Top Moulds for Maximum Efficiency
Based on community analysis and calculations, here are the moulds worth unlocking first to maximize your mould score and rewards:
- Choppa! (500 Reputation, Level 71 Smithing): Boosts heavy and flat commissions, offering a high mould score increase.
- Spiker! (500 Reputation, Level 71 Smithing): Ideal for spiked commissions, synergizing well with other top moulds.
- The Point! (500 Reputation, Level 71 Smithing): Enhances narrow and spiked commissions, versatile for many commissions.
- Needle Point (450 Reputation, Level 60 Smithing): A solid choice for narrow and flat commissions, useful at mid-levels.
- Fleur de Blade (400 Reputation, Level 60 Smithing): Improves broad and spiked commissions, but less impactful than the top three.
Moulds to Skip
Some moulds become obsolete at higher levels and should be avoided to save Reputation:
- Juggernaut Forte: Obsolete at level 79, as better options outperform it.
- Corrupted Point: Skippable at level 60, as the Serrated Tip offers better value.
| Mould Name | Reputation Cost | Smithing Level | Best For |
|---|---|---|---|
| Choppa! | 500 | 71 | Heavy, Flat |
| Spiker! | 500 | 71 | Spiked |
| The Point! | 500 | 71 | Narrow, Spiked |
| Needle Point | 450 | 60 | Narrow, Flat |
| Fleur de Blade | 400 | 60 | Broad, Spiked |
Optimal Mould Unlocking Strategy
Unlocking moulds in the right order can save you time and Reputation, especially if you’re aiming to complete the Giants’ Foundry collection log or maximize XP rates. Here’s a step-by-step approach.
Reputation and Levelling Considerations
Purchasing all moulds costs 5,400 Reputation, but you don’t need every mould to succeed. Focus on the top five moulds listed above, which require 2,150 Reputation. If you’re training Smithing exclusively at the Foundry, you’ll likely earn enough Reputation to unlock moulds as you level, aligning purchases with your Smithing level.
Prioritizing Moulds by Smithing Level
For players with 79+ Smithing, skip lower-tier moulds like Juggernaut Forte and focus on Choppa!, Spiker!, and The Point!. At 71–79 Smithing, prioritize Needle Point and Fleur de Blade for mid-level efficiency. Below 71, rely on default moulds until you can afford and use better options.
Tips for Using Moulds Effectively
Choosing the right moulds is only half the battle. Here are practical tips to ensure you’re getting the most out of your moulds during gameplay.
Matching Moulds to Commissions
Kovac’s commissions specify two sword traits (e.g., “broad and spiked”). To maximize your mould score, select moulds that have the highest combined value for these traits. For example, if the commission is “narrow and spiked,” choose The Point! for the tip (8 narrow, 8 spiked) and similar high-value moulds for the blade and forte.
Using Plugins for Precision
The “Easy Giants’ Foundry” RuneLite plugin highlights optimal moulds for each commission, saving you time and reducing errors. It also tracks crucible contents, temperature, and progress, making it easier to maintain sword quality.
Avoiding Common Mistakes
Here are some pitfalls to avoid when selecting moulds:
- Fast Clicking: Rapidly clicking mould tabs can cause the game to revert to default moulds, lowering your score. Take your time or disable plugins if this occurs.
- Ignoring Level Requirements: You can buy moulds without meeting the Smithing requirement, but you can’t use them until your level is high enough.
- Overbuying Moulds: Don’t waste Reputation on obsolete moulds unless you’re completing the collection log.
Maximizing Rewards with Moulds
High-quality moulds directly impact your XP, gold, and Reputation gains. Here’s how to leverage them for the best results.
Experience Rates
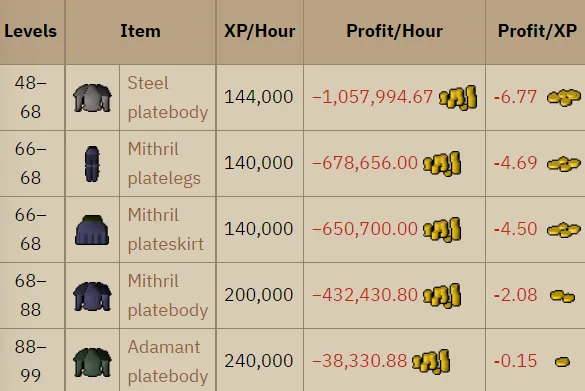
With optimal moulds, you can achieve up to 276,000 XP per hour at high levels, assuming perfect gameplay and high-tier metals like rune or adamant alloys. Even at mid-levels (50–70 Smithing), moulds like Needle Point can push XP rates to 100,000–150,000 per hour, making Giants’ Foundry one of the most engaging Smithing methods.
Profit Potential
Using affordable alloys, such as 14 steel and 14 mithril bars, can yield profits due to the gold reward (double the XP earned). Optimal moulds increase sword quality, boosting this reward. For example, a high-quality sword with a mould score of 59 can net thousands of gold per commission, especially with no mistakes.
Reward Shop Synergies
After unlocking key moulds, consider purchasing the Smiths’ Uniform (20,000 Reputation for all pieces) to further boost efficiency. The full set guarantees bonus progress per machine tick, increasing XP by about 15%. Combining this with top moulds creates a powerful setup for long-term training.
Giants’ Foundry moulds are the backbone of success in this Smithing minigame. By prioritizing high-value moulds like Choppa!, Spiker!, and The Point!, matching them carefully to Kovac’s commissions, and avoiding common pitfalls, you can maximize your Smithing XP, profits, and Reputation. Whether you’re a casual player or an ironman aiming for 99 Smithing, understanding and using moulds effectively will make your time in the Foundry both rewarding and enjoyable. Start forging those giant swords today, and watch your skills soar!
