Your cart is empty

Solo Olm with Shadow OSRS Ultimate Guide

Conquering the Great Olm solo in Old School RuneScape (OSRS) with the Shadow of Tumeken is a challenging yet rewarding feat. This guide dives deep into strategies, gear setups, and mechanics to help you master solo Olm with the Shadow, one of the most powerful magic weapons in the game. Whether you’re an experienced raider or a determined learner, this post will equip you with the knowledge to tackle the Chambers of Xeric final boss efficiently.
The Great Olm, the final boss of the Chambers of Xeric, is a multi-phase encounter requiring precise movement, prayer management, and damage output. When soloing with the Shadow, you leverage its high magic damage to speed up phases, but you must still navigate Olm’s complex attacks.
Olm’s Phases Explained
Olm has three phases in solo runs (more in larger teams), each introducing new mechanics. In phase one, Olm uses one of three powers—fire, acid, or crystal—indicated by its color. Phase two adds another power, and phase three (head phase) focuses on attacking Olm’s head while dodging intensified attacks.
Key Attacks to Watch
- Crystal Burst: Olm throws crystal seedlings under you, exploding for heavy damage if you don’t move.
- Teleport: Olm teleports you to a random tile, dealing damage based on distance from the target tile.
- Fire Wall: Traps you in flames, requiring a water spell to escape or heavy damage if ignored.
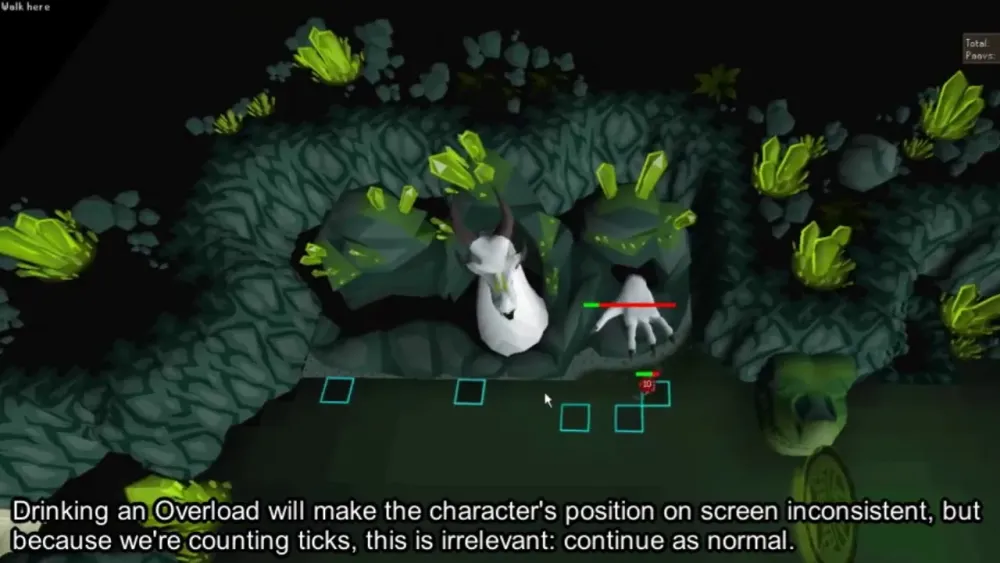
- Falling Crystals: During phase transitions, shadows mark where crystals fall, dealing 10-25 damage in a 3×3 area.
- Life Siphon: In the final phase, stand on blue projectile tiles to avoid damage and Olm healing.
Why Use the Shadow of Tumeken?
The Shadow of Tumeken, introduced with Tombs of Amascut, is a game-changer for solo Olm. Its high magic accuracy and damage output make it ideal for quickly disabling Olm’s hands and head, reducing raid times compared to traditional weapons like the Trident of the Seas.
Shadow’s Strengths
The Shadow boasts a +35 magic attack bonus and scales damage based on your Magic level, making it hit harder than most weapons. Its built-in spell eliminates the need for runes, simplifying inventory management.
Drawbacks to Consider
While powerful, the Shadow’s 5-tick attack speed is slower than the Trident’s 4-tick cycle, requiring precise timing to maximize DPS. It also drains run energy faster, so stamina potions are essential for solo runs.
Optimal Gear and Inventory Setup

Your gear and inventory are critical to balancing damage output, defense, and sustainability. The Shadow shines in high-magic setups, but you’ll need to complement it with the right equipment.
Recommended Gear
| Slot | Item | Alternative |
|---|---|---|
| Head | Ancestral Hat | Ahrim’s Hood |
| Cape | Imbued God Cape | Ardougne Cloak |
| Body | Ancestral Robe Top | Ahrim’s Robetop |
| Legs | Ancestral Robe Bottom | Ahrim’s Robeskirt |
| Weapon | Shadow of Tumeken | N/A |
| Shield | Arcane Spirit Shield | Mage’s Book |
| Gloves | Tormented Bracelet | Barrows Gloves |
| Boots | Eternal Boots | Infinity Boots |
| Ring | Ring of Suffering (i) | Seers Ring (i) |
Inventory Essentials
- 4-6 Saradomin Brews: For healing without draining stats excessively.
- 2-3 Super Restores: To counter Olm’s prayer-draining spheres.
- 2 Stamina Potions: The Shadow’s attacks drain run energy quickly.
- 1-2 Ranging Potions: For the head phase if using a bow (optional).
- Teleport Crystal: For emergency exits.
- Water Runes: To douse fire walls if not using Arceuus spellbook.
Mastering Solo Olm Strategies
Soloing Olm with the Shadow requires a mix of mechanical awareness and efficient cycling. The goal is to disable Olm’s hands quickly while minimizing damage taken.
Phase 1: Disabling the Hands
Start by attacking Olm’s right hand (mage hand), which is weak to magic. The Shadow’s high damage can disable it in 8-12 hits with max gear. Avoid hitting the head—it regenerates health and wastes time.
- Positioning: Stay on the opposite side of Olm’s head to avoid auto-attacks.
- Prayer: Use Protect from Magic for Olm’s green orbs, switching to Protect from Missiles for crystal chunks.
- Special Attacks: Watch for Crystal Burst (move one tile) and Teleport (run to the marked tile).
Phase 2: Managing Dual Powers
In phase two, Olm uses two powers, increasing attack variety. Continue focusing the mage hand, but be ready to dodge additional mechanics like Acid Spray (avoid pools) or Fire Wall (cast a water spell).
- Timing: Attack the mage hand until it clenches, then wait for it to unclench before resuming.
- Health Management: Sip a Saradomin Brew if below 60 HP, but avoid over-healing to preserve restores.
Phase 3: Head Phase
Once both hands are disabled, attack Olm’s head. This phase is hectic, with falling crystals and Life Siphon requiring constant movement.
- Crystal Dodging: Watch for shadows and move two tiles away to avoid 10-25 damage.
- Life Siphon: Stand on blue tiles to negate Olm’s healing and damage.
- DPS Focus: The Shadow’s raw power can end this phase quickly, but prioritize survival.
Tips for Success with Shadow
Using the Shadow effectively demands practice and adaptation. Here are advanced tips to optimize your solo Olm runs.
Mastering 4:1 or 8:1 Cycles
The Shadow’s 5-tick speed doesn’t align perfectly with Olm’s 4-tick attack cycle, unlike the Trident’s 3:0 method. Instead, aim for a 4:1 or 8:1 cycle:
- 4:1 Cycle: Attack four times, move to turn Olm’s head, repeat. This minimizes damage taken.
- 8:1 Cycle: Attack eight times, move, repeat. Better for DPS but riskier.
- Practice: Use a metronome or count ticks to sync your attacks.
Conserving Supplies
Solo runs can drain brews quickly if you take unnecessary hits. To conserve supplies:
- Prayer Flicking: Flick Protect prayers to match Olm’s attacks, saving prayer points.
- Blind Spots: Position in Olm’s blind spots (e.g., behind the thumb) to skip auto-attacks.
- Brew Efficiency: Heal only when below 50 HP to maximize brew doses.
Learning from Mistakes
Expect to die or fail early on—it’s part of the process. Watch your replays or record runs to spot errors, like mistiming a teleport or missing a crystal shadow. Communities like r/ironscape on Reddit offer valuable tips for refining your approach.
Soloing Olm with the Shadow of Tumeken is a test of skill and patience, but the rewards—unique loot like the Twisted Bow or Dragon Claws—are worth it. Practice these strategies, optimize your gear, and you’ll be clearing Chambers of Xeric with confidence. Happy raiding!
Word count: 614
