Your cart is empty

Obor Safe Spot OSRS Guide for Easy Kills
Old School RuneScape (OSRS) offers thrilling boss fights, and Obor, the Hill Giant boss, is a great starting point for free-to-play (F2P) and low-level players. Located in the Edgeville Dungeon, Obor is accessible with minimal requirements, making it an ideal boss for those looking to dip their toes into PvM (Player vs. Monster). One of the best ways to tackle Obor is by using a safe spot, which allows you to attack without taking damage. This guide covers everything you need to know about finding and using the Obor safe spot in OSRS, including preparation, gear, strategy, and tips to maximize your kills.
Obor, known as the Hill Titan, is a level 106 boss in OSRS, designed for F2P players but also accessible to members. He’s a massive Hill Giant with a big club, dealing significant melee damage if you’re not prepared. Fighting Obor is rewarding because he drops the Hill Giant Club, runes, and other loot that can boost your bank, especially for F2P accounts.
Requirements to Fight Obor
Before heading to Obor, you’ll need to meet a few requirements:
- Giant Key: Obtained by killing Hill Giants (1/128 drop rate). You need one key per Obor fight.
- Combat Level: Recommended 40+ for melee or 40+ Magic for safe spotting.
- Access: Edgeville Dungeon, reachable by F2P and members.
Why Use a Safe Spot?
A safe spot lets you attack Obor without him hitting back, making the fight much easier. This is especially useful for low-level players or those with limited gear. By standing in the right position, you can use ranged or magic attacks while staying out of Obor’s melee range.
Preparing for the Obor Fight
Preparation is key to successfully safe spotting Obor. You’ll need the right gear, inventory, and knowledge of the arena to make the fight smooth.
Recommended Gear
Your gear depends on whether you’re using Magic or Ranged, as these are the best methods for safe spotting. Here’s a breakdown:
| Method | Head | Body | Legs | Weapon | Other |
|---|---|---|---|---|---|
| Magic | Wizard Hat | Wizard Robe | Zamorak Robe | Staff of Air | Amulet of Magic |
| Ranged | Coif | Leather Body | Leather Chaps | Shortbow | Amulet of Accuracy |
Note: For F2P, stick to affordable gear like leather armor or wizard robes. Members can upgrade to Mystic robes or Studded armor for better bonuses.
Inventory Setup
Your inventory should support your attack method and sustain you during the fight:
- Magic: Air and Mind runes for Wind Strike or higher spells (Fire Bolt recommended for 40+ Magic).
- Ranged: Iron or Steel arrows (100–200, depending on your level).
- Food: 5–10 pieces of food (e.g., Lobsters or Tuna for F2P).
- Potions: Magic or Ranged potion (optional, for faster kills).
- Teleport: Varrock or Lumbridge teleport for quick escapes.
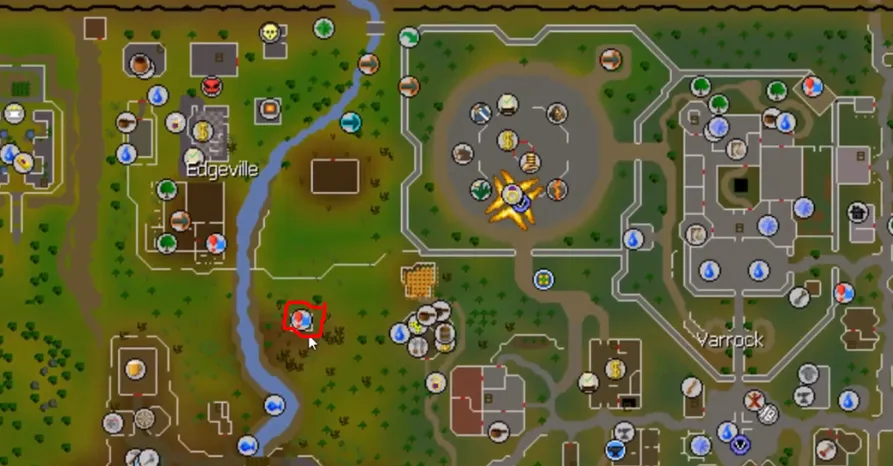
Finding the Obor Safe Spot
The safe spot is the cornerstone of an easy Obor kill. It’s located in Obor’s lair, which you access by using a Giant Key on the door in the Hill Giant area of Edgeville Dungeon.
Getting to Obor’s Lair
Follow these steps to reach Obor:
- Head to Edgeville Dungeon (north of Barbarian Village or via the Edgeville trapdoor).
- Go south to the Hill Giant area.
- Use your Giant Key on the locked door to enter Obor’s lair.
Be cautious of aggressive Hill Giants if you’re low-level. Bring some food for the journey.
Locating the Safe Spot
Obor’s lair has a small layout with a few key features: a central area where Obor spawns and some rocks and walls around it. The safe spot is near the entrance, where you can stand behind a rock to block Obor’s melee attacks.
How to find it:
- Enter the lair and immediately look for the rock formation to your left or right.
- Position yourself so the rock is between you and Obor.
- Ensure Obor is lured to the rock, then step back one or two tiles to keep him stuck.
Once you’re in the safe spot, Obor can’t hit you with melee, but watch out for his ranged boulder attack (more on that later).
Executing the Safe Spot Strategy
Using the safe spot effectively requires a bit of practice, but it’s straightforward once you get the hang of it. Here’s how to pull it off.
Starting the Fight
When you enter the lair, Obor will spawn and aggro you immediately. Follow these steps:
- Run to the safe spot rock.
- Lure Obor so he’s on the opposite side of the rock.
- Start attacking with your chosen method (Magic or Ranged).
Tip: If Obor gets too close before you reach the safe spot, run around the rock to reposition him.
Dealing with Obor’s Attacks
Obor has two main attacks to watch for:
- Melee: High-damage club swings. The safe spot completely negates this.
- Ranged Boulder: Obor occasionally throws a boulder that can hit up to 20. It’s slow and telegraphed, so step one tile to the side when you see him wind up.
Stay alert for the boulder animation, and you’ll avoid most damage. If you get hit, eat food to stay above 20 HP.
Maintaining the Safe Spot
Sometimes, Obor may move out of position, especially if you stop attacking briefly. To keep him in place:
- Attack consistently to hold his attention.
- If he starts walking away, move slightly to re-lure him to the rock.
- Avoid standing too far from the rock, as this can mess up the safe spot.
With practice, you’ll learn how to keep Obor pinned while dishing out damage.
Tips for Maximizing Obor Kills
To make your Obor fights faster and more profitable, consider these extra tips and tricks.
Boosting Your Damage
Higher damage means quicker kills, which saves time and resources. Try these:
- Magic: Use the highest spell you can cast (e.g., Fire Bolt at 35 Magic).
- Ranged: Upgrade to a Maple Shortbow and Steel Arrows if possible.
- Potions: A Magic or Ranged potion boosts your accuracy and damage slightly.
Farming Giant Keys
Since you need a Giant Key per fight, efficient key farming is crucial. Hill Giants in Edgeville Dungeon are your best bet:
- Location: Just outside Obor’s lair.
- Gear: Basic melee setup (e.g., Iron or Steel armor).
- Tip: Bring a brass key for quick access to the Hill Giant shack west of Varrock.
Expect 1 key every 128 kills on average, so stock up during slayer tasks or downtime.
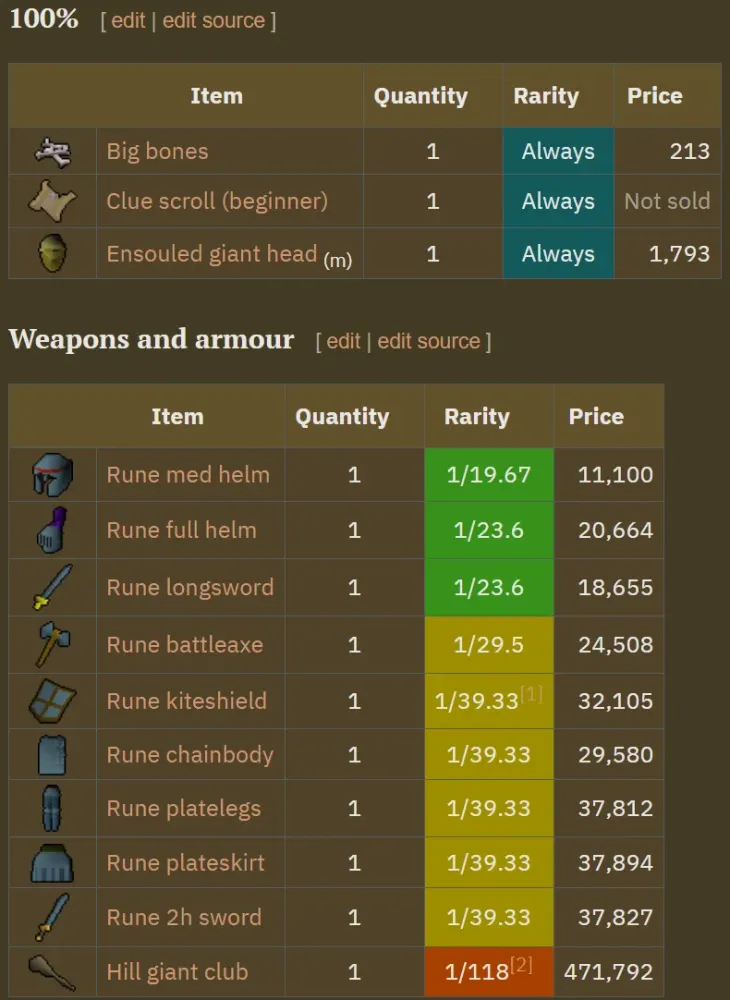
Loot and Profit
Obor’s loot table includes guaranteed big bones, runes, and a chance at the Hill Giant Club (1/118 drop rate). Notable drops:
| Item | Quantity | Rarity |
|---|---|---|
| Hill Giant Club | 1 | 1/118 |
| Chaos Runes | 60–120 | Common |
| Big Bones | 25 | Always |
Profit Tip: Sell the Hill Giant Club on the Grand Exchange for a nice chunk of gold, especially for F2P accounts.
Common Mistakes to Avoid
Even with a safe spot, things can go wrong. Watch out for these pitfalls:
- Not Watching Boulders: Always dodge the ranged attack to avoid unnecessary damage.
- Wrong Positioning: Double-check your safe spot to ensure Obor can’t melee you.
- Low Food: Bring enough food to cover mistakes, especially if you’re new.
By mastering the Obor safe spot, you’ll turn this boss into a reliable source of loot and XP. Whether you’re a F2P player building your bank or a low-level member practicing PvM, this strategy makes Obor a breeze. Grab your Giant Key, set up your gear, and head to Edgeville Dungeon for some stress-free kills!
