Your cart is empty

How to join a multiplayer session in RuneScape Dragonwilds
Introduction
RuneScape: Dragonwilds, launched in early access on April 15, 2025, has taken the gaming world by storm with its cooperative survival crafting gameplay set in the dragon-ravaged continent of Ashenfall. Powered by Unreal Engine 5, this standalone title in the RuneScape universe invites players to gather resources, craft powerful gear, and battle fearsome creatures, all while exploring a vibrant, lore-rich world. While solo play offers a challenging adventure, the game truly shines in multiplayer, where up to four players can team up to share tasks, conquer Vaults, and face the Dragon Queen’s minions together. Multiplayer sessions allow for dynamic collaboration, letting players specialize in skills like Artisan or Runecrafting while their friends tackle other roles, making progression faster and more fun. However, joining a multiplayer session can be confusing for newcomers, especially with the need to link accounts and navigate server settings. This blog post provides a detailed guide on how to join a multiplayer session in RuneScape: Dragonwilds, covering account setup, hosting and joining worlds, troubleshooting common issues, and tips for a seamless co-op experience. Whether you’re teaming up with friends or diving into a public server, this guide will help you survive Ashenfall with your allies by your side.
Getting Started: Setting Up for Multiplayer
Before you can join a multiplayer session in RuneScape: Dragonwilds, you need to prepare your accounts and understand the game’s multiplayer framework. The game uses Epic Online Services (EOS) to facilitate online co-op, requiring a linked Epic Games account even if you’re playing on Steam. Multiplayer sessions, or “worlds,” can be private (friends-only), public (open to anyone), or solo, with a maximum of four players per world. Your character’s progress, including skills, gear, and inventory, carries across all worlds, so you can seamlessly switch between solo and multiplayer without losing progress. Below, we outline the steps to join a multiplayer session, from account linking to entering a world, along with tips to enhance your co-op experience.
Step 1: Linking Your Epic Games and Steam Accounts
To access multiplayer features, you must link your Epic Games account to your Steam account. This is mandatory for online play, though solo mode doesn’t require it. Here’s how to do it:
| Step | Action | Details |
|---|---|---|
| Log into Epic Games | Access your Epic Games account. | Visit the Epic Games website or launcher and sign in. If you don’t have an account, create one (Jagex confirms you can use a “dummy” account that can be removed later). |
| Navigate to Connections | Go to the Apps and Accounts section. | In your Epic Games profile, find the “Connections” or “Apps and Accounts” tab under account settings. |
| Link Steam | Connect your Steam account. | Select Steam, sign in with your Steam credentials, and authorize the connection. Ensure you’re linking the Steam account where Dragonwilds is installed. |
| Accept EOS Terms | Boot Dragonwilds and accept Epic Online Services terms. | On first launch, the game prompts you to accept EOS terms. Click “Continue with Epic Games” to enable multiplayer functionality. |
Notes:
- If you encounter an “EOS required” error or grayed-out multiplayer options, double-check your account linkage in the game’s Settings > Legal > Update EOS Settings.
- Linking accounts also sets the stage for future crossplay functionality, as confirmed by Jagex’s Senior Community Manager, @JagexDoom.
Step 2: Joining a Friend’s World
To join a friend’s multiplayer session, they must first host a world set to “Play With Friends” or “Public.” The host will share the world’s name and, if applicable, a password. Here’s how to join:
| Step | Action | Details |
|---|---|---|
| Access the Play Menu | From the main menu, click “Play.” | Launch Dragonwilds and select the “Play” button on the main menu. |
| Select Friends Tab | Navigate to the “Friends” tab. | In the Worlds menu, click the “Friends” tab to view available friends’ worlds. Ensure you’re Steam friends with the host, as the game uses your Steam friends list. |
| Choose the World | Select the host’s world from the list. | Look for the world name provided by your friend. Worlds are listed with details like player count and host name. |
| Enter Password (if required) | Input the password if the world is private. | If the host set a password, enter it exactly as provided (case-sensitive, no spaces). Click “Enter World” to join. |
| Spawn in the World | Join the session. | You’ll spawn in the host’s world, marked by a blue arrow on the map to locate your friends. Use the chat feature (planned for improvements per the early access roadmap) to coordinate. |
Tips:
- Ensure the host remains online, as the session ends if they disconnect (dedicated servers are planned for a future update).
- If you can’t see the world, verify your Epic Games account linkage or ask the host to check their world settings (e.g., ensure it’s set to “Friends” and not “Solo”).
- Character progress carries over, so you’ll retain your skills (e.g., Artisan Level 15) and gear (e.g., Reinforced Armor) from other worlds.
Step 3: Joining a Public Server
If you don’t have friends playing or want to team up with random players, you can join a public server. Public worlds are accessible to anyone unless password-protected. Here’s how:
| Step | Action | Details |
|---|---|---|
| Access the Play Menu | Click “Play” from the main menu. | Start at the main menu and select “Play.” |
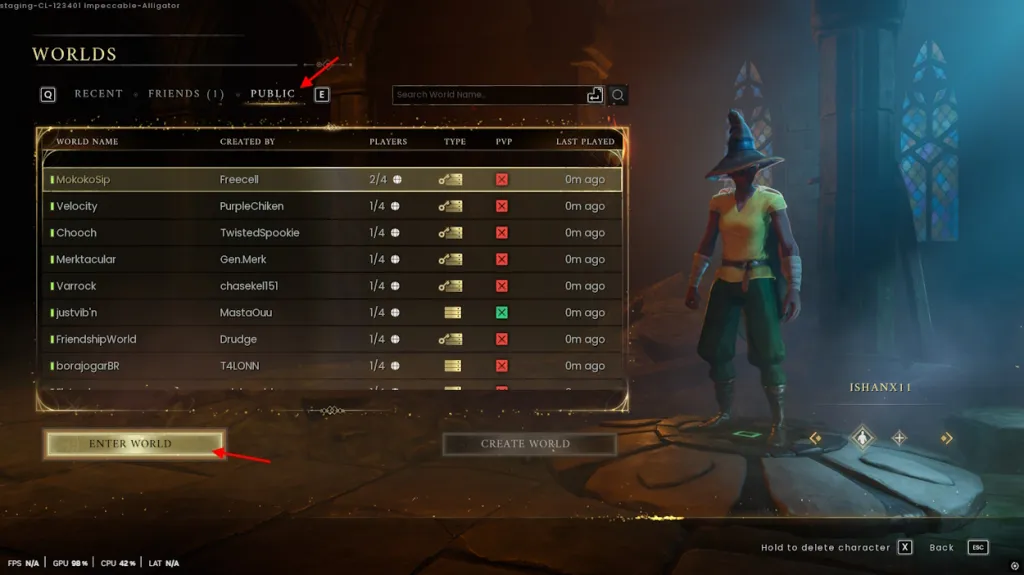
| Select Public Tab | Go to the “Public” tab. | In the Worlds menu, navigate to the “Public” tab to view available servers. |
| Filter Servers | Look for password-free servers. | Check the “Type” column for servers without a key icon, indicating no password is required. Sort by player count or ping for a stable experience. |
| Join a Server | Select a server and click “Enter World.” | Choose a server with open slots (max 4 players). If a password is required, you’ll need to obtain it from the host (e.g., via community Discord). |
| Start Playing | Spawn and collaborate. | You’ll join the server and can use chat to coordinate with other players. Be mindful of server etiquette, like not hoarding resources. |
Notes:
- Public servers are visible with details like name, player count, and host. Avoid servers with full slots (4/4) or high ping for better performance.
- If the host leaves, the session ends, so consider joining servers with active hosts or wait for dedicated servers in a future update.
- Public servers are great for meeting new players, but communication is key, use the in-game chat to align on tasks like resource gathering or Vault runs.
Step 4: Hosting Your Own Multiplayer World (Optional)
If you prefer to control the session, you can host a world and invite friends or open it to the public. Here’s a quick guide to hosting:
| Step | Action | Details |
|---|---|---|
| Access Create World | From the main menu, click “Play” and select “Create World.” | In the Worlds menu, choose “Create World” to set up a new session. |
| Choose Settings | Select “Play With Friends” or “Public.” | “Play With Friends” limits access to your Steam friends list; “Public” allows anyone to join. |
| Customize World | Name the world and set a password (optional). | Use up to 16 characters (no spaces or special symbols). Add a password for privacy. Toggle friendly fire for PvP (experimental and janky). |
| Create World | Click “Create World” to host. | You’ll become the host. Share the world name and password with friends via Steam or Discord. |
| Manage Players | Kick or ban players if needed. | Go to Settings > Socials to manage players (e.g., remove disruptive users). |
Tips:
- Avoid enabling friendly fire unless your group wants to experiment with PvP, as it’s not well-balanced in early access.
- Share the exact world name and password to avoid confusion, as names are case-sensitive.
- As host, stay online to keep the session active. Future dedicated servers will eliminate this requirement.
Troubleshooting Common Multiplayer Issues
Joining multiplayer sessions can sometimes hit snags, especially in early access. Here’s a table of common issues and solutions:
| Issue | Cause | Solution |
|---|---|---|
| “EOS required” Error | Epic Games account not linked or EOS terms not accepted. | Verify account linkage in Epic Games’ Apps and Accounts section. In-game, go to Settings > Legal > Update EOS Settings and click “Continue with Epic Games.” Restart the game. |
| Friends’ World Not Visible | Incorrect settings or not Steam friends. | Ensure the host’s world is set to “Play With Friends” via Edit Settings. Confirm you’re Steam friends with the host. |
| Disconnected When Host Leaves | Host-based sessions end if the host logs off. | Ask the host to stay online or wait for dedicated servers in a future update. Alternatively, host your own world. |
| Unable to Join Full Server | Server has 4/4 players. | Choose a server with open slots (e.g., 2/4 or 3/4) in the Public tab. Refresh the list for new servers. |
| Game Returns to Title Screen | Account linkage or server issue. | Re-link Epic and Steam accounts. Test joining other worlds to isolate the issue. Check Steam Discussions for similar reports. |
Pro Tip: If issues persist, visit the RuneScape: Dragonwilds Discord or r/RSDragonwilds subreddit for community solutions or report bugs to Jagex via the official website.
Tips for a Great Multiplayer Experience
To make the most of your multiplayer sessions, consider these strategies:
- Coordinate Roles: Divide tasks based on skills. For example, one player can focus on Artisan to craft Reinforced Armor, while another levels Runecrafting for Nature Runes. This speeds up progression, as Dragonwilds is grindier than other survival games.
- Use Chat Effectively: The in-game chat, set for improvements per the roadmap, is crucial for planning. Discuss priorities like building a Crafting Table or exploring Vaults.
- Share Resources: In co-op, resources like Ash Logs or Rune Essence can be pooled. Drop items for teammates or store them in a shared base.
- Prepare for Combat: Equip Bronze gear or a Crystal Bow before tackling tough enemies like Vault Guardians. Use spells like Tempest Shield to protect the team.
- Build a Team Base: Construct a centralized base with all crafting stations (e.g., Rune Altar, Smelting Furnace) under a roof. Use Lodestones for fast travel to resource-rich areas.
- Respect Server Etiquette: In public servers, avoid taking resources without contributing or griefing (e.g., destroying structures). Communicate intentions via chat.
Note: The maximum player count is currently four, but Jagex is exploring increasing it to eight or more based on community feedback, though stability is their priority in early access.
Frequently Asked Questions
Q: Do I need an Epic Games account to play multiplayer in RuneScape: Dragonwilds?
A: Yes, you need to link an Epic Games account to your Steam account for multiplayer, as the game uses Epic Online Services. However, Jagex confirms you can use a “dummy” account that can be removed later. Solo play doesn’t require this linkage.
Q: Why can’t I see my friend’s world in the Friends tab?
A: Ensure you’re Steam friends with the host and their world is set to “Play With Friends” (check via Edit Settings). Verify your Epic Games account is linked correctly. If the issue persists, ask the host to restart their session or check Steam Discussions for similar issues.
Q: What happens if the host leaves a multiplayer session?
A: If the host disconnects, the session ends, and all players are booted. This is because multiplayer is currently host-based. Dedicated servers are planned for a future update to address this. For now, ensure the host stays online or consider hosting yourself.
Q: Can I join a public server without a password?
A: Yes, look for servers in the Public tab with no key icon in the “Type” column, indicating they’re password-free. Be aware that servers with 4/4 players are full, so choose one with open slots.
Q: Does my progress carry over between multiplayer and solo worlds?
A: Yes, all progress (skills, gear, inventory) is tied to your character, not the world. You can switch between solo, friends, or public worlds without losing anything. To start fresh, create a new character from the main menu.
Q: Is friendly fire dangerous in multiplayer sessions?
A: Friendly fire (PvP) is an optional setting when hosting a world. It’s experimental and not well-balanced in early access, so avoid enabling it unless your group wants to test it. It can lead to accidental team damage, especially in chaotic fights.
Q: Can I kick disruptive players from my hosted world?
A: Yes, go to Settings > Socials in-game to kick or ban players from your world. This is useful for managing disruptive players in public or friends-only sessions.
Conclusion
Joining a multiplayer session in RuneScape: Dragonwilds opens the door to a cooperative adventure where you and up to three allies can conquer Ashenfall’s challenges together. By linking your Epic Games and Steam accounts, navigating the Friends or Public tabs, and troubleshooting issues like “EOS required” errors, you can seamlessly join friends or random players to craft, fight, and explore. The tables and tips in this guide provide a clear path to setting up and enjoying co-op, from hosting your own world to coordinating roles in a public server. As Dragonwilds evolves through early access, with dedicated servers and potential player count increases on the horizon, the multiplayer experience will only get richer. So, grab your Pickaxe, link your accounts, and dive into a multiplayer session, whether you’re building a fortified base or slaying dragons, Ashenfall is best explored with friends by your side.
