Your cart is empty

OSRS Black Demon Task Guide: Best Strategies, Locations, and Gear
Black Demons in Old School RuneScape (OSRS) are a classic Slayer task that many players encounter as they progress through mid-to-high-level Slayer training. Assigned by various Slayer Masters at combat level 80 and above, these jet-black demons offer decent experience rates and a chance at unique drops, though they’re not the most profitable task out there. Whether you’re a seasoned adventurer or a mid-level player tackling your first Black Demon task, this guide will walk you through everything you need to know—locations, strategies, gear setups, and more—to make the most of this assignment. Let’s dive into the dark dungeons of Gielinor and conquer these fearsome foes!
What Are Black Demons?
Black Demons are large, menacing demons scattered across various dungeons in OSRS. With a combat level of 172 (and variants up to 184), they boast high offensive stats, including a max hit of 16 with melee, but their defense is relatively low for their level. They’re weak to demonbane weapons like Arclight and water spells, making them manageable with the right setup. Assigned by Slayer Masters like Chaeldar, Nieve, Konar, Krystilia, and Duradel, this task requires no Slayer level but does demand a combat level of 80 to be assigned.
Why Tackle a Black Demon Task?
While Black Demons aren’t a goldmine, they offer solid Slayer XP (around 157 per kill, or more with alternatives like Demonic Gorillas) and can be an AFK-friendly task in certain spots. They also provide access to niche drops like Hard Clue Scrolls and, if you’re lucky, a rare Rune Chainbody. For players who’ve completed Monkey Madness II, this task opens the door to Demonic Gorillas, which drop valuable Zenyte Shards—a major incentive for profit-focused Slayers.
Best Locations for Black Demon Slayer Tasks

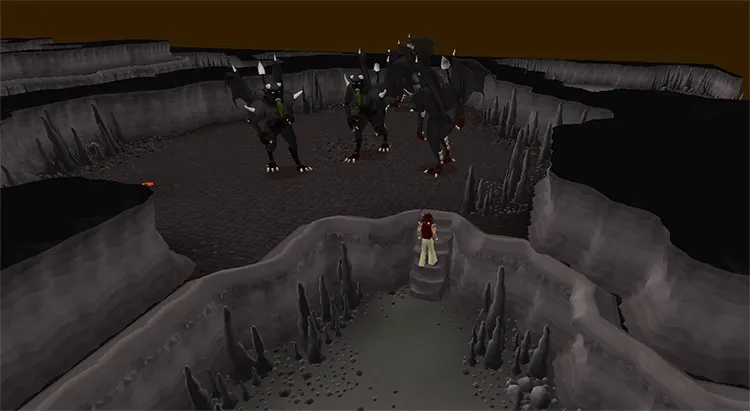
Taverley Dungeon
Taverley Dungeon is a top pick for cannon users due to its 24 Black Demon spawns. Located deep within the dungeon, you’ll need 70 Agility for the pipe shortcut (boostable with a Summer Pie) or a Dusty Key to access the area. This spot is single-combat, but the high spawn count makes it ideal for fast kills with a cannon and Protect from Melee prayer.
Catacombs of Kourend
For an AFK approach, the Catacombs of Kourend is unbeatable. With four spawns in a multicombat area, you can set up a cannon or simply pray Protect from Melee while wearing Proselyte armor. Bonus: you’ll passively collect Ancient Shards and Dark Totem pieces, which can lead to fighting Skotizo (another Black Demon variant) for extra XP and loot.
Chasm of Fire
The Chasm of Fire offers a middle ground—five spawns, safespots for Ranged or Magic, and cannon compatibility. Access it via the Shayzien House teleport or Fairy Ring (code DJR). It’s less crowded than Taverley and provides decent XP rates, especially if you combine cannoning with a safespot.
Brimhaven Dungeon
Brimhaven Dungeon has four Black Demons but is less popular due to its 875-coin entry fee (waived after Hard Karamja Tasks) and proximity to Wild Dogs and Iron Dragons, which can interfere with cannoning. It’s a viable option if you’re near Karamja, but travel time makes it less efficient.
Wilderness Slayer Cave
For the brave, the Wilderness Slayer Cave offers four spawns and boosted loot potential with Krystilia’s tasks (e.g., Larran’s Keys). However, it’s deep in the Wilderness (level 20+), so PKers are a constant threat. Bring minimal risk gear and be ready to teleport out if needed.
Strategies for Killing Black Demons
Melee Strategy: Cannon and Prayer
Melee is the go-to for fast XP. Here’s how to optimize it:
- Gear: Proselyte armor, Slayer Helmet (on task), and your best DPS weapon (Whip, Dragon Scimitar, or Arclight if available).
- Prayer: Protect from Melee is essential—Black Demons hit hard without it.
- Cannon: Set it up in Taverley or the Catacombs for maximum efficiency.
- Inventory: 8-10 Prayer Potions, a teleport (e.g., Games Necklace), and some food for emergencies.
This setup can net 40-50k Slayer XP per hour with a cannon, making it a favorite for XP grinders.
Ranged Strategy: Safespotting
For lower-level players or those avoiding melee, Ranged is a safe bet. Use safespots in the Chasm of Fire or Taverley Dungeon:
- Gear: Black D’hide, Rune Crossbow with Broad Bolts, and an Ava’s Device.
- Method: Lure a demon to a safespot, then attack from a distance.
- Inventory: Ranging Potions, food, and a teleport.
It’s slower than melee but safer for those under 100 combat.
Magic Strategy: Water Spells
Black Demons are weak to water spells, so Magic can work if you’re training it:
- Gear: Mystic robes, Trident of the Seas, or Slayer Staff with Water Blast.
- Method: Safespot or tank with Protect from Melee.
- Inventory: Runes, food, and Prayer Potions if tanking.
This is niche but viable for AFK Magic XP alongside Slayer.
Alternative Monsters: Demonic Gorillas and Skotizo
If you’ve got Monkey Madness II done, Demonic Gorillas in the Crash Site Cavern are a lucrative substitute. They drop Zenyte Shards (1/300, worth ~9M GP) and offer 400+ Slayer XP per kill. Skotizo, accessible with a Dark Totem in the Catacombs, gives 618 XP and decent loot but requires preparation. Both count toward your Black Demon task.
Gear and Inventory Setup
Recommended Gear Loadouts
Here’s a breakdown of gear for different combat styles:
| Style | Head | Body | Legs | Weapon | Ammo/Shield |
|---|---|---|---|---|---|
| Melee | Slayer Helmet | Proselyte Hauberk | Proselyte Cuisse | Abyssal Whip | Defender |
| Ranged | Black D’hide Coif | Black D’hide Body | Black D’hide Chaps | Rune Crossbow | Broad Bolts |
| Magic | Mystic Hat | Mystic Robe Top | Mystic Robe Bottom | Trident of the Seas | N/A |
Extras: Amulet of Glory, Ring of Wealth (for Wilderness), and Boots of your choice (e.g., Climbing Boots).
Inventory Essentials
- Prayer Potions (8-10): For sustained Protect from Melee.
- Food (5-10): Sharks or better for emergencies.
- Teleport: Games Necklace or Kourend Teleport.
- Cannon Supplies: Cannon Base, Stand, Barrels, Balls (if cannoning).
- Optional: Ranging/Magic Potions, Alchs for drops.
Tips and Tricks for Black Demon Tasks
Maximizing Efficiency
- Cannon Placement: In Taverley, place it near the center of the spawn area; in the Catacombs, stand under it for AFK kills.
- Task Extension: Unlock “It’s Dark in Here” for 100 Slayer points to extend tasks to 200-250 kills.
- Konar Boost: If assigned by Konar, you might get Brimstone Keys for extra loot.
Managing Risks in the Wilderness
In the Wilderness Slayer Cave, limit your risk to 3-4 valuable items (e.g., Slayer Helmet, Whip, Proselyte Top). Use RuneLite’s player indicators to spot PKers and keep a teleport handy. The extra loot from Krystilia’s table can make it worth the gamble.
Should You Skip or Block?
Black Demons are a high-weight task (frequently assigned), and without a cannon or access to Demonic Gorillas, they can feel slow and unrewarding. If you’re under 100 combat or lack funds for supplies, consider blocking them. Otherwise, they’re worth doing for XP, especially with the right setup.
With this guide, you’re ready to tackle your OSRS Black Demon task like a pro. Whether you’re cannoning in Taverley, AFKing in the Catacombs, or chasing Zenyte Shards with Demonic Gorillas, there’s a strategy here for every playstyle. Good luck, and happy Slaying!
