Your cart is empty

How to Fight Zulrah in OSRS: A Comprehensive Guide for Beginners and Pros
Zulrah, the infamous solo-only snake boss in Old School RuneScape (OSRS), is a rite of passage for many players. Located in the swampy shrine east of Zul-Andra, this level 725 serpent offers lucrative rewards but demands skill, preparation, and strategy. Whether you’re a beginner tackling your first kill or a seasoned player aiming to optimize your runs, this guide will walk you through everything you need to know about how to fight Zulrah in OSRS. From gear setups to rotation mastery, we’ve got you covered with actionable tips to conquer this beast and rake in the gold.
Before diving into the fight, it’s crucial to grasp what makes Zulrah unique. This boss isn’t your typical hack-and-slash encounter—it’s a dynamic battle requiring adaptability. Zulrah cycles through three distinct forms, each with its own attack style and weaknesses, making it a test of both combat prowess and pattern recognition.
Zulrah’s Three Forms
- Serpentine (Green): Attacks with Ranged. Weak to Magic. Use Protect from Missiles.
- Tanzanite (Blue): Primarily uses Magic, occasionally Ranged. Weak to Ranged. Use Protect from Magic.
- Magma (Red): Uses Melee, which can be avoided by staying out of range. Weak to Magic. No prayer needed if positioned correctly.
Why Fight Zulrah?
Zulrah is a goldmine, averaging around 150k-200k GP per kill, with potential for rare drops like the Tanzanite Fang or Serpentine Visage, which can fetch millions. It’s also a requirement for the Western Provinces Hard Diary, making it a must-do for achievement hunters. With practice, you can achieve 20-30 kills per hour, translating to 3M-5M GP/hour—some of the best solo money-making in OSRS.
Preparation: Gear, Stats, and Inventory
Success against Zulrah hinges on preparation. You’ll need decent combat stats, the right gear, and a well-stocked inventory. Here’s how to set yourself up for victory.
Recommended Stats
- Ranged: 80+ (90+ for efficiency)
- Magic: 80+ (90+ for faster kills)
- Defence: 70+ (to tank hits)
- Prayer: 45+ (for protection prayers)
- Hitpoints: 80+ (to survive combos)
- Agility: 76 (optional, for Zul-Andra shortcut)
Gear Setups
Zulrah requires switching between Magic and Ranged to exploit its weaknesses. Below are budget and high-end setups:
| Slot | Budget (Magic) | Budget (Ranged) | High-End (Magic) | High-End (Ranged) |
|---|---|---|---|---|
| Weapon | Trident of the Seas | Toxic Blowpipe | Trident of the Swamp | Twisted Bow |
| Head | Mystic Hat | Black D’hide Coif | Ahrim’s Hood | Armadyl Helmet |
| Body | Mystic Robe Top | Black D’hide Body | Ahrim’s Robetop | Armadyl Chestplate |
| Legs | Mystic Robe Bottom | Black D’hide Chaps | Ahrim’s Robeskirt | Armadyl Chainskirt |
| Cape | God Cape | Ava’s Accumulator | Imbued God Cape | Ava’s Assembler |
| Necklace | Occult Necklace | Necklace of Anguish | Occult Necklace | Necklace of Anguish |
| Ring | Ring of Recoil | Ring of Recoil | Ring of Suffering (i) | Ring of Suffering (i) |
Notes: The Ring of Recoil or Suffering is essential for dealing with snakelings (1 HP enemies that hit hard). Void Knight equipment is a great mid-tier hybrid option if you have it.
Inventory Setup
- Anti-venom+ (1-2): Cures venom, which ramps up to 20 damage per tick.
- Prayer Potions (2-4): Sustain protection prayers.
- Ranging/Magic Potions (1 each): Boost damage output.
- Food (Sharks/Karambwans): 15-20 pieces, with Karambwans for combo eating.
- Rune Pouch: Vengeance runes (optional but highly recommended).
- Zul-andra Teleport Scroll: Quick access (optional).
- House Teleport: For rejuvenation pool (if applicable).
Getting to Zulrah
Zulrah’s shrine is east of Zul-Andra, and getting there efficiently is key to maximizing kills per hour.
Travel Options
- Zul-andra Teleport Scroll: Fastest method, drops you near the dock.
- Fairy Ring (BJS): Requires 76 Agility for the stepping stone shortcut.
- Charter Ship to Port Tyras: Costs 3,200 GP (less with Ring of Charos), then run south.
- Player-Owned House (POH): Fairy ring + rejuvenation pool for quick resets.
Pro Tip: Start with the fairy ring until you’re confident in your kills, then switch to Zul-andra scrolls to save time.
Mastering Zulrah’s Rotations
The heart of the Zulrah fight lies in its rotations—four predictable patterns that dictate its forms, attacks, and special mechanics. Learning these is the difference between dying repeatedly and farming efficiently.
The Four Rotations
- Rotation 1 (Alpha): Green → Red → Blue → Green (Jad phase).
- Rotation 2 (Bravo): Green → Blue → Red → Green (Jad phase).
- Rotation 3 (Charlie): Green → Red → Blue → Red → Green (Jad phase).
- Rotation 4 (Delta): Green → Blue → Red → Blue → Green (Jad phase).
Key Mechanics to Watch
- Venom Clouds: Spawn in all forms. Avoid standing in their 3×3 radius to prevent rapid damage.
- Snakelings: Summoned by white orbs. Tank them with a Ring of Recoil/Suffering; they die after one hit.
- Jad Phase: Late in each rotation, Zulrah alternates Ranged and Magic attacks. Flick prayers based on its head animation (up for Ranged, down for Magic).
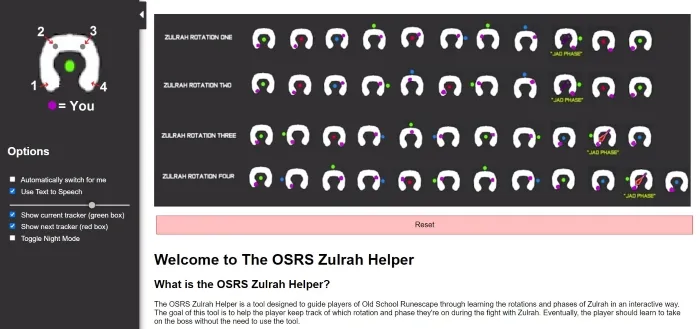
How to Learn Rotations
Use the Zulrah Helper plugin on RuneLite. It overlays the next phase, prayer, and safe spots on your screen. Practice with this until you memorize the patterns—most players get comfortable after 10-20 kills.
Fighting Zulrah: Step-by-Step Strategy
Now that you’re geared up and understand the rotations, here’s how to execute the fight.
Starting the Fight
- Teleport to Zul-Andra and board the sacrificial boat.
- Enter with Magic gear on, as Zulrah always starts in Green form.
- Drink potions, activate Protect from Missiles, and attack with your Magic weapon.
Phase-by-Phase Breakdown
- Green Phase: Pray Missiles, use Magic. Move to avoid venom clouds.
- Red Phase: No prayer needed. Stand near pillars to avoid Melee hits, use Magic.
- Blue Phase: Pray Magic, switch to Ranged gear. Watch for occasional Ranged attacks and eat if needed.
- Jad Phase: Flick prayers (Ranged → Magic → Ranged → Magic). Stay calm and watch Zulrah’s head.
Tips for Success
- Positioning: Use pillars as safe spots during Red phases and to block snakelings.
- Eating: Combo eat with Karambwans during downtime (when Zulrah dives) to save ticks.
- Vengeance: Cast it during Blue phases for extra damage.
- Health Management: Keep HP above 50 to avoid getting combo’d out by snakelings or Jad phase.
After the Kill
Once Zulrah dies, loot appears under you, along with a Zul-andra teleport scroll. Use it to return, bank, and repeat. If you die, reclaim items from Priestess Zul-Gwenwynig (free under 50 kills, 100k GP after).
Optimizing Your Zulrah Runs
Once you’ve got the basics down, it’s time to push for efficiency and profit.
Increasing Kills per Hour
- Upgrade Gear: Twisted Bow or Sanguinesti Staff speeds up kills dramatically.
- POH Setup: Build an Ornate Rejuvenation Pool and Fairy Ring for quick resets.
- Practice Rotations: Aim for 2-3 minute kills by minimizing downtime.
Maximizing Profit
Focus on consistent kills rather than rare drops. Zulrah scales (100-300 per kill) and common loot add up fast. Bank uniques like the Magic Fang or Uncut Onyx for a big payday.
With this guide, you’re ready to take on Zulrah in OSRS. Start slow, master the rotations, and soon you’ll be swimming in GP. Happy hunting!
